Whether you’re brand new to embroidery, or have been stitching for years, one of the most important skills to master is how to start and end embroidery stitches. Securing the threads at the start lays the foundation for the hard work ahead. While securing the threads at the end ensure that all your hard work doesn’t come unraveled. There are several methods for starting and ending embroidery stitches. In this tutorial, we cover them all.
To Knot or Not to Knot?
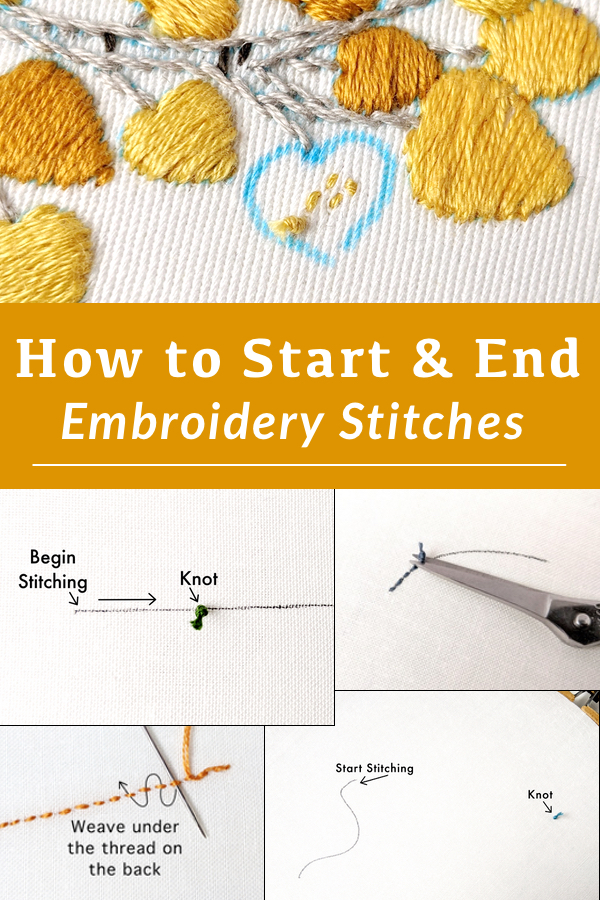
How to Start & End Embroidery Stitches
Let’s begin with the basics. The simplest way to start and end embroidery stitches is with a knot placed on the back of the work. However, while knots are quick and easy, they are not the best at securing stitches. Even the most seemingly tight knot can come undone over time, especially if the embroidery is on a project that will be washed or handled frequently such as clothing or linens.
Knots also add bulk to the back of your work and can show through on the front of thin or light-colored fabrics. Finally, knots make the back of the embroidery look bumpy and messy. This is not a big deal if you plan to frame and hang your work but very unsightly when embroidering clothing, napkins, or towels.
So while there are no embroidery police who will come and confiscate your finished work, by using knots you are risking all that hard work simply coming undone.
3 No Knot Methods for Starting Embroidery Stitches
If we’re not going to use a knot to secure the stitches, then what? How about a knot to secure the thread, followed by a little stitching or weaving, followed by snipping that knot away leaving the fabric knot-free and the thread secure for years to come! Below are three no knot methods that are secure and simple to learn.
Option 1: Away Waste Knot
This method creates a secure foundation for embroidery and is useful for all stitches. Not only is it very simple to execute, but it also works when stitching around tight corners and using thin lines of thread (two instances when the other methods fall short). On the flip side, this method requires quite a bit of extra thread. This could be an issue if you’re using fancy, expensive floss. Also, it requires some work on the back of the stitching which can be time-consuming. With all that in mind, let’s get started!
Step 1: Make & Place the Away Waste Knot
Make a knot at the end of the thread and take the needle down into the fabric while leaving the knot on top. Place the knot 3-5-inches from where you plan to start stitching. Don’t put it in line with your stitching or in a place where the stitching will cross over the thread on the back.
Step 2: Stitch
After placing the knot, bring the thread back up to the front and begin stitching.
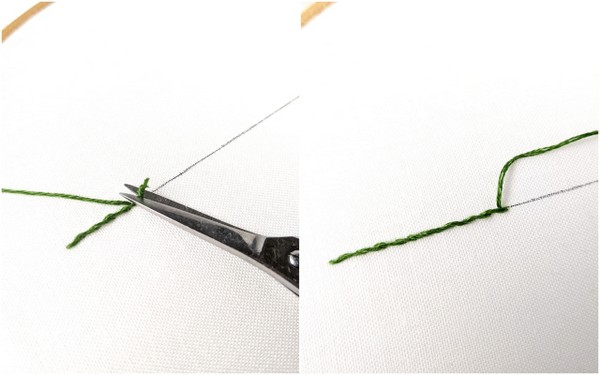
Step 3: Remove the Knot
When you reach the end of your stitching, or after you’ve stitched at least a few inches to be sure it is secure, pull the knot up gently and snip it off from the front, close to the fabric.
Step 4: Weave the Tail
Finish this method by flipping your work over and weaving the tail from the knot into the stitches. This is why you want to be careful not to stitch over the thread on the back.
Option 2: Waste Knot for Line Stitches
This method is best used when stitching a straight or gently curved line. Unlike the away waste knot it doesn’t use as much extra thread and after you get the hang of it, there is no need to turn the fabric over, making it fairly quick and easy. I use this as my preferred method when stitching on a line.
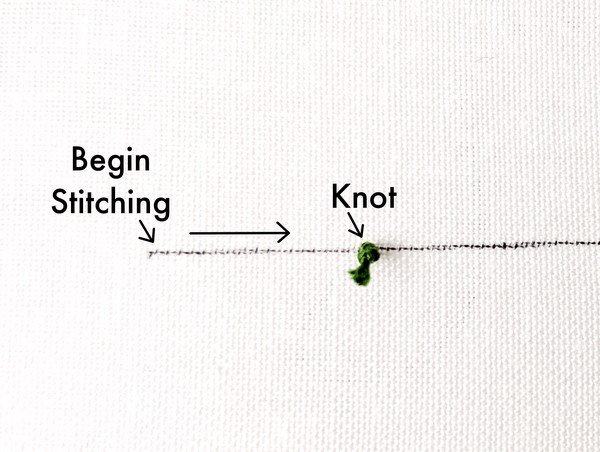
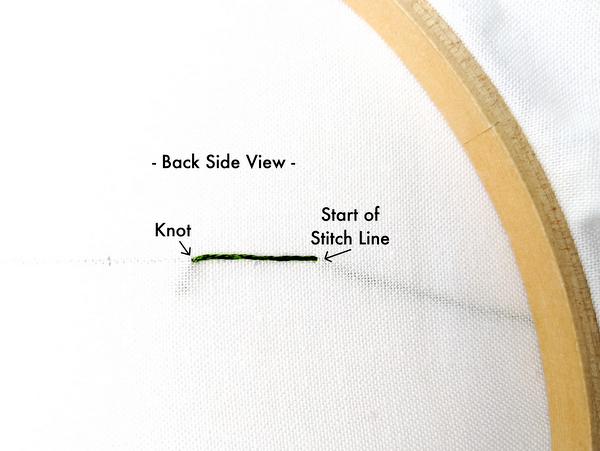
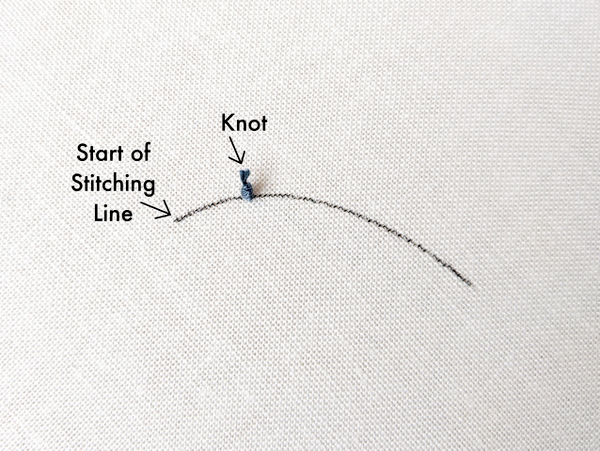
Step 1: Make & Place the Waste Knot
Make a knot at the end of the thread and take the needle down into the fabric leaving the knot on top. Instead of placing the knot away from the stitching, place it in line with the stitching, roughly 1-inch from where the stitching will begin. You will be stitching toward the knot so be sure to place it on the correct side.
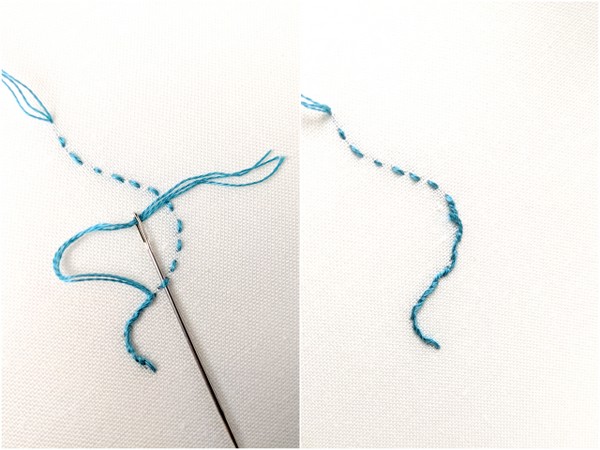
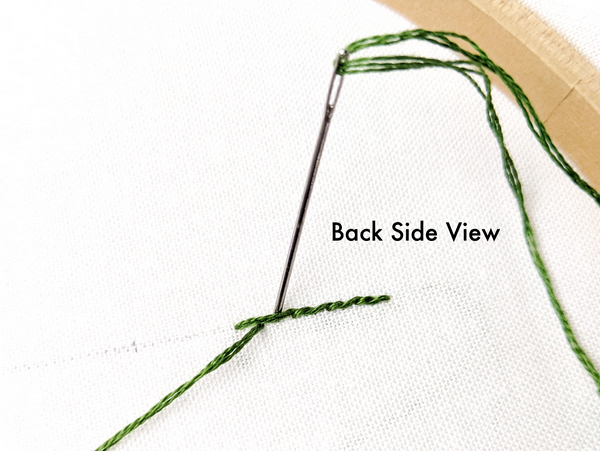
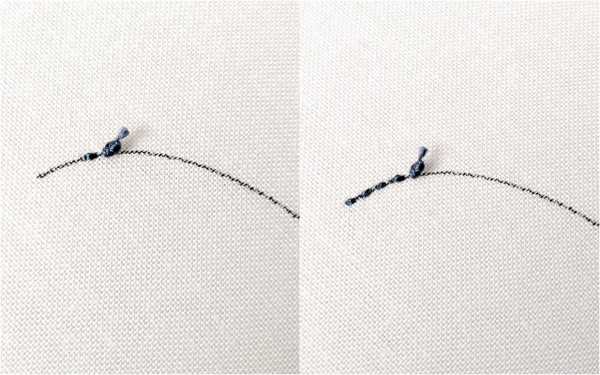
Step 2: Stitch Toward the Knot & Weave Through the Back thread
Bring the thread back up at the start of the stitching line. In the process, you will create a line of thread on the back from the knot to the start.
Start stitching toward the knot. As you stitch, use your fingers to manipulate the back thread so the stitches are placed alternately on either side. This will secure the thread in place. The first few times, you may need to flip your work over to make sure the thread is in the correct place, but after you get the hang of it, this method is really simple to do without looking at the back.
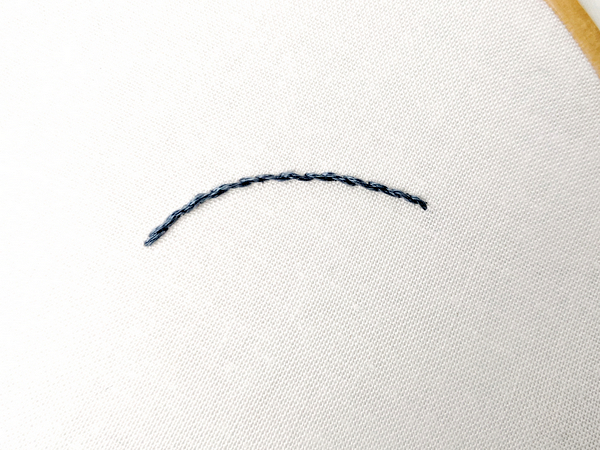
Step 3: Remove the Knot & Stitch Over
When you have secured the line of thread on the back with stitching, gently pull the knot up and snip it off from the front. Continue stitching over the spot where the knot once was.
Option 3: Waste Knot with Anchor Stitches
While it might seem time-consuming to secure a line of stitches with more stitches, I actually find this to be the quickest of all three methods. Not only does it eliminate the need to turn your work over, but it works well with all types of stitches, making this my most frequently used method for starting embroidery stitches.
The biggest challenge to making a waste knot with anchor stitches is that you need to cover the anchor stitches with more stitching. This can be a challenge when using a particularly fine thread or stitch. However, with some practice, you can learn to make the anchor stitches very tiny, allowing them to be easily covered.
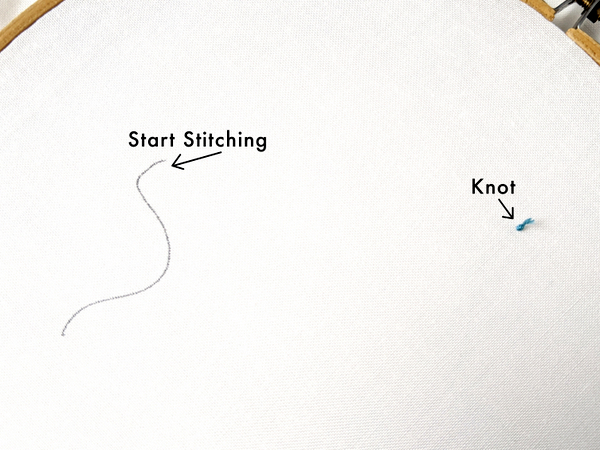
Step 1: Make & Place the Waste Knot
Make a knot at the end of the thread and take the needle down into the fabric leaving the knot on top less than 1″ from where you plan to start stitching. The knot can be placed on the line of stitching, or a few inches away in an empty area of the fabric. For this example, the knot is placed on the line of stitching about a 1/2-inch from where the stitching will begin.
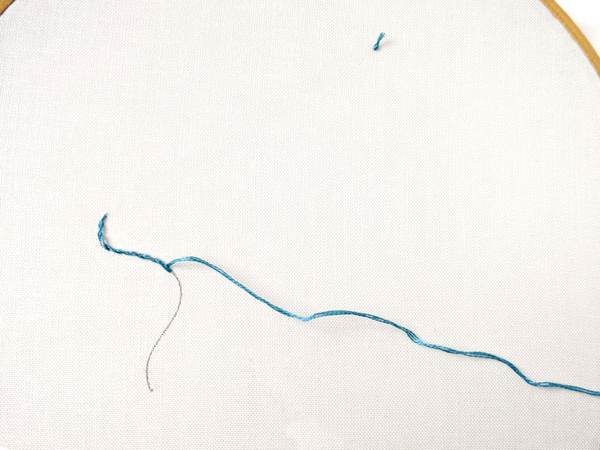
Step 2: Make Anchor Stitches
Take the needle back up through the fabric and make a very small stitch one or two threads away from the knot. Move over a few threads and repeat this step until you have created a row of tiny stitches. I prefer to use three or four stitches, but if you are working on a piece that will be washed frequently or handled a lot, go ahead and add a few more to make sure the thread is as secure as it can be.
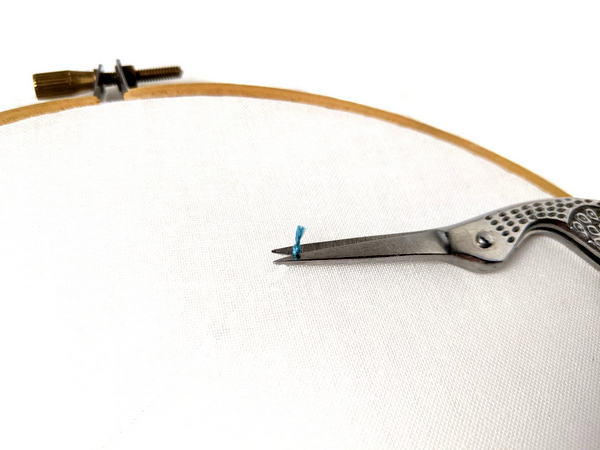
Step 2: Remove the Knot
After completing the row of anchor stitches, pull gently on the knot and snip it off.

Step 3: Cover the Anchor Stitches
Once you have created the anchor stitches and removed the knot, move your needle and thread over to the start of the line and stitch over the anchor stitches. Like magic, they have disappeared!
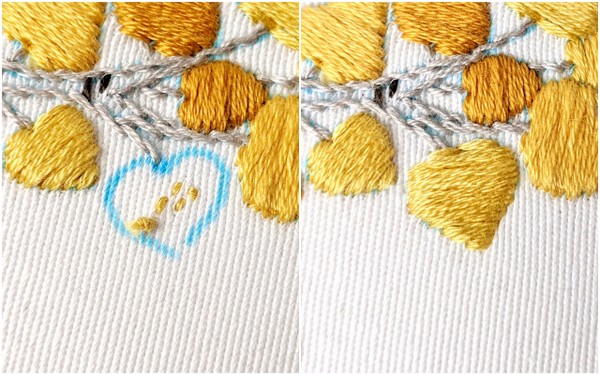
Anchor stitches can also be used when stitching non-linear shapes that will later be filled in or covered with thread. In the below example, I added a few anchor stitches to the center of a leaf that will be filled with satin stitch. After making the anchor stitches, I snipped off the knot and then stitched the whole thing with satin stitch, covering the anchor stitches in the process.
Ending Your Thread Without A Knot
Now that we’ve learned three methods for starting embroidery stitches, let’s talk about how to end them. Once again, we’re going to skip the basic knot in favor of a more secure method.
Weave The Thread
This one is very simple. When you finish a section of stitching or reach the end of a piece of thread, flip your work over and weave the thread back through the last bit of stitching. Weave through at least 4-5 stitches before snipping off the end of the thread.

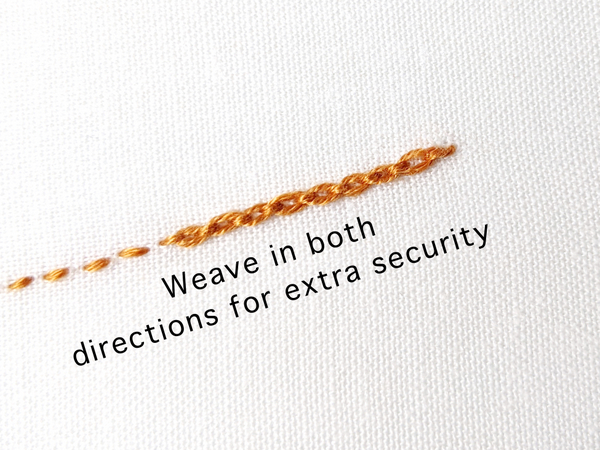
For extra security, you may want to weave in one direction for a few stitches and then back in the other direction for a few. This creates a double weave on the back. I only bother with this step when embroidering items that will be washed or handled often.
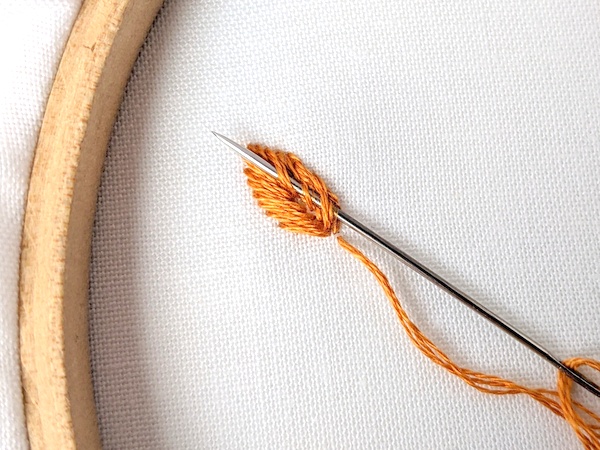
The weaving method also works for non-linear stitches. The example below shows a shape filled with satin stitch. I then flipped it over and wove the thread under to secure the end.
The hardest part of the weaving method is remembering to end your stitching with enough thread left to weave on the back. As someone who is always trying to stitch just a little farther before reaching the end of my thread, I constantly struggle with this. 🙂
Pat
Thank you for the info. I do not like knots on the back of my embroidery.
Vicki
This is so helpful, and very clearly explained. Thank you!
Jody
This is good information for someone like me, just starting out with this hobby. Thank you for posting this!!
Susan
Hi,
I’m one of those “just a little farther” people.
Amanda
I hear you! I am always trying to make “just one more stitch” before finishing the thread 🙂
Mary Anne Buhr
Thank you so much for this information, slowly starting to teach myself embroidery, and wondering what to do with the “mess” on the back. I’ve tried some books and web sites, found nothing like these clear, precise instructions. Using anchor stitches is easy, and in my case, completely invisible. Thanks again, very useful.
Cheryl Cartwright
Thank you so much for this wonderfully informative article! I am a newbie and have been struggling to deal neatly with starting and ending stitches.