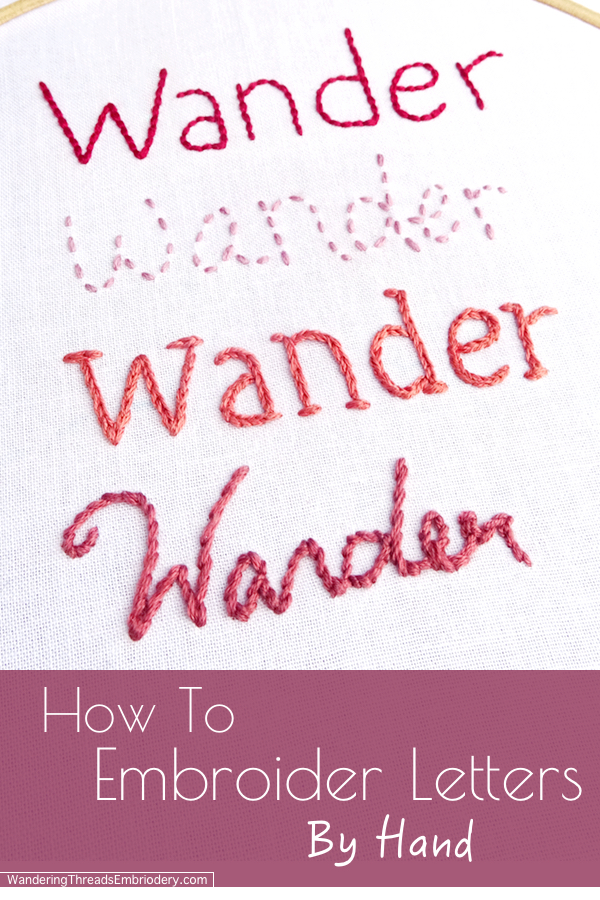
If you want to add a personal touch to your projects, learning how to embroider letters is a great skill to have. There are countless possibilities for adding lettering to all your sewing and craft projects. Maybe you want to make a personal label for a quilt, add your favorite quote to an embroidery piece, monogram cloth napkins, or even stitch a funny little saying on a piece of clothing. Well, guess what? Once you learn the basics, embroidering letters is really easy!
Font Choice
How do you decide what type of font to use when embroidering letters? For the most part, it’s a matter of personal choice, but there are a few factors to keep in mind when choosing a font.
- Size: If you are embroidering a small size text, it’s best to keep the font simple. The smaller the letters, the more difficult it will be to embroider around tight curves and angles.
- Legibility: Sometimes a font that looks great on paper doesn’t look so great when worked with needle and thread. A few practice letters is always a good idea before committing to one font.
- Appearance: Think about the overall appearance of the item you are adding lettering to and choose a complementary font. For example, if you’re making a personalized label for a wedding quilt you might choose a romantic cursive font, while a more casual, handwritten font would be perfect for adding a fun quote to your favorite dish towel.
How to Embroider Letters Using 4 Easy Stitches
When it comes to embroidering letters, the choice of stitches is nearly endless. From basic stitches like back or running to more complicated stitches like double chain and french knot (yes, you really can embroider letter with french knots), the possibilities are nearly limitless. Despite all those choices, I find myself coming back to the same four basic stitches again and again when embroidering letters. These four stitches – back, running, split, & stem – not only look great with any font, but they are also easy to learn and simple to execute.
{These are the same four stitches featured in the Basic Embroidery Stitches Tutorial. If you are not familiar with these stitches, I recommend checking out that post.}
Let’s get started!
Back Stitch Lettering
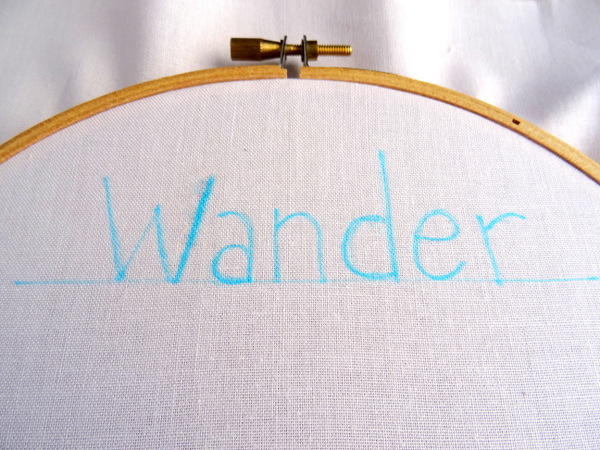
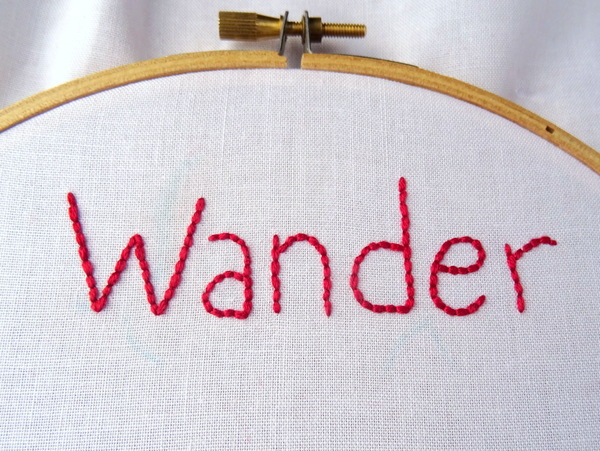
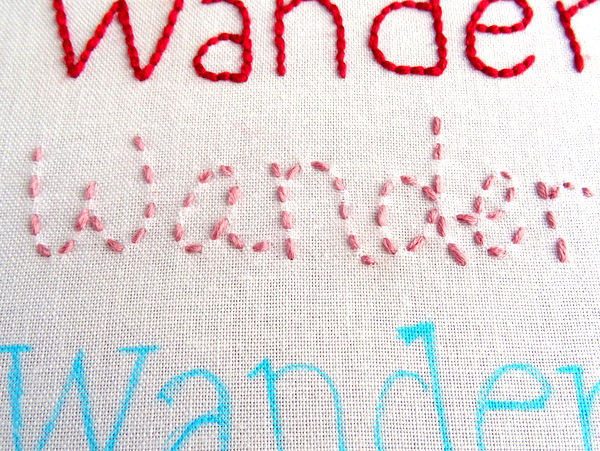
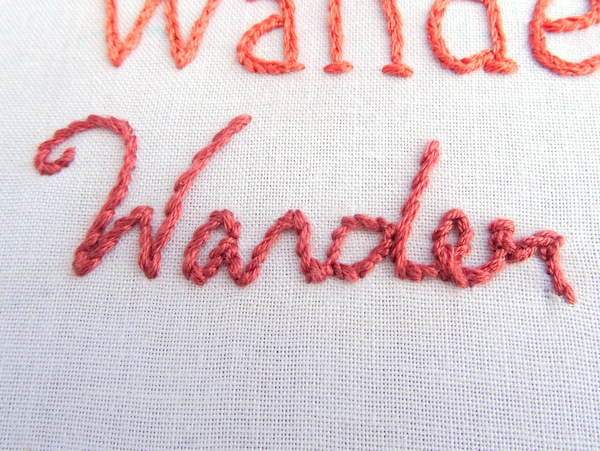
To practice, choose a word at least 5 or 6 letters long. You can use a word processing program to select a font, print it out and transfer to your fabric, or simply draw the letters by hand. I chose the word “wander” and a very basic font. All of the letters in this tutorial are stitched using four strands of DMC embroidery floss.
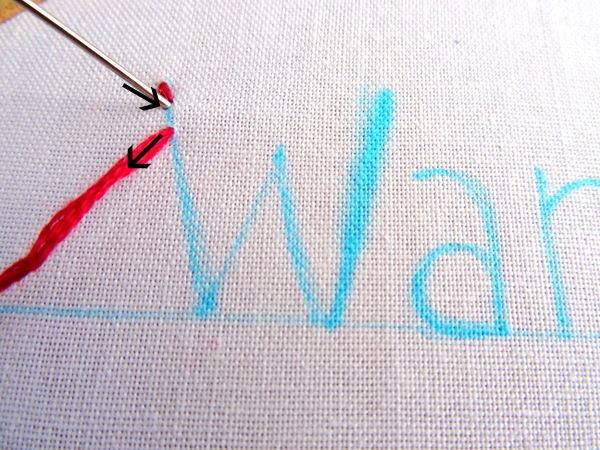
Start your back stitch my making a single stitch, coming up one stitch length away, and going back in the same place where the previous stitch ended. It’s kind of like stitching in reverse.
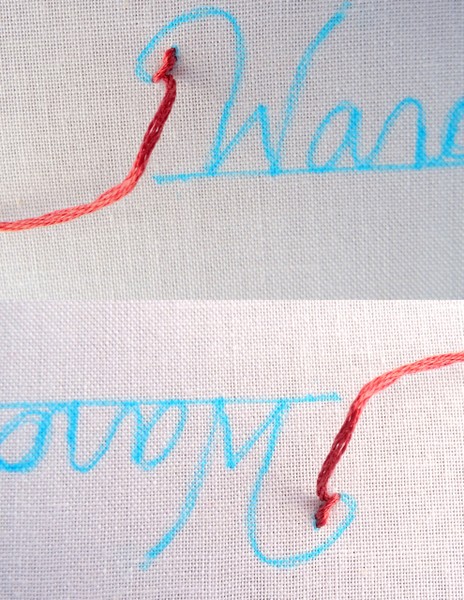
Continue stitching until the letter is complete. Hey, you just embroidered your first letter! {Pro tip: While it’s tempting to trail your thread from one letter to another, if you’re using a light colored fabric it will be visible! Resist the urge. Unless your letters flow together, taking the time to end the thread before starting another letter is worth the effort}
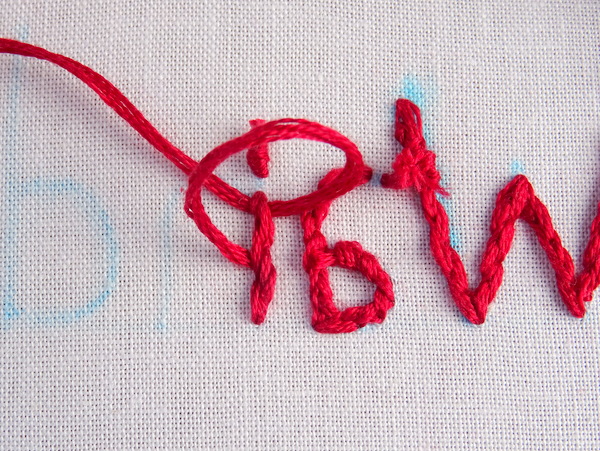
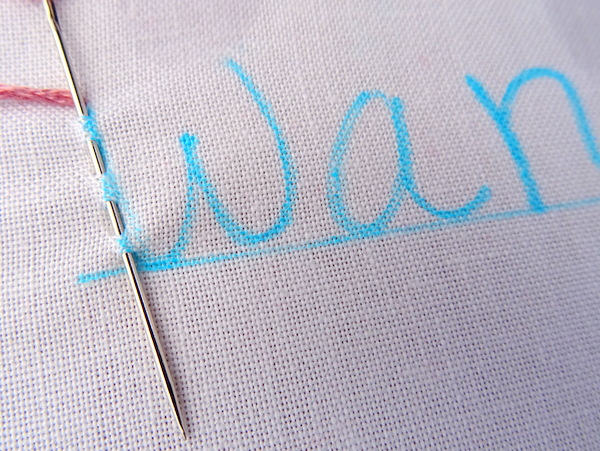
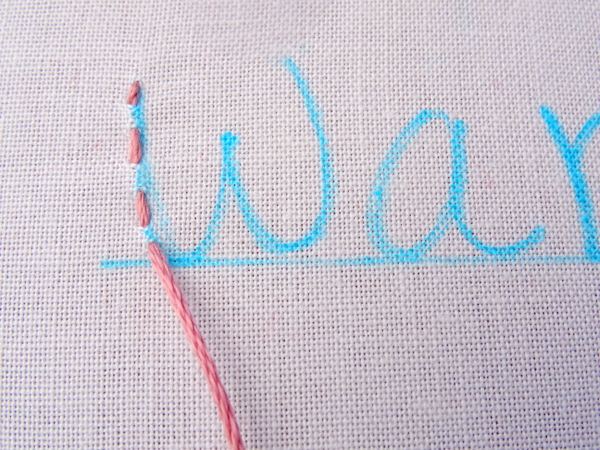
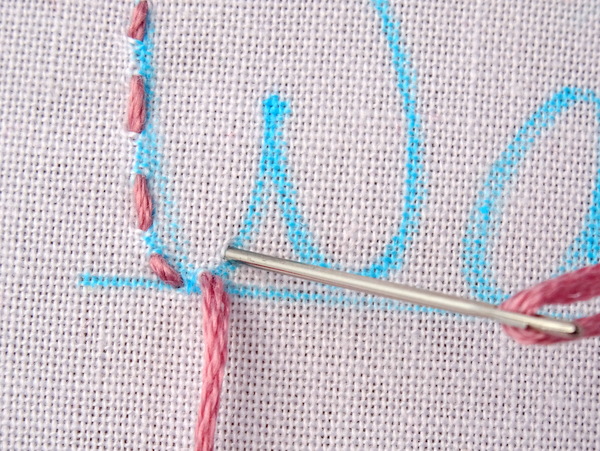
When you’re learning how to embroider letters, the instinct is to simply follow the same path you would when writing. That doesn’t always work out. Take the letter “a” for example. Instead of starting in the middle as if I were writing, I’m going to start at the top and work my way down and around. That way I can be sure the inside loop meets up with the back of the “a”.
The same rule applies to letter “n”. Start by stitching down the straight side. If you were writing, chances are the pen would now travel back up the straight side before making the curve. This won’t work with embroidery. Doubling up on stitches will only look bulk and messy.
You also don’t want to simply take the thread from the bottom and pull it across the back to where the curve starts. Instead, turn your work over and wrap the thread up the stitch until you reach the start of the curve. Now, the bulk of the double line is hidden on the back, and you won’t see a stretched piece of thread through the fabric.
Continue stitching until your word is complete.
No matter what stitch you’re using the same four rules apply:
- Always properly end the thread before starting a new letter. The exception to this rule is when the letters are connected (like in a cursive font) or if the font is very small and the letters very close together.
- Determine the path of stitching before you begin. It will not always be the same as when writing letters.
- Some letters will need to be stitched in two parts. Instead of stretching the thread across the back, turn your work over and wrap the thread around the existing stitches until you reach the new starting point.
- Shorten the stitch length when stitching around corners.
Running Stitch Lettering
Next, we’re going to tackle Running Stitch. It can be worked using the sewing method or one stitch at a time. I find for letters it’s best to use a combination of both methods. The sewing method is great for straight lines. Simply bring the thread to the front and weave it in and out of the fabric. Try to keep the stitches and the empty spaces roughly the same length.
Pull the thread through to complete the series of stitches.
While the sewing method is admittedly faster, for curves or really small letters, it’s much easier to make one stitch at a time.
Using the four rules outlined above, continue stitching until you reach the end of the word.
Split Stitch Lettering
Split stitch is one of my favorites for lettering because it creates a really interesting texture. It’s also a good stitch for small letters and fonts with lots of curves. Start by making a single stitch. Next, bring the thread back up in the middle of that same stitch. Essentially, you are splitting the stitch in two. Pull the needle all the way through and repeat the process.
The end result is a beautifully textured letter that looks a bit like a braid.
Once again, using the basic rules outlined above, continue stitching until you reach the end of the word.
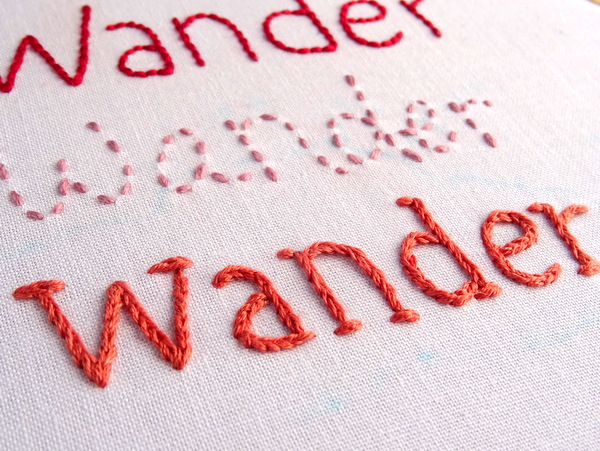
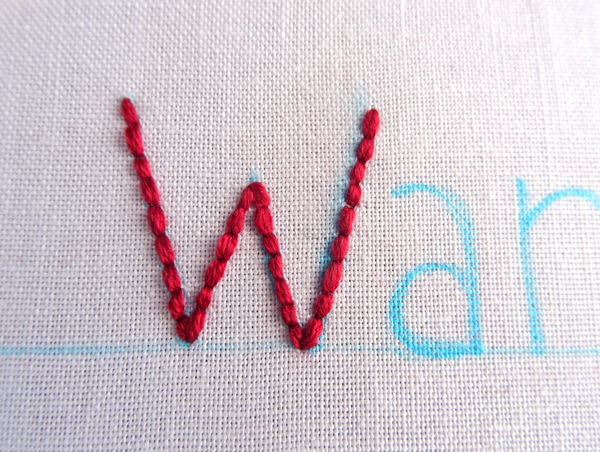
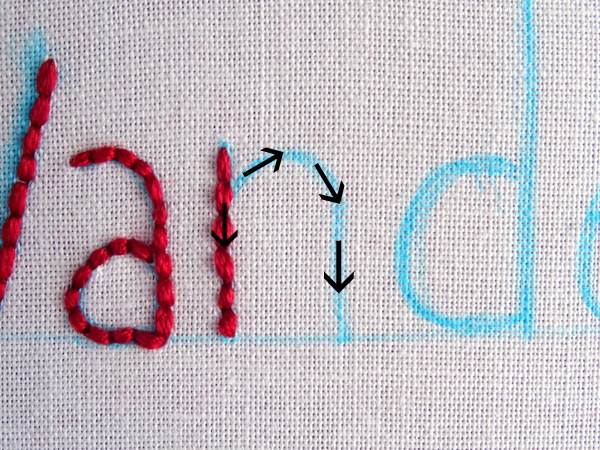
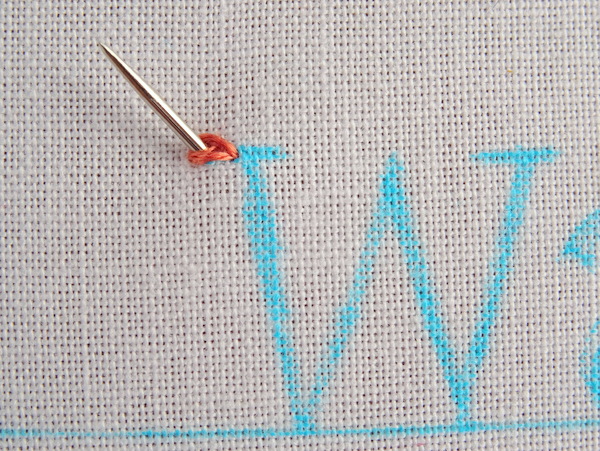
Stem Stitch Lettering
Finally, we reach what is possibly the most beloved stitch for lettering, Stem Stitch. This simple stitch looks like a twisted rope and adds a bit of elegance to embroidered letters. It also turns corners beautifully which makes it the perfect choice for a cursive font. Stem stitch is worked in a similar fashion to split, except instead of coming up in the middle of the previous stitch you come up next to it.
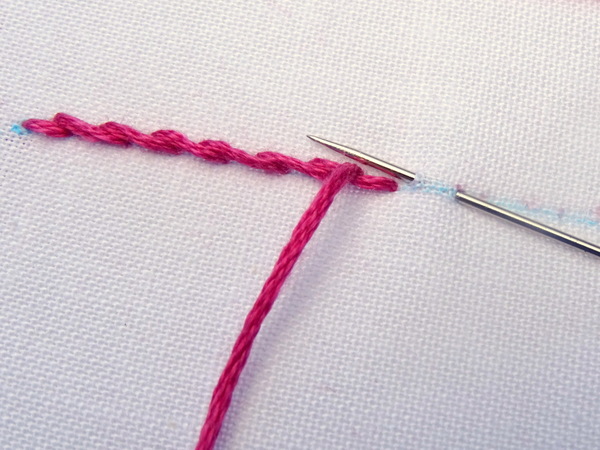
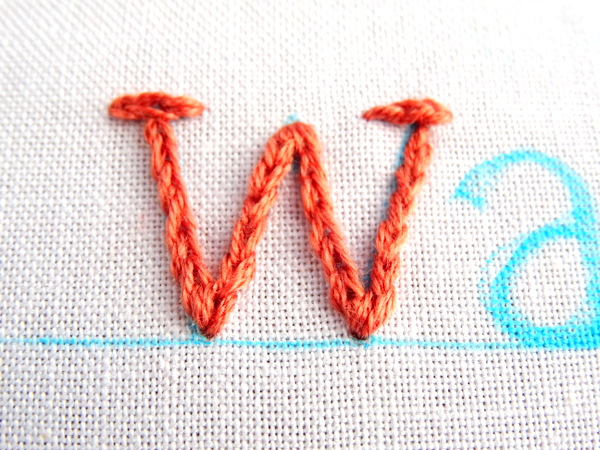
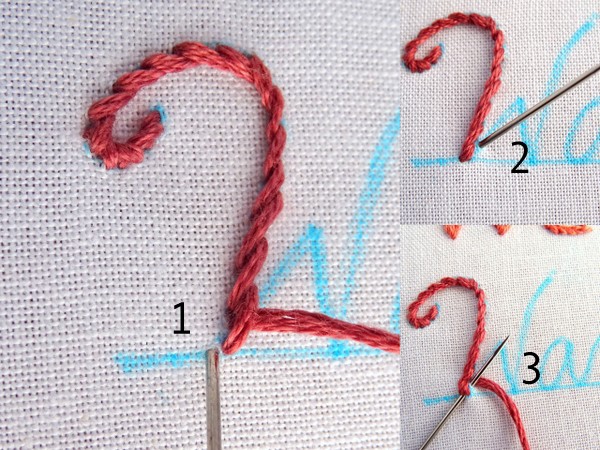
There is one extra rule to follow when using stem stitch for lettering. Are you ready for it? Always stitch in the same direction. For right-handed sewers, the stitch is worked left to right and for left-handed sewers, the stitch is worked right to left. This means as you go around curves, it might be necessary to turn your hoop so you continue stitching in the correct direction. For example, this cursive “W” has a lovely little curve at the top. In order to stitch in the correct direction (I’m right-handed), I had to turn the hoop upside down and so I could go left to right.
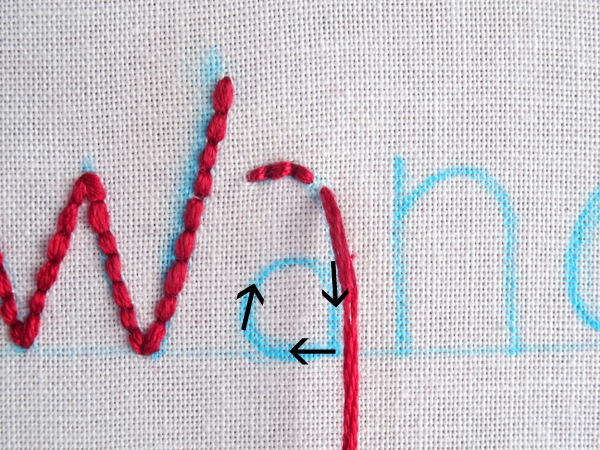
As I rounded the corner I turned the hoop back over and continued in a left to right direction. Don’t forget to shorten your stitch length when you go around corners.
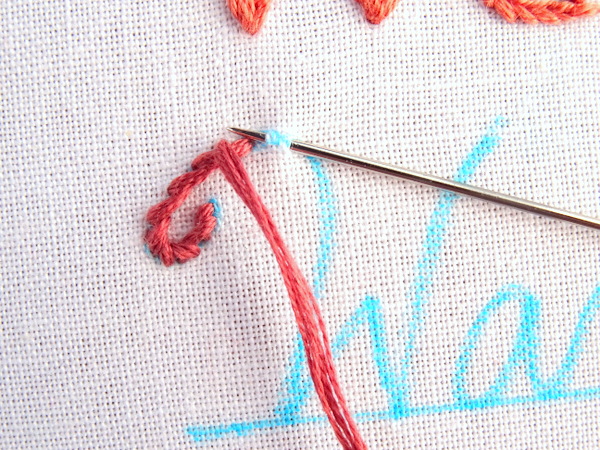
Speaking of corners…while stem stitch is great for turning corners, it does have limitations. Specifically sharp corners like the one we see on the uppercase “W”. If you try to go around this corner – even if you shorten your stitches – you will end up with a rounded curve. The solution is to end the stitch and then come back up again on the other side. Except, instead of coming up at the bottom, come back up one stitch length away and then stitch in a normal fashion. That way you don’t risk pulling out the previous stitch. Are you confused yet? Let’s look at in picture form.
Using these two additional techniques along with the four universal lettering rules, keep stitching until you reach the end of the word.
In the next lesson, we’ll cover more lettering stitches including stitch combinations and filler stitches for large text.
How to Embroider Large Letters by Hand {Part 2}
Nature Alphabet Pattern
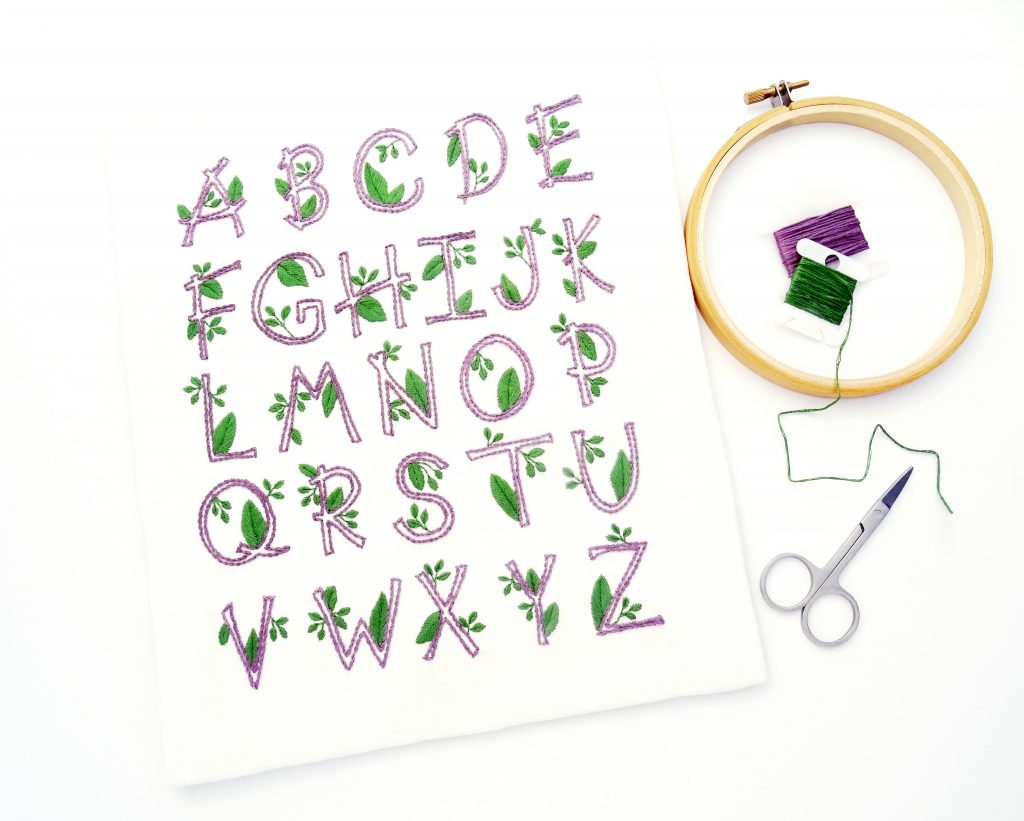
If you love stitching letters, the Nature Alphabet Pattern is for you! Featuring a set of embroidered letters adorned with leaves, this simple pattern uses only three different stitches and is suitable for all skill levels.
Stitch the full alphabet as a sampler, use the individual letters for monograms, or combine the letters to make words of your own. Visit the Nature Alphabet listing in my Pattern Shop for more details about this PDF pattern or to purchase.

Cali Smith
What kind of marker did you use to write the name?
Amanda Watson
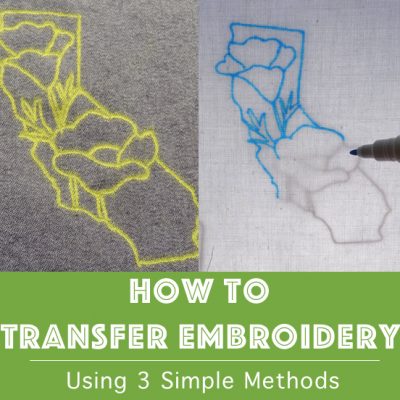
I like the use a water-erasable pen. You can find them at most sewing or craft stores. For more about transferring pattern see the post: https://www.wanderingthreadsembroidery.com/how-to-transfer-embroidery/
Sandra Kenny
These are great resources, thank you.
Verena
Thanks so much! What kind of yarn do you recommend using for embroidering on cotton t-shirts?
Amanda Watson
I recommend a standard cotton embroidery floss for t-shirts. Because t-shirt material is stretchy I would also recommend using a stabilizer so the embroidery does not become distorted when you remove it from the hoop.
Mary
So nice to see hobbies like this are still alive. Very informative article, thank you.
Karen
Thanks for sharing this information!
Krystal
Thanks for the informative post! How many packs of embroidery floss (regular single color packs like you’d find at a craft store) did you use to stitch the whole word ‘wander’?
Amanda Watson
So happy you enjoyed the post. The amount of floss will depend on how many strands you use. Standard DMC embroidery floss has six strands. For the above examples, I used 4 strands. More will create a thicker line and less will result in a thinner line. Even using all six strands you will not need more than 2 skeins of floss and if you use only strands one pack should be enough. Hope this helps!
Julia Grace
On your split stitch,how many strands of thread did you use? I tried three strands but it was too small and didn’t turn out like yours.
Amanda Watson
I used four strands for the split stitch letter. Split stitch usually looks best when using an even number of strands, and yes, it will look different with a lesser number of strands.
Raelyn Lawless
Would you still use the embroidery floss on a handkerchief or would you use something else?
Amanda Watson
Embroidery floss would be perfect for a handkerchief!
Courtney
What would you recommend using for denim?
Amanda Watson
Regular embroidery floss will work great for denim! I would recommend using a larger needle than you would for thin cotton. Something in the range of a size 13 or 14 embroidery needle should work well.
Crystal
I’ve never embroidered before. I do quilt though, and currently working on a quilt for my first grandson. The fabric is a flannel and I want to embroider his name. I’m thinking the split stitch is the likely option. Any suggestion on thread, no clue what to get, is “floss” a thread reference?
Amanda Watson
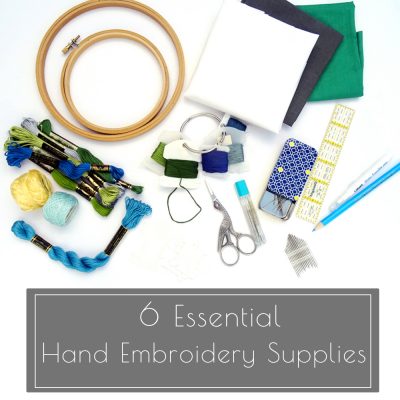
Yes, I think split stitch would be an excellent choice. I just finished up a quilt myself (which also had a flannel back!)and stitched the label on the back with a mix of split and back stitch. Floss is the common term used for embroidery thread. You can find it at most sewing stores in a variety of colors. For more information on choosing a type of embroidery thread take a look at my short article on embroidery supplies: 6 Essential Hand Embroidery Supplies. Have fun with the quilt!
Laura
Hi, is there any way to copy/transfer the outline of the writing so that it matches a particular font just right, rather than doing this free hand? Thanks!!
Amanda Watson
Try typing the font you want in a word processing document and then transfer it onto the fabric by using your computer screen as a lightbox.
Karen
Great idea!
Elizabeth
Super helpful article! I am a beginner and wondering if you think I will need stabilizer for a running stitch on a sweatshirt? If so, do you have any recommendations on brand? I mostly found machine stabilizer. Is this the same? Thanks so much! Hope you’re staying safe and healthy!
Amanda Watson
Because a sweatshirt is comprised of a thicker material, using a stabilizer is not absolutely necessary. However, since most sweatshirts are 100% cotton and have a tendency to stretch, using a stabilizer will help prevent the embroidery from becoming distorted as you stitch. Machine stabilizer (often called Cut Away stabilizer) will absolutely work for your purposes. The downside is that you may need to spend some extra time basting it in place so it doesn’t move around. For that reason, I prefer a fusible type stabilizer that can be ironed on to the fabric. Hope this helps and thanks for the well wishes. Same to you!
Mary Jo
Do you always use a hoop ?
Amanda Watson
I do, but it’s a personal choice. Some people prefer to stitch without a hoop. I find it easier to keep the stitches neat when the fabric is pulled taut.
Linda Critelli
I hope I haven’t taken on an impossible task for a beginner, but, I want to embroider names on rag knit socks as Christmas stockings. I think the split stitch as it looks more substantial. Obviously I can’t put in a hoop, do you think a stabilizer can be ironed inside the sock?
Amanda Watson
I love this idea! I agree that split stitch would look great on top of knitted socks. You may want to play around with using all 6 strands of the floss or even using a thicker pearl cotton floss so the stitches stand out against the knitting. I would also suggest keeping the text as simple as possible by using a plain font and capital letters. Depending on how stiff the socks are, you may not need a stabilizer. If you do use one, I would suggest the iron-on kind that then dissolves when washed. That way the socks won’t have a stiff and uncomfortable lining on the inside. Have fun with this project!
Bonnie
Well, I want to embroider four letters of a grandchild’s name
on the top part of a felt stocking kit below the sequins. The felt piece
is too small for a hoop and I have not done hand embroidery without
a pattern in 60 years. Any suggestion as to how to accomplish this
easiest?
Amanda Watson
To create the text pattern I would suggest either hand drawing it on paper, or using a word document program and then printing it on paper. Once you have the pattern you can transfer it to the fabric using a variety of methods. I think using a heat-transfer pen and the iron-on method would be the easiest for transferring to a fabric such as felt. Don’t worry about the hoop. I’ve embroidered many times on small pieces of felt without a hoop, and while it does require a bit of a steady hand it’s not a deal-breaker. Sounds like a fun project!
Marge
Thank you for the tutorial. I especially appreciated your reminders about doing split stitch from left to right and shortening the stitches to go around corners. I have made Christmas stockings for our sons, their wives, and now our grandchildren, but since several years pass between each project, I always forget how to embroider the name. Here are two things I did that might be useful for other neophytes trying to do something similar.
1. I’m sure your suggestions for how to transfer letters to an opaque fabric are the best approach. But in this time of Covid and not having time to order new supplies, I instead printed the child’s name on the computer in a very large font, cut it out, and pinned the name on the cuff of the stocking. I used the tip of a seam ripper to gently break through the center line of each letter (you could also use a pin). Then, keeping the name pinned in place, I used a pencil to draw through the breaks in the paper to mark the lines on the fabric.
2. As I was doing the split stitch, I had a hard time making the needle come up through the fabric above the line without splitting the thread. So instead of pulling the thread taut right away, I would use my left thumb to keep the stitch slightly loose while I brought the needle halfway up from underneath at the correct point above the line. Only then would I reach under the fabric to pull the thread all the way through from the previous stitch.
Hope the suggestions help someone else. Thank you again
Marge
Oops, I meant that I was doing the stem stitch (not the split stitch)
Amanda
Thanks for sharing these useful tips Marge!
Michelle Nixon
Is it possible to embroidered onto knitted wool stocking? I would like to add an initial to the ribbed collar
Amanda
Absolutely! I would recommend using thick embroidery floss, or maybe even a piece of yarn so the stitching doesn’t disappear into the knitted wool.
Five for Friday – Embroidery – auribuzz
[…] 5 – How to Embroider Letters by Wandering Threads Embroidery […]
Charisse
I’m always curious about the general length of the stitch – eg. 2-3mm ?
Thanks
Amanda
The desired stitch length will vary depending on a number of factors – the stitch you are using, the thickness of the thread, the scale of the pattern, and in some cases, personal preference. Also, when you are stitching around corners I always find it helpful to shorten the stitches. That said, for a general stitch length, I would recommend between 4-6mm.
Charisse
Thankyou Amanda!
Dianne
I am new to embroidery. Your tutorials are very helpful. I want to hand embroider letters on a quilt label that is black fabric. How do I transfer the letters onto the fabric? I can either use a letter font and transfer the letters onto to the fabric, or just handwrite directly onto the fabric. I don’t know how to do either.
And what colour and type of thread should I use? I think I would like to use a stem stitch. The label is fairly small. How many strands of thread should I use?
I appreciate any help. Thank you. ?
Amanda
There are several ways to transfer lettering onto dark fabric. The easiest is to get a white pattern marking pen or pencil (found at most fabric/craft stores) and write directly on the fabric. Just be aware that not all these pens/pencils show up well on black fabric and you may need to test a few to find one that works. The other options are to create a pattern for your lettering (either hand-drawn on paper or computer-generated and printed) and then use the iron-on or transfer paper methods. Both require some basic supplies. Take a look at my article about transfer methods for complete instructions:
https://www.wanderingthreadsembroidery.com/how-to-transfer-embroidery/
As for color and type. I would recommend a standard 6-strand cotton floss in a light color that stands out against the black fabric. Since the label is small and you plan to use stem stitch, I would recommend using only 2 strands. Hope this helps!
7 Unique Ways to Use Your Monogram at Your Wedding - Wedding Fanatic
[…] depending on how large you want your monogram to be. You can also complete the project yourself by learning four easy stitches, such as the split stitch and stem […]
Jane Kelly
Is it possible to embroider on an item, like a small stuffed pillow? I know I can do the embroidery, I just don’t know how to start and stop when I can’t get to the back of the item since it’s not a flat piece of fabric. I enjoy your tips.
Amanda
The key to embroidering a pillow is to do it before it’s stuffed and sewn into a pillow! I’ve embroidered many pieces of fabric that I then turned into pillows but am not sure there is a way to do it when the pillow is already stuffed.
Carly Fonda
How do you hide and secure your knots in the beginning and end? Also- what type of stabilizer do you recommend for a 100% cotton soft baby tee? Thank you for your help!!
Amanda
If I am embroidery something where the back is visible (such as a t-shirt) I would hide and secure the knots or use a weaving method instead of any knots. For stabilizer for a soft t-shirt, an iron-on that you cut away after the stitching is complete is the easiest and most effective.
Harnil
Split stich lettering is awesome. Thanks for sharing these useful tips. Very informative article.
Amanda
It is an awesome stitch! Glad to know that you found the tips useful 🙂
Henry Nichols
Thank you very much for sharing this useful information.
Nat
So much great information here, thank you! I was just wondering is it possible for you to share which fonts you have used here as your samples? Always find it so hard to find exactly what I am looking for. Thanks so much, Nat
Amanda
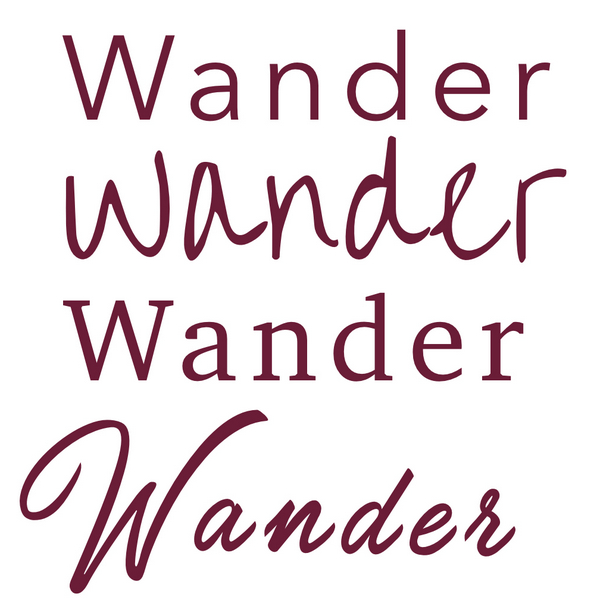
Absolutely! From top to bottom here at the font names in the example: Avenir Next, Over the Rainbow, Charter, Carolina Mountains
The 7 Best Embroidery Software of 2021 – Guide and Reviews
[…] you want letter embroidery, it converts the laptop fonts quickly. Finally, you will find cataloging software. Every kind of […]
Chloe
Hi
I’m looking to use hand sewn embroidery to put the names of my two children on their book bags for school, what type of stitch would you recommend please mend?
Amanda
What a cute idea! I recently added text to one of my canvas bags using stem stitch and it came out beautiful! I love how smoothly it turns corners and the final look is similar to a line of rope.
Mary
I would like to embroider names on a silk baptism gown. Any suggestions? The material is so delicate and also stretches a bit. I am having a hard time writing the names on the fabric. I thought I might try embroidering thru a piece of thin paper with the name on it, but I’m not sure this is a good idea. I’d appreciate any suggestions.
Amanda
For a delicate fabric such as silk, I would recommend using a stabilizer to make it easier to work with and less likely to stretch. There are many kinds of stabilizers, but for silk try a tear-away type or a water-soluble type (only if the silk is hand-washable). Stitching through a thin piece of tracing paper is also a great idea for fabrics that you can’t draw on. You can either pin it on or use a temporary spray adhesive to keep the paper in place. Hope this helps!
Mary
Thank you!!
Tex Hooper
Thank you for explaining the weave process for lettering. I need my son’s shirt embroidered. I’ll have to hire a seamstress who has the right machine to do it.
Tara cook
Help!! I have an apron that I am trying to embroider my granddaughters name on. The problem is that the fabric is a small pattern on red background. Transfer paper is not working, and it’s to dark to see through and trace off a screen. What else can I try? Thanks
Amanda
Have you tried using stick and stitch paper? This is a great, simple option for transferring to dark fabric. https://www.wanderingthreadsembroidery.com/how-to-use-stick-stitch-embroidery-transfer-paper/
Kitty
This was really great advice especially about not carrying a thread from letter to letter. I did that once and tore it out because despite the thickness of the fabric, there was still a shadow.
Claire
Thank you so much for this post! For the split stitch, what path did you use for the serifs on the letters? Like for the W, did you do the main lines first and then add the serifs across the top? If so, do you end up kind of double splitting some of the stitches to make it all look connected? I hope that makes sense!
Amanda
I stitched the serifs on top first and then the straight lines below. They are not actually connected, but I did tuck the straight line a bit under the serif so it appears that way. Hope this helps!
gretchen
Hello Amanda,
I do know how to cross stitch, needlepoint, and embroider. I purchased 10 Irish linen handkerchiefs for a gift for my friends from nursing school and I thought it would be more personal to embroider their initial in a corner. I am wondering about the underneath area that might not look neat? Suggestions?
Chloe Donaldson
Hi I was wanted to embroider Onto a piece of felt, would that be possible?
Sue Bailey
Hi and thanks for this wonderful information.
I would like the letters to look the same on both sides of the blanket.
What stitch would you recommend?
MISS KAREN ROSEMARY WRIGHT
Thanks you so much for all the tutorials. Absolutely brilliant!!!!!! I am starting to embroider my granddaughters denim jacket with her name and little summer flowers. First time doing embroidery. Wish me luck.
Any ideas on daisies.