Learning how to embroider letters is both a fun and useful skill. From monograms to labels to quotes, there are endless ways embroidery letters can add that little something special to all your projects. In How To Embroider Letter By Hand {Part 1} we learned four simple stitches for embroidery letters. We also discussed font choice and the importance of stitch length and direction.
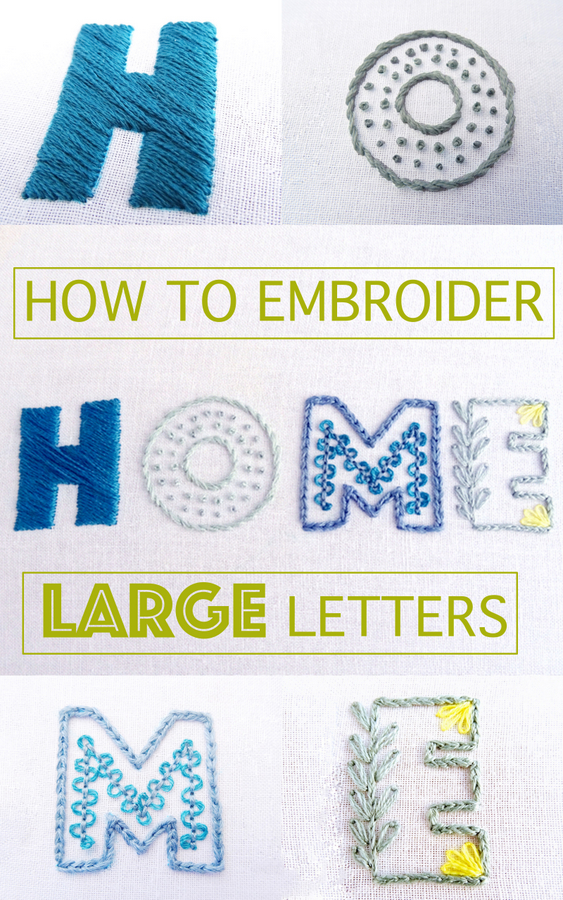
In part two, we take those basic skills to the next level by learning how to embroider large letters. These are the type of letters that are wide and thick and need more than a thin outline stitch. In this lesson, we will cover traditional and non-traditional filler stitches in addition to combination stitches for creating fun and unique large embroidered letters.
Free Downloadable Pattern
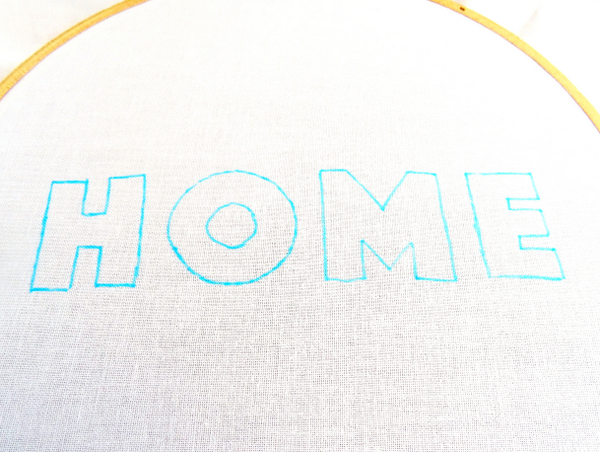
For this project, I’ve created a free downloadable PDF pattern so you can follow along at home. Download it HERE, or by clicking the link at the end of the post. Included with the PDF are instructions for transferring the pattern to fabric along with a materials list (which can also be found at the bottom of this post).
Once you transfer the pattern to fabric, come back here for stitching instructions.
How To Embroider Large Letters with Satin Stitch
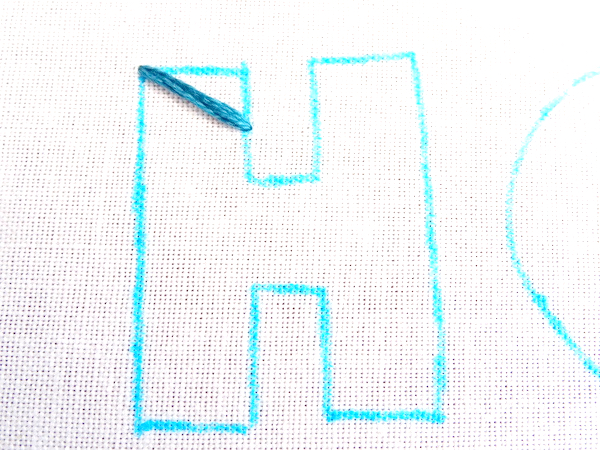
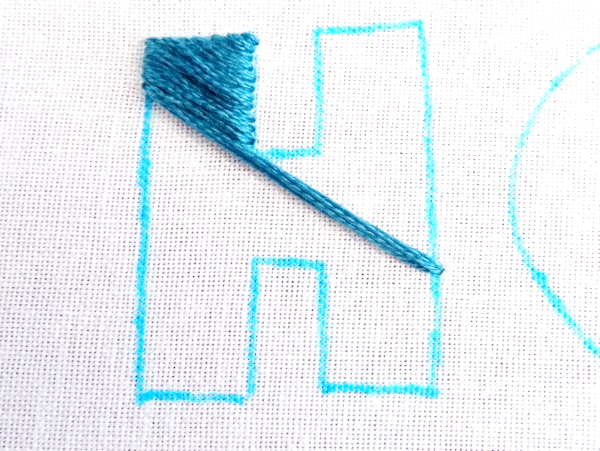
For the first letter, we’re going to use satin stitch. This is a classic filler stitch that creates a smooth, satin-like finish. If you are not familiar with satin stitch, I recommend first reviewing my Satin Stitch Embroidery Tutorial. One of the common complaints about satin stitch is that it’s hard to keep the stitches straight. To avoid this problem, we’re going to make our stitches diagonal. Starting at the top left corner of the H, make a single stitch on the diagonal.
Stitch all the way to the top corner, making sure your stitches are close but not overlapping.
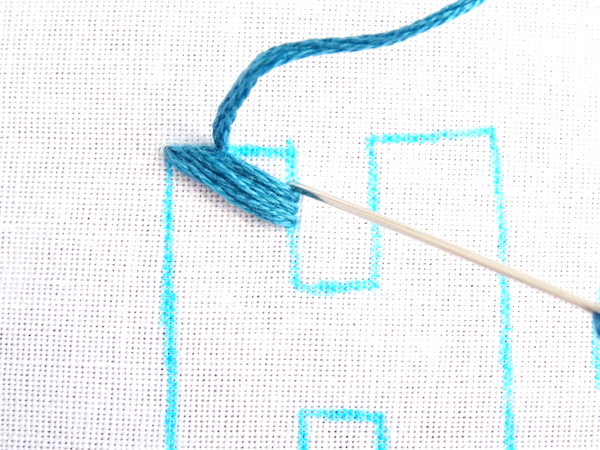
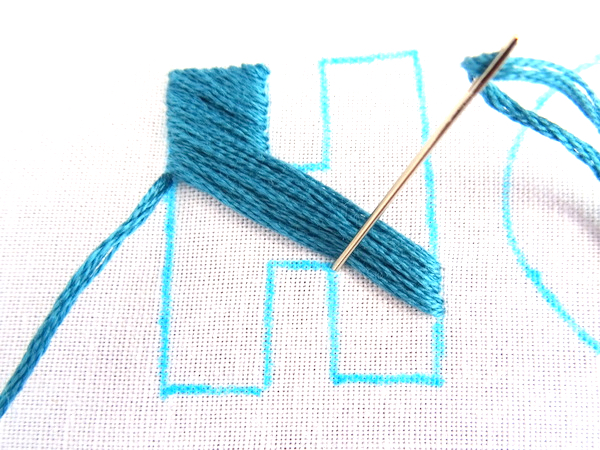
Turn the fabric over and thread the needle through the stitches down to the where you started. From here we’re going to stitch all the way down the letter. When you reach the end of the short section take the thread across to the far side of the H.
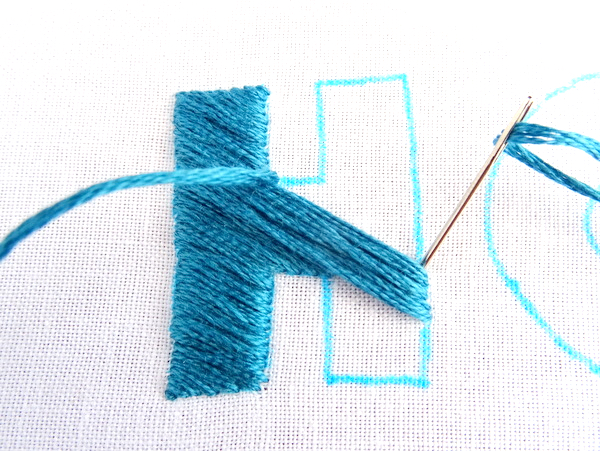
After the middle is filled in, shorten the stitch again and continue stitching down the left side of the letter.
When you reach the bottom, once again turn your work over and thread the needle back up to the top of the middle section of the H. From here, continue stitching upward until you reach the top of the letter.
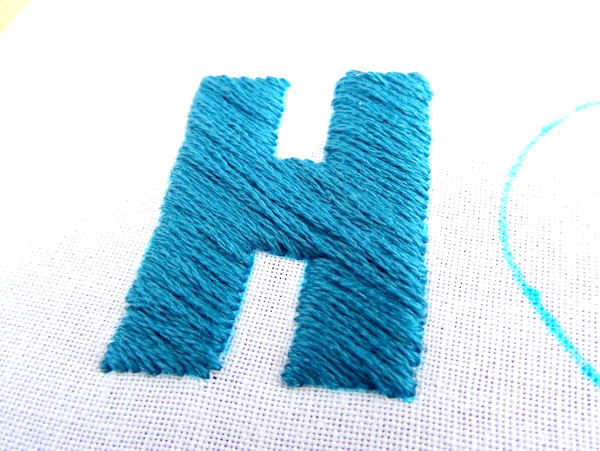
The final step is to fill in the bottom of the right side leg. You now have a beautiful satin stitch letter!
How To Embroider Large Letters With Stem Stitch and French Knots
For the next letter, we’re going to combine two stitches. Stem stitch will outline the letter while French Knots act as a filler stitch. Once again, if you are not familiar with these stitches be sure to review their corresponding tutorials.
» Stem Stitch Tutorial
» French Knot Tutorial
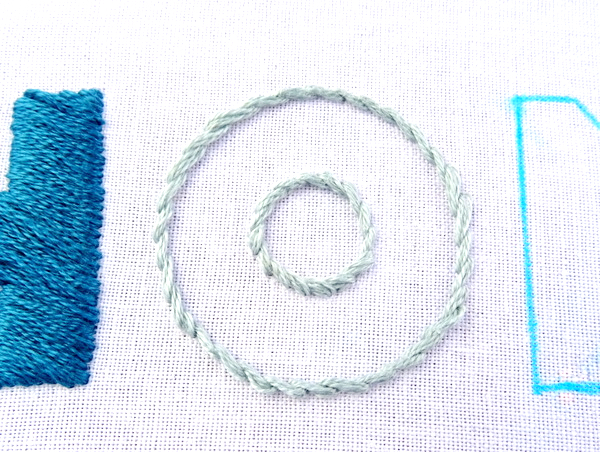
Start by outlining the inner and outer areas of the letter O with stem stitch.
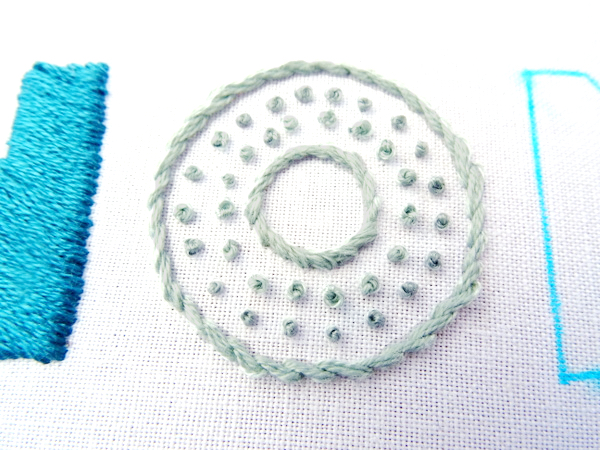
Next, use french knots to fill in the letter. After some experimentation, I decided on two evenly spaced rows of knots. You might only want one, or you might choose to the place the knots close together and fill in the letter completely. Either way, the combination of stem stitch and french knots is an easy way to fill in any letter.
How to Embroider Large Letters with Chain Stitch and Whipped Back Stitch
For the third letter, we’ll use a different combination of stitches. This time the letter M is outlined with chain stitch and the inside is filled with whipped back stitch. You can learn more about both of these stitches by taking a look at their tutorials.
» Chain Stitch Tutorial
» Back Stitch Tutorial
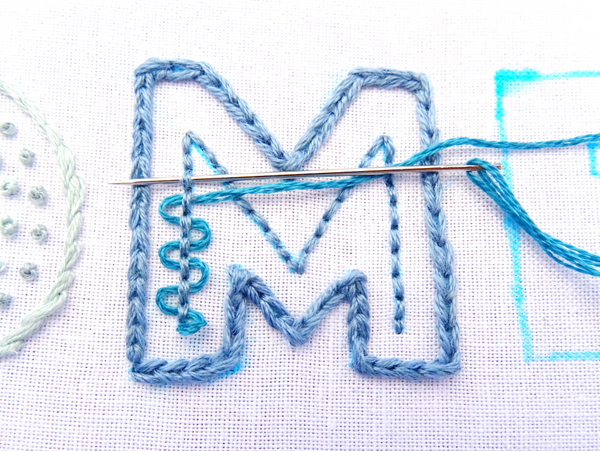
Begin by outlining the letter M with chain stitch and stitching the inner line with back stitch. Next, using a different color thread, weave through the back stitch without pulling the thread tight.
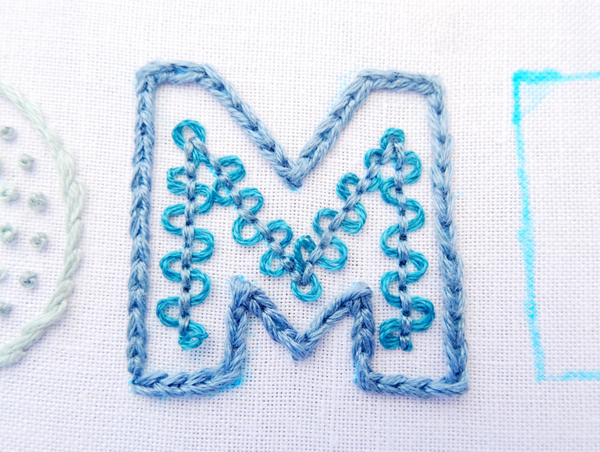
The end result is a wavy line that serves as a filler stitch and contrasts nicely with the sharp lines of the letter M.
How to Embroider Large Letters with Split Stitch and Lazy Daisy Embellishments
I think this last letter might be my favorite. Once again, we’re using a combination of two stitches to create a simple outline with some fun embellishments. Start by outlining the E with split stitch. Next, add a row of lazy daisy stitches up the straight side of the E. Finally, using a contrasting color thread, stitch a trio of lazy daisies into the top and bottom corners of the letter.
» Split Stitch Tutorial
» Lazy Daisy Tutorial

That’s it! Four letters, seven stitches, and one fun and easy large lettering project.
Free Downloadable Pattern
Use this link to download the free HOME Large Lettering PDF:
How to Embroider Large Letters
Materials List:
- 9 x 9-inch Fabric Square:
Choose a fabric with a medium weave such as cotton, muslin, or flour sack. - Embroidery Hoop: Size 8
- Embroidery Needle: Size 7 or 9
- Water Soluble Pen or other items for pattern transfer. (See Transfer Instructions on the PDF)
- Small Scissors
- DMC Embroidery Floss #: 3809, 928, 930, 927, 445
Color & Stitch Guide
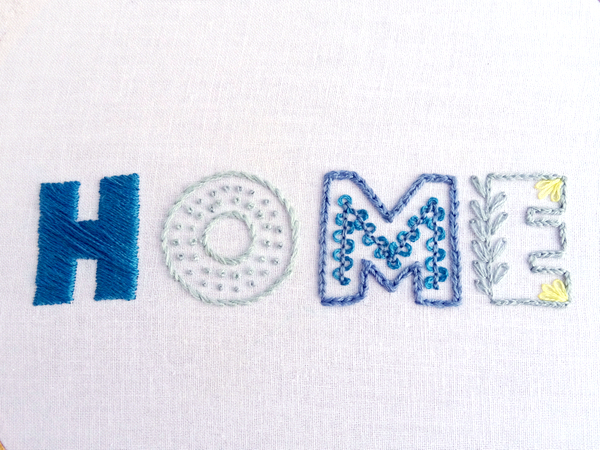
The thread colors and stitches for each letter are as follows:
H – DMC thread 3809 / Satin Stitch
O – DMC thread 928 / Stem Stitch & French Knot
M – DMC thread 930 (outer) & 3809 (inner) / Chain & Whipped Back Stitch
E – DMC thread 927 (outer) & 445 (inner corners) / Split & Lazy Daisy Stitch
More Embroidery Letters: The Nature Alphabet Pattern!
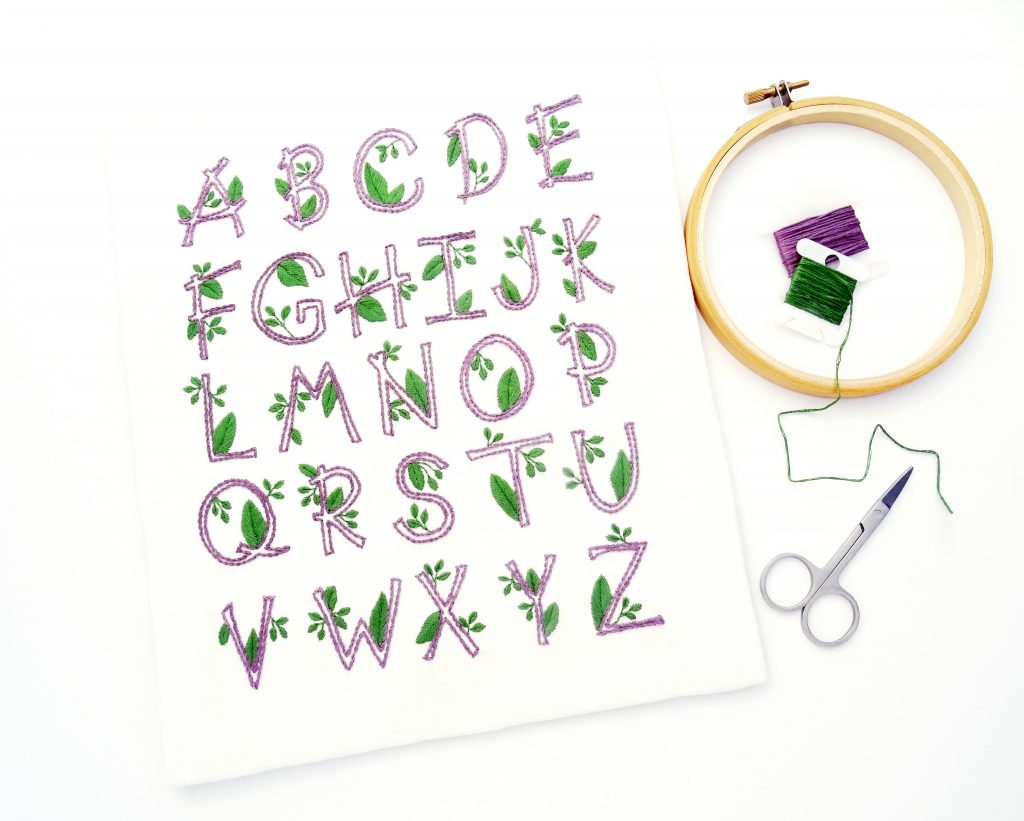
If you love stitching letters, the Nature Alphabet Pattern is for you! Featuring a set of embroidered letters adorned with leaves, this simple pattern uses only three different stitches and is suitable for all skill levels.
Stitch the full alphabet as a sampler, use the individual letters for monograms, or combine the letters to make words of your own. Visit the Nature Alphabet listing in my Pattern Shop for more details about this PDF pattern or to purchase.

Linda Franklin
This is beautiful. Do you have all letters of the alphabet in caps and small letters or can you tell me where to get this size font? I want to learn how to hand embroidery letters in satin. Thx.
Amanda Watson
I don’t currently have a full set of these letters available, but you could certainly make your own using a text editor. Simply pick a font you like, expand to the size of your choice and print out the letters you want to stitch. I love how these big letters look in satin stitch!
Kim Leonard
Hi, I am just starting to get into sewing and embroidery a bit, so my question for you is how do I make a reverse image of my lettering if I am creating my own project? I would like to create an image on Word and then reverse it and iron it on as you have suggested above. Love your site, your embroidery is beautiful! Thank you, Kim
Amanda Watson
Hi Kim, I use a word processing program called Pages (like Word but on a Mac) and under the Arrange tab at the top of the document I am able to select the text and choose “Flip Horizontally” to reverse the text. It might be in a different place, but I assume Word has the same option. If you haven’t already, I would recommend reading my post about transferring embroidery for more info regarding the iron-on method. https://www.wanderingthreadsembroidery.com/how-to-transfer-embroidery/.
Carolyn
I love the look of the “H” and want to use this angled technique. My question is, how many strands do you recommend? My piece is not very large, and I think 3 strands will be good, but I wondered if you have a rule of thumb for choosing the number.
Amanda
I usually base the number of threads on the size of the piece I am stitching. That said, with satin stitch, the higher the number of threads, the thicker the end result will be. So if you want a thick satin stitch that looks like it’s raised off the fabric, use more threads. For a flatter look, use fewer threads. The example shown in this tutorial uses all 6 strands because I was trying to achieve a thick, raised look. My suggestion would be to stitch a small example shape filled with satin stitch using different numbers of threads so you can see what the end result will be for all the options.
Olivia
I’ve been using this guide to embroider some block letters onto canvas. There have been some tricky moments but they look pretty good so far, however I’m about to tackle some letters with round edges (D and B). Do you have any tips on how to approach this technique to get a good, smooth curve? Thanks!
Amanda
This advice varies a bit depending on which stitch you are using, but in general, shortening your stitches on the curves helps create a smooth look. Don’t be afraid to make the stitches on the curved sections significantly shorter than the ones on the straight sections.
Also, when stitching letters such as D & B that have both straight and curved parts, I recommend stitching the straight part first and then instead of continuing the stitch over the top of the letter to the curved section, ending the stitching at the top and start it again on the curved part with the first stitch backward. Let’s use the letter D with split stitch as an example. I would stitch up the straight side of the letter and stop at the top. I would then bring my needle back out at the start of the curved section one stitch length away and make a backstitch that meets up with the top of the straight side that I just stitched. From here you can complete the split stitch and continue stitching forward using split stitch and shortening it around the tightest part of the curve. What this accomplishes is a crisp change between the straight and curved parts and helps avoid that awkward look of distorted stitches when trying to stitch a 90° turn.
I hope this helps!
Harnil Patel
This is really a great idea.. I also want to learn it in Kathiawadi style. Can u plz let me know what kinda threads and cloth material do I have to use for Kathiawadi stich?
Amanda
I am so sorry but this is not a style that I know enough about to make recommendations.