Long and Short Embroidery Stitch Tutorial

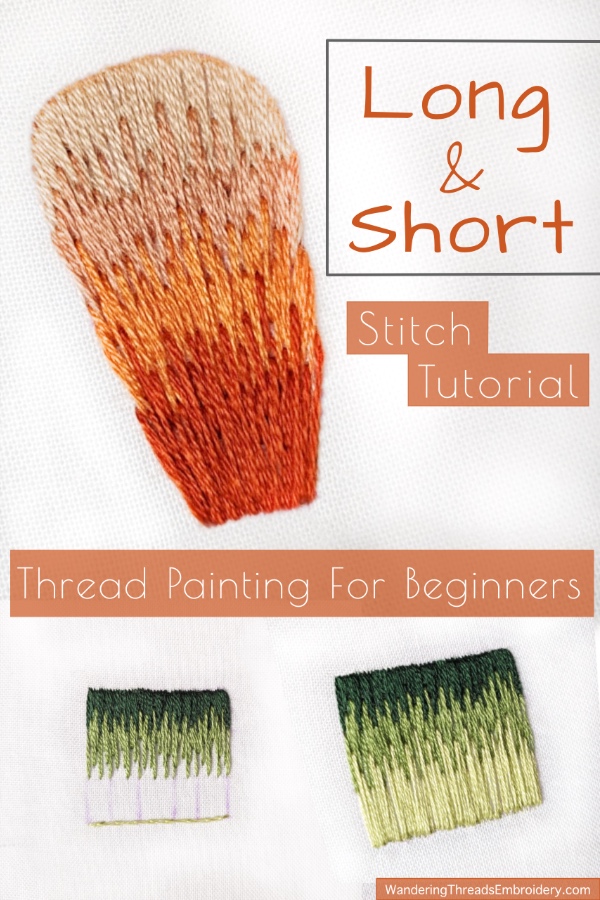
Long and Short embroidery stitch, also called needle painting or thread painting, is a fill type of stitch that produces stunning results. The most often-seen version of this stitch uses several similar shades of thread to create an ombre effect.

What is Long & Short Stitch?

In simple terms, long & short stitch is a series of interlocking straight stitches that fill a shape. By blending different thread colors and using only one or two strands of floss, the result is reminiscent of a painting.

While similar to Satin Stitch, Long & Short stitch is a better choice for larger shapes. Even using one single thread color, long & short stitches can create an interesting textured effect as a filler stitch in a larger shape.

For this tutorial, we will be using long & short stitches to fill in three shapes. All the examples use two strands of floss. The fewer strands of floss, the easier it is to blend the colors and stitches. One strand of floss is ideal for a truly blended look, but it will take longer to stitch.

Long & Short Stitch Tutorial: Square
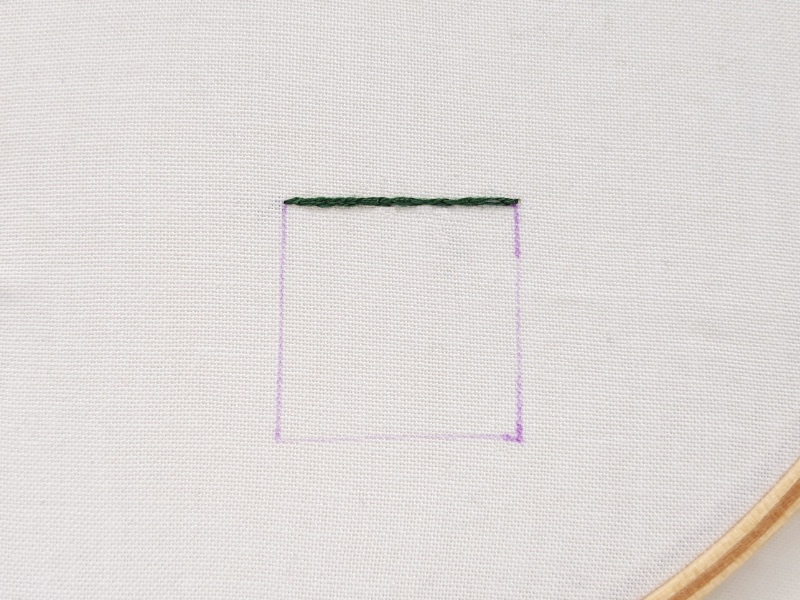
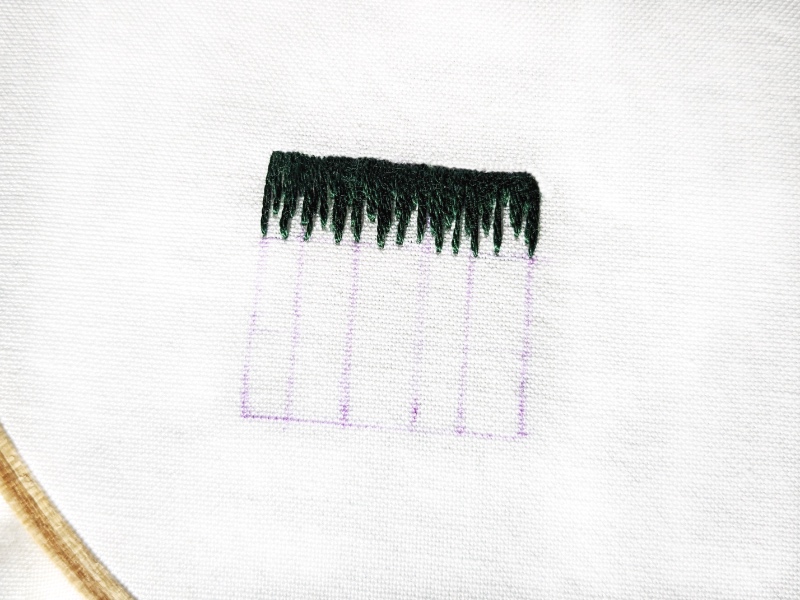
1. Draw a Square

The three green shades used in this example are:
DMC 319, 3347, and 3348.

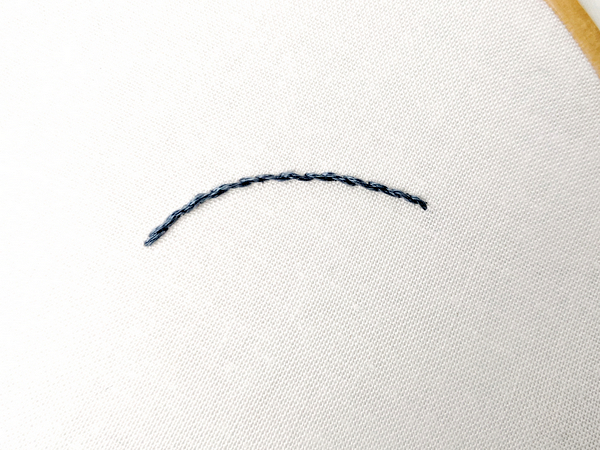
Let’s start with a simple square. The example shown is a 1″ x 1″ square. Fill the top line with split stitch using the same color you will start filling with. In this case, we are starting with #319, the darkest color.
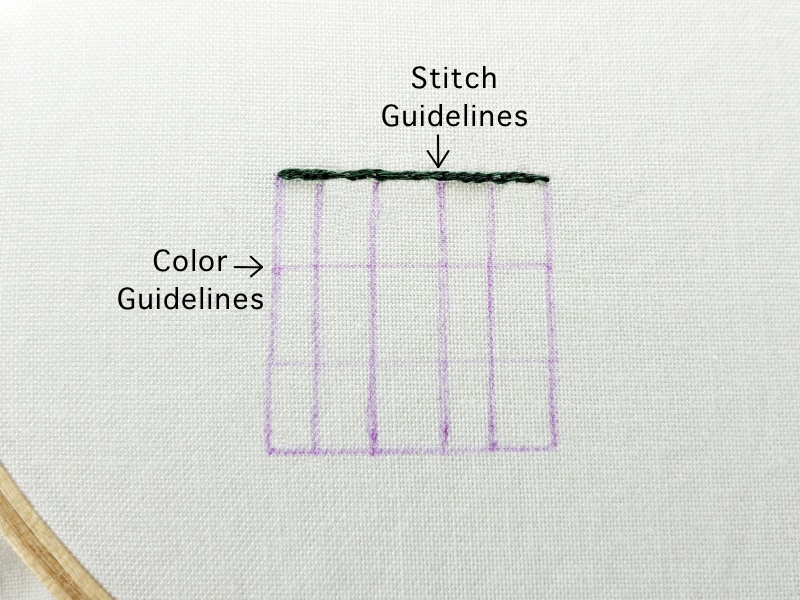
2. Draw guidelines

Draw vertical guidelines to keep the stitches straight and horizontal guidelines to mark the thread color changes. These lines are optional, but I find them helpful, especially when working on a larger shape with multiple colors.

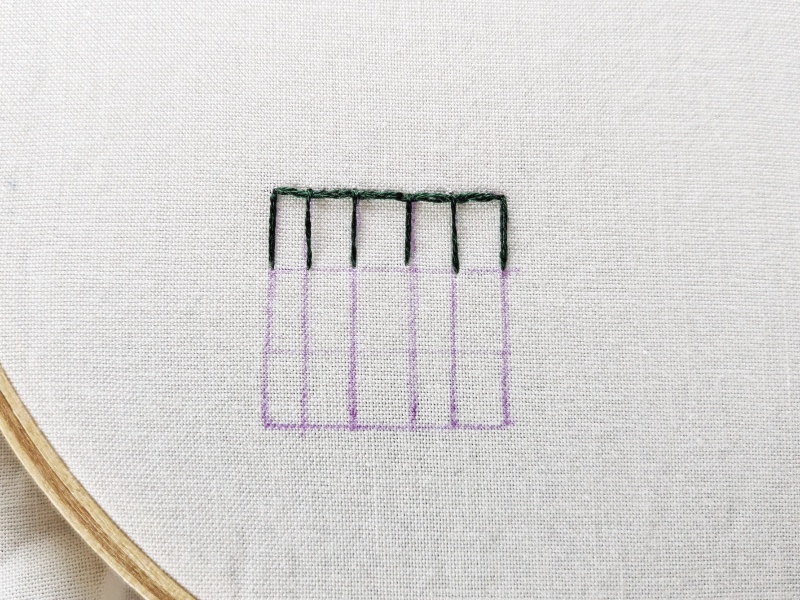
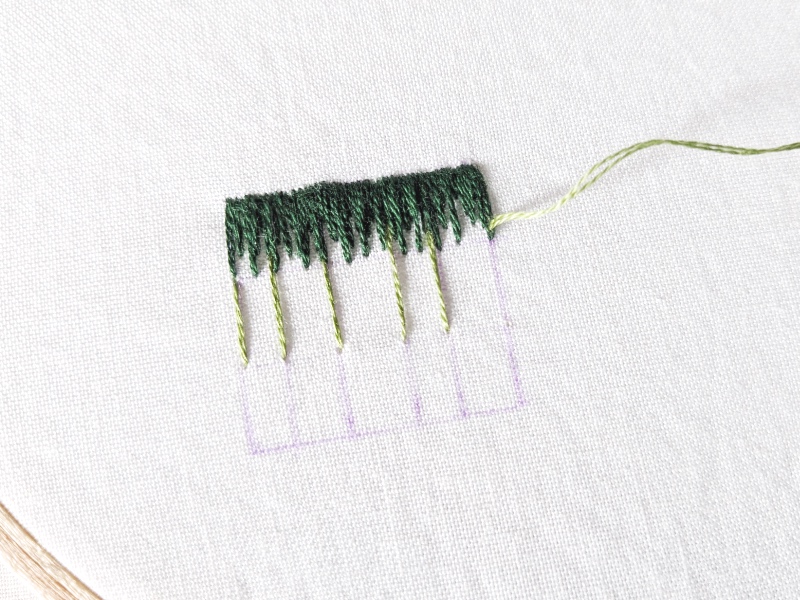
3. Stitch Guidelines:

Following the vertical lines, stitch over the drawn guidelines starting from the top of the split stitch line to the first color-changing guideline. These lines should be roughly the same length. Be sure to start the stitch above the line of split stitch.

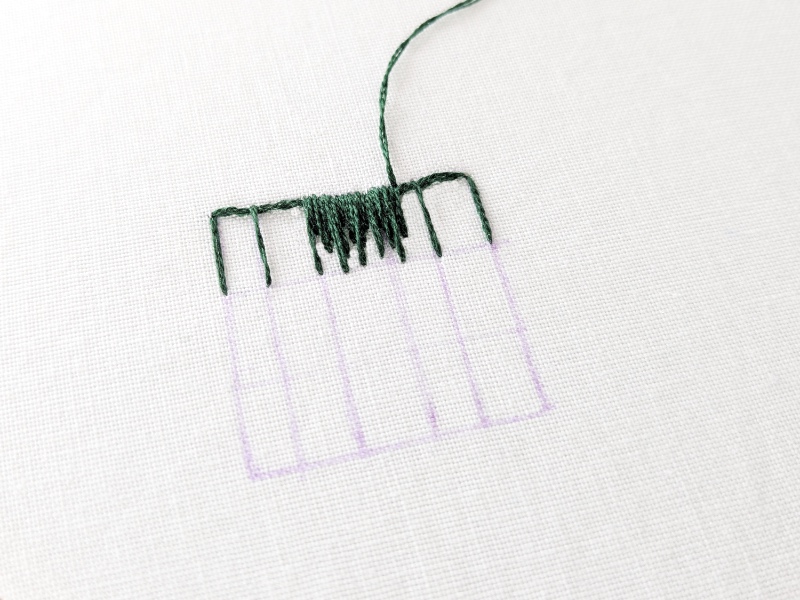
4. Fill in with Long & Short Stitches

Starting in the middle of the square*, stitch toward one side by filling in the gaps between the guidelines with long and short stitches. Vary the length of the stitches, but try not to make any longer than the original guideline stitches or any shorter than half the length of the guidelines. Keep the stitches straight and close together without overlapping. The technique is similar to Satin Stitch but with varying stitch lengths.

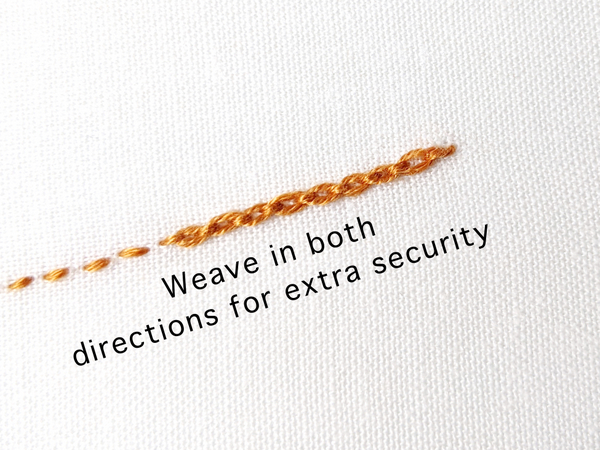
When you reach one side of the square, weave the needle through the threads in the back and bring it back up in the middle. Stitch in the other direction until the first row is complete.

* I find it easier to keep the stitches straight when starting in the middle and stitching out toward each side.

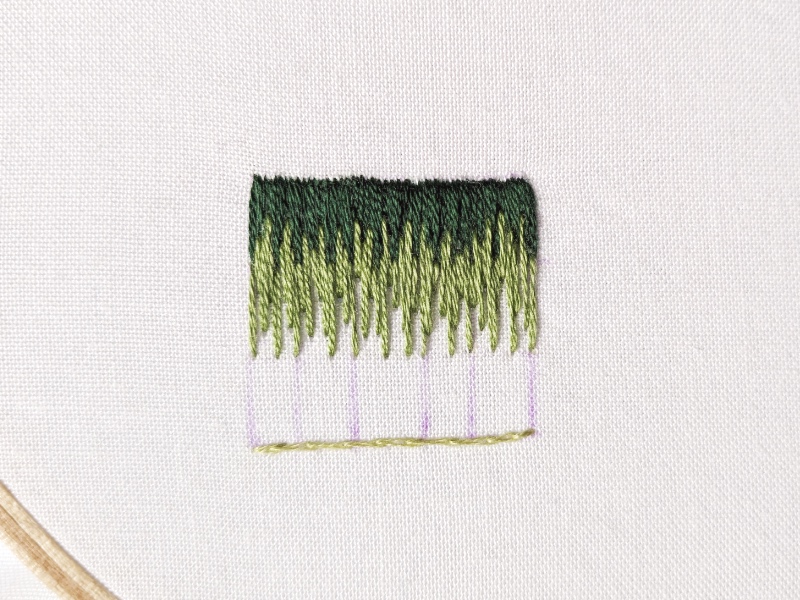
5. Stitch Guidelines Using the Second Color

Start the second row by threading your needle with DMC 3348 and stitching long guidelines from the bottom of the first layer to the second horizontal line.

Instead of meeting the two colors by starting exactly where the first color ends (using the same hole), try splitting the first stitch with the second color. This helps avoid a stark color change and blends the two colors more effectively.

6. Fill with Long and Short Stitches

Just like you did with the first row, start in the middle and fill with long and short stitches until you reach the edge of the square. Then, return to the middle and stitch in the other direction.

The ambiguity when it comes to stitch lengths is a struggle for some and what makes this stitch challenging. Try not to overthink it and instead focus on making a variety of stitch lengths in a random pattern.

7. Fill in the Last Row

Start the last row by covering the bottom of the square with a line of split stitch using DMC 3347. Make long guideline stitches and fill with long & short stitches. This time, all the stitches will end at the bottom, outside the line of split stitch.

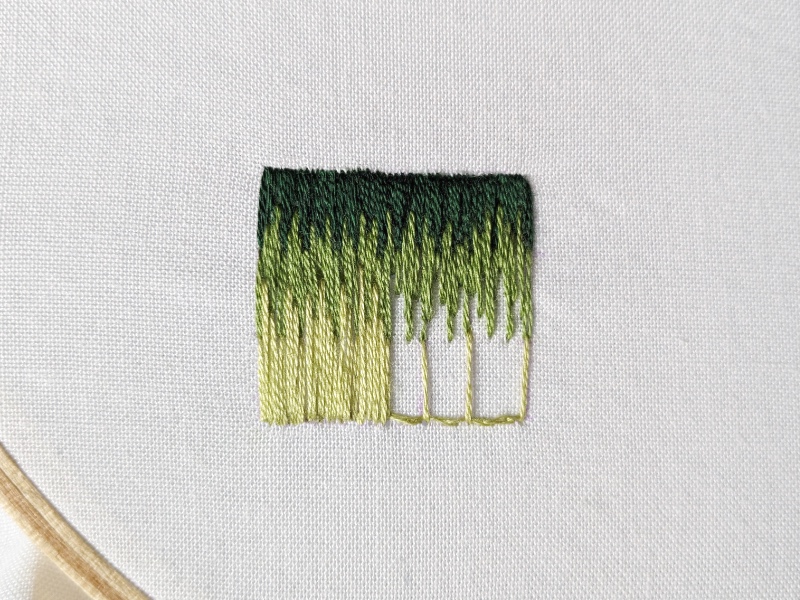
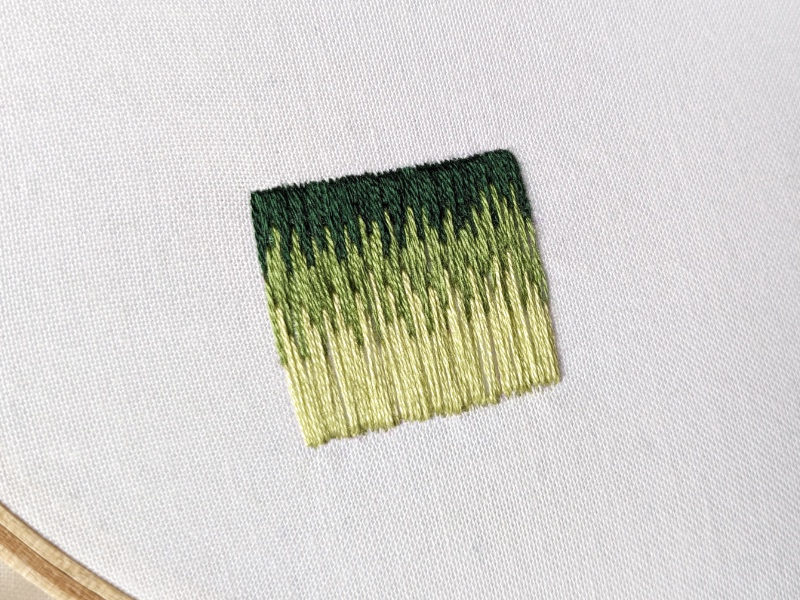
As you can see, my square is far from perfect. There are a few instances where the thread doesn’t lay flat, and it might look better with an additional thread color at the bottom. My long & short stitch is always a work in progress!

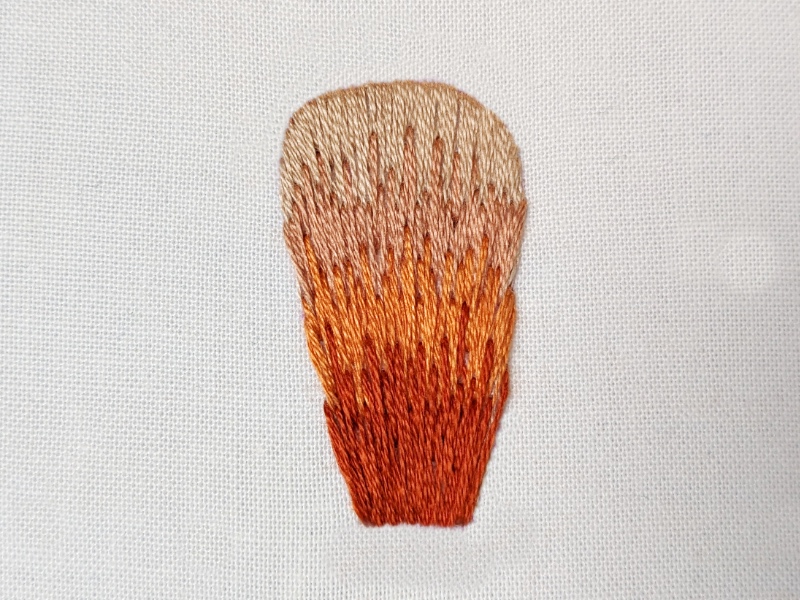
Long & Short Tutorial – Petal Shape

The basic technique for Long & Short stitch is the same for filling all shapes. However, when it comes to shapes with angled edges, the stitches are placed at an angle to match the shape. This is where the guidelines are helpful as getting off track is easy.

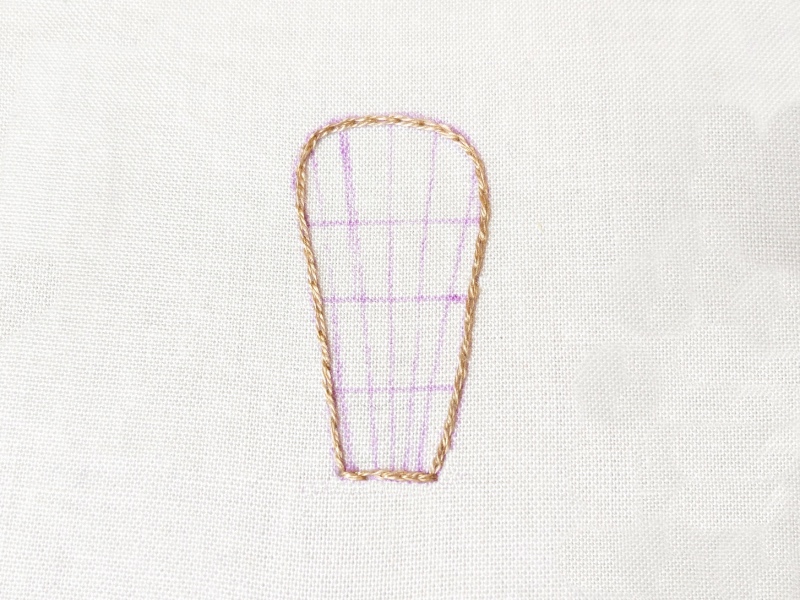
1. Draw the Shape with Guidelines & Outline with Split Stitch

The four thread colors used in this example are:
DMC 920, 922, 3064, and 3864

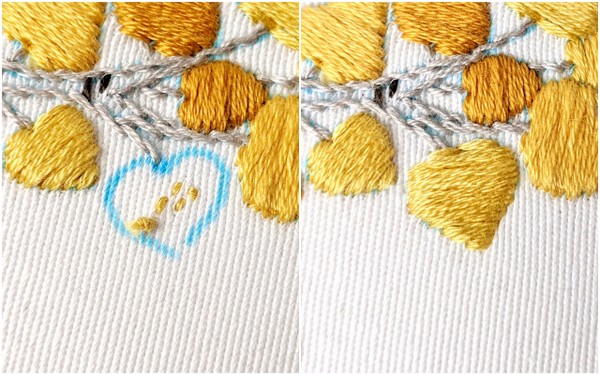
For this example, draw a petal shape that is wider and rounded at the top and tapers slightly at the bottom. Draw the first vertical guideline in the center, then a few more on either side following the angle of the shape. Add three horizontal guidelines to indicate the thread color changes.

Outline the entire shape with split stitch using the lightest color thread, DMC 3864. When outlining the entire shape with split stitch, it’s always best to use the lightest color as it’s the easiest to cover up.

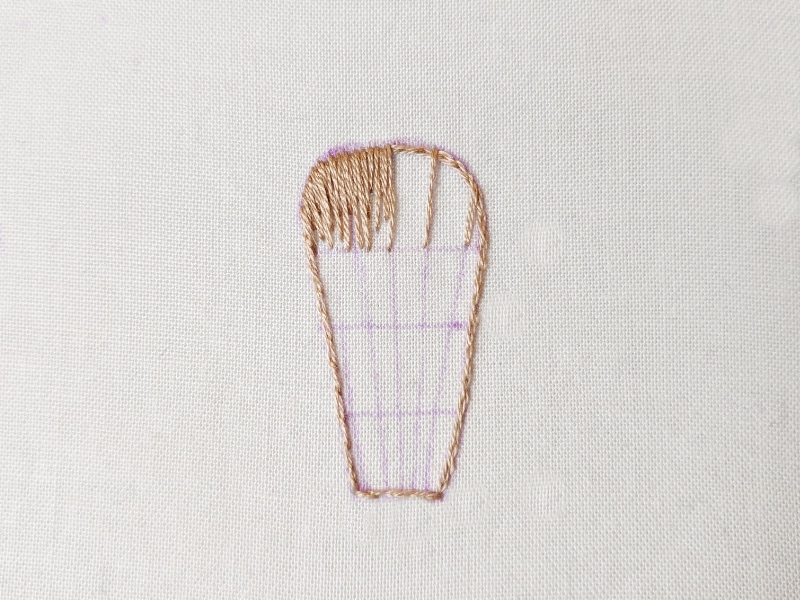
2. Add Guideline Stitches & Fill w/ Long & Short Stitches

Add the guideline stitches to the top row using DMC 3684 starting above the line of split stitch and ending at the first horizontal line. Be sure to angle the stitches near the edge to match the angle of the shape.

Start in the middle and fill with long and short stitches until you reach one edge. Return to the middle and stitch in the other direction.

3. Fill in the Second Row With the Next Color

Following the same steps as above, add long guideline stitches using DMC 3064. Then, fill in with long and short stitches. Note that fewer stitches will be needed to fill each section as the shape tapers toward the bottom.

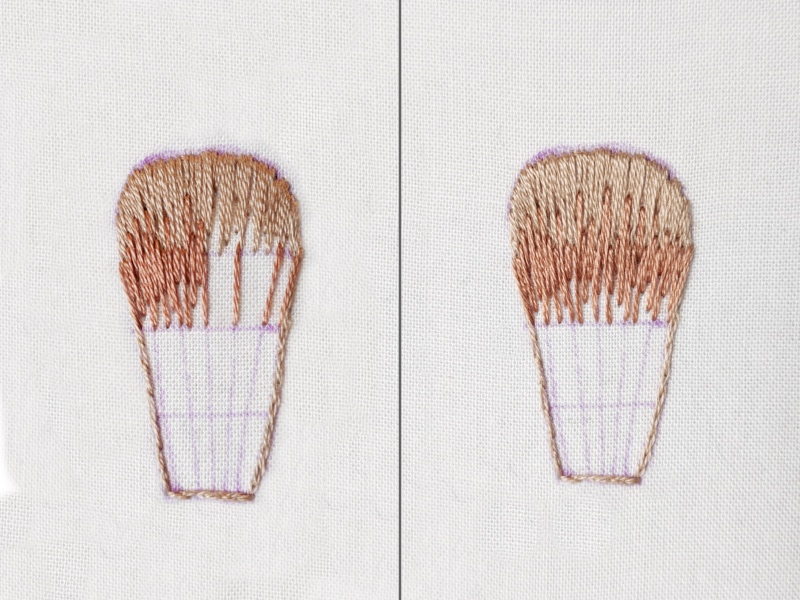
4. Fill in the Final Two Rows

Following the steps above, fill in the next two rows with DMC 922 and 920. Stitch the last row over the split stitch at the bottom. Remember that as the shape gets smaller, you will need fewer stitches. Be sure to avoid overlapping them to achieve a smooth look.

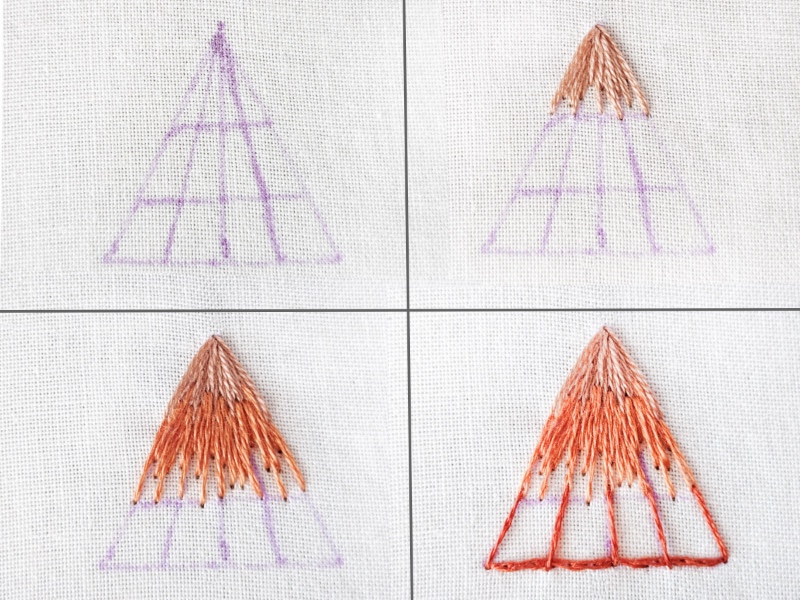
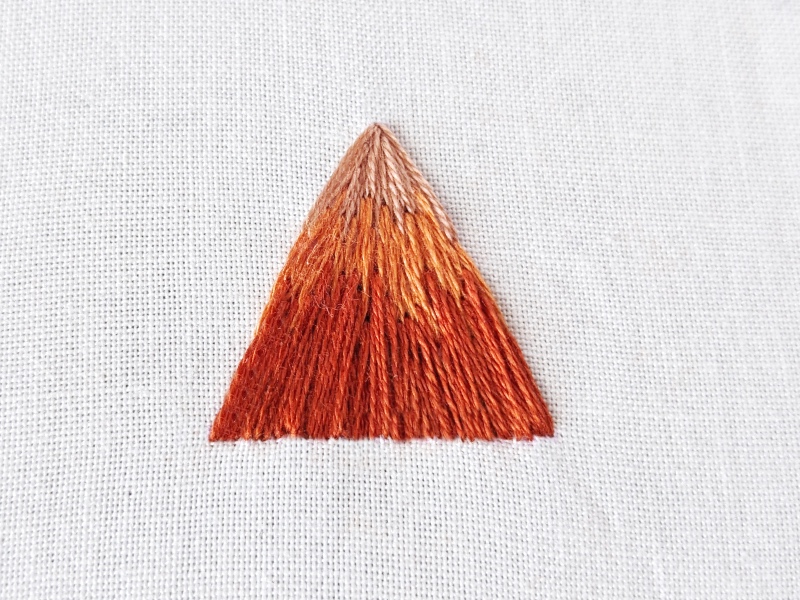
Long & Short Stitch – Triangle

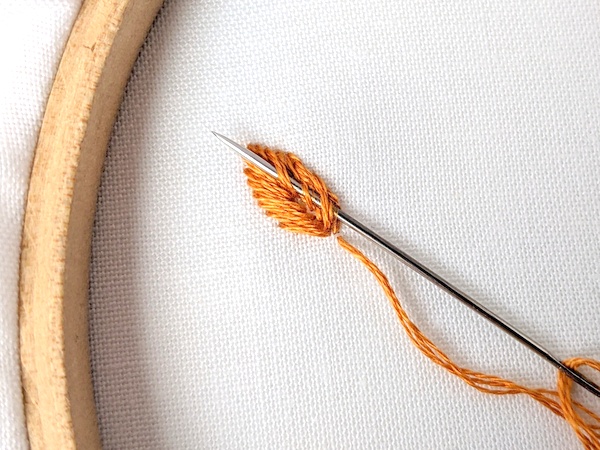
The steps for filling in a triangle shape with Long & Short stitch are the same as above. However, since the shape comes to a point at the top, the top row of stitches will need to be sharply angled and far fewer stitches are needed for the top row than the bottom row.

When using long & short for shapes such as this, you may find it easier to start at the wide bottom and use fewer stitches as you move up each row to the narrow top. In this example, I started at the top and moved down which meant that I needed to use more stitches in each row to fill the shape. Try it both ways and see what works best for you. The key to successful long & short stitches is to follow the technique guidelines while finding your own style.

Happy Stitching!

How to use Stick & Stitch Embroidery Transfer Paper

While there are a number of tried and true methods for transferring embroidery patterns, stick & stitch embroidery transfer paper may just have them all beat. A relatively new product, this sticky-backed, dissolvable, printable paper turns transferring patterns from a chore to a breeze!

How to use Stick & Stitch Embroidery Transfer Paper

1. Print or trace the pattern onto a sheet of stick & stitch transfer paper.

  • Stick & stitch paper can be traced on by hand, or printed on using an inkjet or laser printer. The pattern goes on the rough (non-sticky) side of the paper. If using a printer, double-check how to load the paper so it doesn’t print on the wrong side (I’ve made this mistake more times than I care to admit).
  • If tracing by hand, use a light-colored pen or pencil and don’t press too hard. Remember that you will need to wash the transfer paper off the finished piece and a dark pen could bleed onto the fabric and thread. This is especially important when stitching with white or very light-colored thread. To be on the safe side, do a test using the writing utensil you plan to use and make sure it washes off completely along with the transfer paper.
  • If using a printer, make sure the setting is for plain, not photo, paper. Some printers use extra ink when set to print photos which could bleed or fail to wash out completely. Again, do a test to make sure the ink setting is not too dark.
Stick & Stitch Tutorial

2. Trim the stick & stick paper to roughly the shape of the pattern.

If you’ve printed a whole sheet of paper and the pattern is only on a portion, cut off the extra paper around the edges of the pattern.

Stick & Stitch Tutorial

3. Adhere the stick & stitch pattern to the fabric

Lay the fabric flat on a hard surface, remove the backing from the transfer paper, place the pattern on top, and press firmly. Take your time and make sure it is well adhered to.

Stick & Stitch Tutorial
  • Smooth fabric works best with the sticky backing, but any fabric is suitable for stick & stick, even if it needs extra help from pins or stitches. In fact, a textured fabric that is difficult to mark with a transfer pen is the perfect candidate for a stick & stick sheet. On the flip side, a thin slippery fabric is also great for working with stick & stitch because it acts as a stabilizer making it easier to stitch.
  • If the pattern is not sticking well, add a few straight pins to the edges, or make some long running stitches to hold the pattern in place. Before washing, simply remove the pins or snip the stitches.
  • You can remove and re-stick the pattern, but it won’t be as sticky the second time around so try to get it right in one go.

4. Stitch over the top of the transfer paper.

Once the pattern is firmly adhered to the fabric, stitch as usual.

  • A little bit more pressure is needed to push the needle through the transfer paper and fabric. If this bothers your fingers, try using a thimble.
  • The needle can become a little gummy when stitching though the sticky paper. This happens more often in warm, humid climates. An easy solution is to wipe the needle periodically with rubbing alcohol.
Stick & Stitch Tutorial

5. Wash away the pattern

  • Place the finished piece in a shallow bowl of lukewarm water. Make sure the water completely covers the fabric. Leave it for 5-10 minutes.
    *Cold water is okay to use, but it takes longer to dissolve the paper. Additionally, if the fabric has not been pre-washed, be careful when using water that is too warm as it could cause the fabric to shrink.
  • Shake the fabric in the water to remove any loose bits of semi-dissolved paper. I sometimes use my fingers to gently push away any stubborn bits.
  • Give the fabric one final rinse and then lay flat to dry.
  • If any ink is left behind or still visible from the pattern (see notes on using ink to transfer by hand), dab a tiny spot of soap on the spot and rub very gently.
How to use Stick & Stitch Embroidery Transfer Paper

What patterns work with stick & stitch transfer paper?

With no tracing, ironing, or messy carbon paper involved, stick & stitch transfer paper is a great option for any embroidery pattern! Want to try it out? Get yourself a package of my favorite brand of stick & stitch transfer paper, and then try it with one of my embroidery patterns. You can find both paid and free digital patterns in my pattern shop!

More ways to transfer: How to Transfer Embroidery: 3 Simple Methods

*Some of the items on this page are part of ourĀ Amazon affiliate store. Wandering Threads Embroidery is paid a small percentage if you click through and purchase an item. The prices are the same as buying directly from Amazon and the funds help cover the cost of running this site. Thanks for your support!

How to Start & End Embroidery Stitches

Whether you’re brand new to embroidery, or have been stitching for years, one of the most important skills to master is how to start and end embroidery stitches. Securing the threads at the start lays the foundation for the hard work ahead. While securing the threads at the end ensure that all your hard work doesn’t come unraveled. There are several methods for starting and ending embroidery stitches. In this tutorial, we cover them all.

To Knot or Not to Knot?
How to Start & End Embroidery Stitches

Let’s begin with the basics. The simplest way to start and end embroidery stitches is with a knot placed on the back of the work. However, while knots are quick and easy, they are not the best at securing stitches. Even the most seemingly tight knot can come undone over time, especially if the embroidery is on a project that will be washed or handled frequently such as clothing or linens.

Knots also add bulk to the back of your work and can show through on the front of thin or light-colored fabrics. Finally, knots make the back of the embroidery look bumpy and messy. This is not a big deal if you plan to frame and hang your work but very unsightly when embroidering clothing, napkins, or towels.

So while there are no embroidery police who will come and confiscate your finished work, by using knots you are risking all that hard work simply coming undone.

3 No Knot Methods for Starting Embroidery Stitches

If we’re not going to use a knot to secure the stitches, then what? How about a knot to secure the thread, followed by a little stitching or weaving, followed by snipping that knot away leaving the fabric knot-free and the thread secure for years to come! Below are three no knot methods that are secure and simple to learn.

Option 1: Away Waste Knot

This method creates a secure foundation for embroidery and is useful for all stitches. Not only is it very simple to execute, but it also works when stitching around tight corners and using thin lines of thread (two instances when the other methods fall short). On the flip side, this method requires quite a bit of extra thread. This could be an issue if you’re using fancy, expensive floss. Also, it requires some work on the back of the stitching which can be time-consuming. With all that in mind, let’s get started!

Step 1: Make & Place the Away Waste Knot

Make a knot at the end of the thread and take the needle down into the fabric while leaving the knot on top. Place the knot 3-5-inches from where you plan to start stitching. Don’t put it in line with your stitching or in a place where the stitching will cross over the thread on the back.

Start & End Embroidery Stitches with an Away Knot
Step 2: Stitch

After placing the knot, bring the thread back up to the front and begin stitching.

Start & End Embroidery Stitches with an Away Knot
Step 3: Remove the Knot

When you reach the end of your stitching, or after you’ve stitched at least a few inches to be sure it is secure, pull the knot up gently and snip it off from the front, close to the fabric.

Step 4: Weave the Tail

Finish this method by flipping your work over and weaving the tail from the knot into the stitches. This is why you want to be careful not to stitch over the thread on the back.

Start & End Embroidery Stitches with an Away Knot

Option 2: Waste Knot for Line Stitches

This method is best used when stitching a straight or gently curved line. Unlike the away waste knot it doesn’t use as much extra thread and after you get the hang of it, there is no need to turn the fabric over, making it fairly quick and easy. I use this as my preferred method when stitching on a line.

Step 1: Make & Place the Waste Knot

Make a knot at the end of the thread and take the needle down into the fabric leaving the knot on top. Instead of placing the knot away from the stitching, place it in line with the stitching, roughly 1-inch from where the stitching will begin. You will be stitching toward the knot so be sure to place it on the correct side.

Start & End Embroidery Stitches with a Waste Knot
Step 2: Stitch Toward the Knot & Weave Through the Back thread

Bring the thread back up at the start of the stitching line. In the process, you will create a line of thread on the back from the knot to the start.

Start & End Embroidery Stitches with a Waste Knot

Start stitching toward the knot. As you stitch, use your fingers to manipulate the back thread so the stitches are placed alternately on either side. This will secure the thread in place. The first few times, you may need to flip your work over to make sure the thread is in the correct place, but after you get the hang of it, this method is really simple to do without looking at the back.

Start & End Embroidery Stitches with a Waste Knot
Step 3: Remove the Knot & Stitch Over

When you have secured the line of thread on the back with stitching, gently pull the knot up and snip it off from the front. Continue stitching over the spot where the knot once was.

Start & End Embroidery Stitches with a Waste Knot

Option 3: Waste Knot with Anchor Stitches

While it might seem time-consuming to secure a line of stitches with more stitches, I actually find this to be the quickest of all three methods. Not only does it eliminate the need to turn your work over, but it works well with all types of stitches, making this my most frequently used method for starting embroidery stitches.

The biggest challenge to making a waste knot with anchor stitches is that you need to cover the anchor stitches with more stitching. This can be a challenge when using a particularly fine thread or stitch. However, with some practice, you can learn to make the anchor stitches very tiny, allowing them to be easily covered.

Step 1: Make & Place the Waste Knot

Make a knot at the end of the thread and take the needle down into the fabric leaving the knot on top less than 1″ from where you plan to start stitching. The knot can be placed on the line of stitching, or a few inches away in an empty area of the fabric. For this example, the knot is placed on the line of stitching about a 1/2-inch from where the stitching will begin.

Start & End Embroidery Stitches with Anchor Stitches
Step 2: Make Anchor Stitches

Take the needle back up through the fabric and make a very small stitch one or two threads away from the knot. Move over a few threads and repeat this step until you have created a row of tiny stitches. I prefer to use three or four stitches, but if you are working on a piece that will be washed frequently or handled a lot, go ahead and add a few more to make sure the thread is as secure as it can be.

Start & End Embroidery Stitches with Anchor Stitches
Step 2: Remove the Knot

After completing the row of anchor stitches, pull gently on the knot and snip it off.

Start & End Embroidery Stitches with Anchor Stitches
Step 3: Cover the Anchor Stitches

Once you have created the anchor stitches and removed the knot, move your needle and thread over to the start of the line and stitch over the anchor stitches. Like magic, they have disappeared!

Start & End Embroidery Stitches with Anchor Stitches

Anchor stitches can also be used when stitching non-linear shapes that will later be filled in or covered with thread. In the below example, I added a few anchor stitches to the center of a leaf that will be filled with satin stitch. After making the anchor stitches, I snipped off the knot and then stitched the whole thing with satin stitch, covering the anchor stitches in the process.

How to Start & End Embroidery  With Anchor Stitches

Ending Your Thread Without A Knot

Now that we’ve learned three methods for starting embroidery stitches, let’s talk about how to end them. Once again, we’re going to skip the basic knot in favor of a more secure method.

Weave The Thread

This one is very simple. When you finish a section of stitching or reach the end of a piece of thread, flip your work over and weave the thread back through the last bit of stitching. Weave through at least 4-5 stitches before snipping off the end of the thread.

End Embroidery Stitches by Weaving

For extra security, you may want to weave in one direction for a few stitches and then back in the other direction for a few. This creates a double weave on the back. I only bother with this step when embroidering items that will be washed or handled often.

End Embroidery Stitches by Weaving

The weaving method also works for non-linear stitches. The example below shows a shape filled with satin stitch. I then flipped it over and wove the thread under to secure the end.

The hardest part of the weaving method is remembering to end your stitching with enough thread left to weave on the back. As someone who is always trying to stitch just a little farther before reaching the end of my thread, I constantly struggle with this. šŸ™‚

Happy Stitching!

FREE Holiday Embroidery Pattern & Tutorial

Bring on the spirit of the season with this FREE holiday embroidery pattern and tutorial! This elegant design features a grouping of greenery, berries, and a candle surrounded by a simple hoop topped with a bow.

Free Holiday Embroidery Pattern

This pattern is versatile and perfect for home decoration or giving as a gift. Display it in the hoop with a ribbon for hanging or complete the look with a wooden frame. Stitch it on napkins, tea towels, or placemats to create a fun holiday table.

Using eight different embroidery stitches, this is a great project for brushing up on skills while creating something uniquely beautiful.

Free Holiday Embroidery Pattern Download

The free embroidery pattern is available to download as a PDF by clicking HERE, or on the title above. The PDF includes:

  • Full-color photo of the finished embroidery pieces
  • One holiday pattern  + optional “Merry Christams” text
  • Reverse image of the pattern for the iron-on transfer option
  • Printable stitch and color guide
  • Material list
  • Instructions for transferring the pattern using three simple methods
  • Directions for framing the finished embroidery
Free Holiday Embroidery Pattern & Tutorial

Supplies Needed:

  • Embroidery HoopĀ to fit the pattern. The candle & greenery pattern measures appoximately 4″ x 4″ and fits inside a 5 or 6″ hoop. With the optional “Merry Christmas” text, the pattern measures approximately 4″ x 6″ and fits inside a 7 or 8-inch hoop.
  • FabricĀ big enough to fit the hoop, or add 3-4 inches on each side if choosing to finish the embroidery in a wooden frame
  • Embroidery FlossĀ in colors of your choice, or use the suggested colors in this guide. I used two sets of DMC 6-stranded embroidery floss in the following numbers:
  • White Fabric – 3721, 08, 676, 3363, 523, 501
  • Blue or Black Fabric – 3777, 07, 3024, 3046, 3022, 3347
  • Free Holiday Embroidery Pattern: Pattern transfer instructions are included in the PDF.
  • Sewing Scissors, a Water SolubleĀ Marking Pen or Stick & Stitch Transfer Paper, and anĀ Embroidery Needle.
  • Felt for finishing the back of the hoop
Holiday Embroidery Pattern Materials

Holiday Pattern Stitching Instructions

Step 1:
Choose your fabric and transfer method. For this tutorial, I’m using white fabric with the pattern traced on top with a water-soluble marking pen. If you would like to stitch the fabric on a dark-colored fabric, choose an alternative transfer method* and use the DMC floss colors in the supplies list for blue or black fabrics.
* My favorite method for transferring onto dark fabric is to use a stick & stitch transfer paper that you stitch on top of and then wash off. For a full tutorial on how to use this method, visit, How to use Stick & Stitch Embroidery Transfer Paper.

Free Pattern - Wandering Threads Embroiery

Step 2:
Start by stitching the hoop with Outline Stitch using 3 strands of DMC 08. Remember, the key to outline stitch is to always leave the working thread above the line you are stitching.

Outline Stitch Embroidery Tutorial

Free Holiday Pattern

Step 3:
Stitch the branch(es) with large leaves. First, stitch the branch with Stem Stitch using 3 strands of DMC 3363. Start at the bottom and stitch to the top so the thread is in the correct place to begin the leaves. Stem stitch is exactly the same as outline stitch, except the working thread is kept below the line.

Stem Stitch Embroidery Tutorial

Holiday Hand Embroidery pattern

Step 4:
Stitch the leaves with Fishbone Stitch using 3 strands of DMC 3363. Start with the topmost leaf and work your way down the branch.

Fishbone Stitch Embroidery Tutorial

Holiday Pattern - fishbone stitch

Avoid trailing lines of thread on the back of your work by weaving the thread through the back side of the stitches to the bottom of each leaf. Since you are starting each leaf at the top, a thread line will be created from bottom to top, but as you stitch your way down the leaf with fishbone, the line will disappear under the stitches.

Holiday Pattern

Repeat this step for the other large-leafed branch, or save it for later and move on to the next branch.

Holiday Pattern - fishbone leaves

Step 5:

Stitch the branch with small leaves. First, stitch the branch with Stem Stitch using 3 strands of DMC 523. See above for tips and a tutorial link.

Holiday Pattern - Stem Stitch

Step 6:
Stitch the leaves with Fishbone Stitch using 3 strands of DMC 523. Start with the topmost leaf and work your way down the branch.

Holiday Pattern - Fishbone Stitch

Step 7:
Stitch the evergreen branch and needles with Back Stitch using 3 strands of DMC 501. Stitch the branch first and then the needles using one long back stitch for each.

Back Stitch Embroidery Tutorial

Holiday Pattern - Back Stitch

Step 8:
Stitch the pinecone with Split Stitch using 2 strands of DMC 08. Stitch the outline first followed by the inside details. Since the pinecone is small, it will be necessary to keep your stitches small.

Split Stitch Embroidery Tutorial

Holiday Pattern - Split Stitch

Step 9:
Stitch the berry branches with Split Stitch using 2 strands of DMC 08. Again, these are small branches so make small stitches to keep things neat and even. When stitching a line where the beginning and end are visible using split stitch, I like to make the first and last sitch especially small.

Holiday Pattern - Split Stitch

Step 10:
Stitch the berries with French Knots using 2 strands of DMC 3721 wrapped x2.

French Knot Embroidery Tutorial

Embroidery Tutorial - French Knots

Step 11:
Stitch the candle with Satin Stitch using 3 strands of DMC 3721.
*Optional: Outline the candle with split stitch using 2 strands of thread before stitching over top with satin stitch. While it initially takes a bit more time, I find that in the end, this method allows for a quicker and neater satin stitch.

Satin Stitch Embroidery Tutorial

Embroidery Tutorial - Satin Stitch

Step 12:
Stitch the candle flame with Stem Stitch using 3 strands of DMC 676. First, outline the flame, then follow the same stitching pattern until the shape is completely filled in.

Embroidery Tutorial - Stem Stitch

Step 13:
Stitch the bow with Chain Stitch using 3 strands of DMC 3721. Start at the bottom of the ribbon and stitch up and around the loop on the opposite side. Continue stitching around the second loop and then down to the bottom of the ribbon.

Chain Stitch Embroidery Tutorial

Embroidery Tutorial - Chain Stitch

Step 14:
Stitch the optional text with Stem Stitch using 3 strands of DMC 3721.

For complete instructions on stitching letters, visit the How to Embroider Letters by Hand post.

Holiday Pattern - Merry Christmas

Finish the Back

For this project, I have chosen to finish the back with a piece of felt. This simple two-step method involves sinching the edges and then attaching a piece of felt using a whip stitch. For detailed instructions visit: How to Finish and an Embroidery Hoop.

Alternately, you could choose to finish your embroidery in a wooden frame by following these instructions: How to Frame Embroidery: the Easy Method.

How to Finish Embroidery in The Hoop

Admire Your Work!

Free Holiday Hand Embroidery Pattern
Holiday Embroidery Pattern & Tutorial

More Holiday Embroidery Patterns

Thanks for downloading the Free Holiday Embroidery Pattern and stitching along with me! You can find additional holiday patterns including wreaths, ornaments, and more in the holiday pattern shop.

Wandering Threads Embroidery Holiday Patterns

Happy Stitching!


1 2 3 4 12