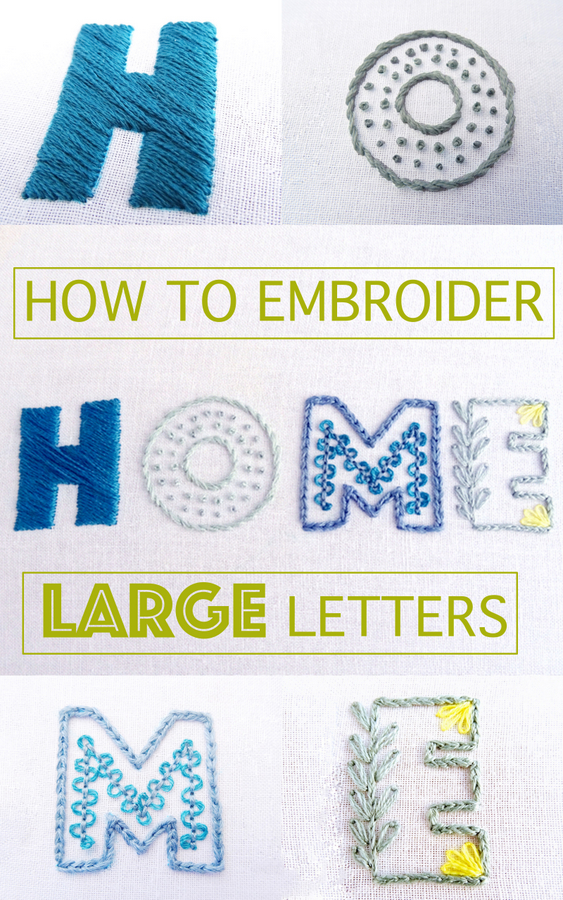
Simple Snowflake Embroidery Pattern Tutorial

Celebrate the season with this FREE simple snowflake embroidery pattern! December is here, and for many people, that means the beginning of the snowy season. While the cold, fluffy white stuff isn’t always fun to shovel, it is fun to create snowflake art — preferably in front of a roaring fire while sipping a cup of hot chocolate. Whether you want to add a bit of whimsy to your favorite skirt, tea towel or scarf, or simply create a stand-alone work of art, snowflake embroidery is a fun and simple project.

Simple Snowflake Embroidery Pattern

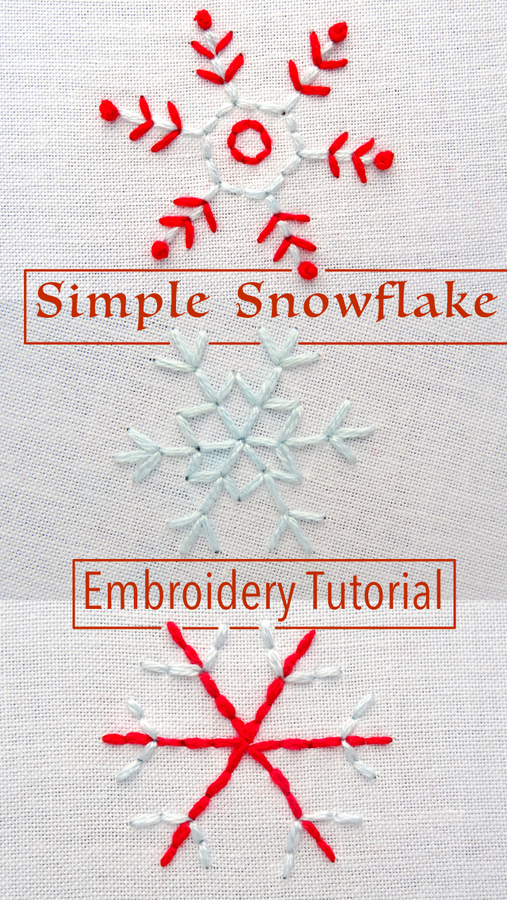
This set of three unique snowflake patterns are designed with simplicity in mind. Using only two stitches – back and french knot – these basic snowflakes can easily be stitched in large or small sizes.
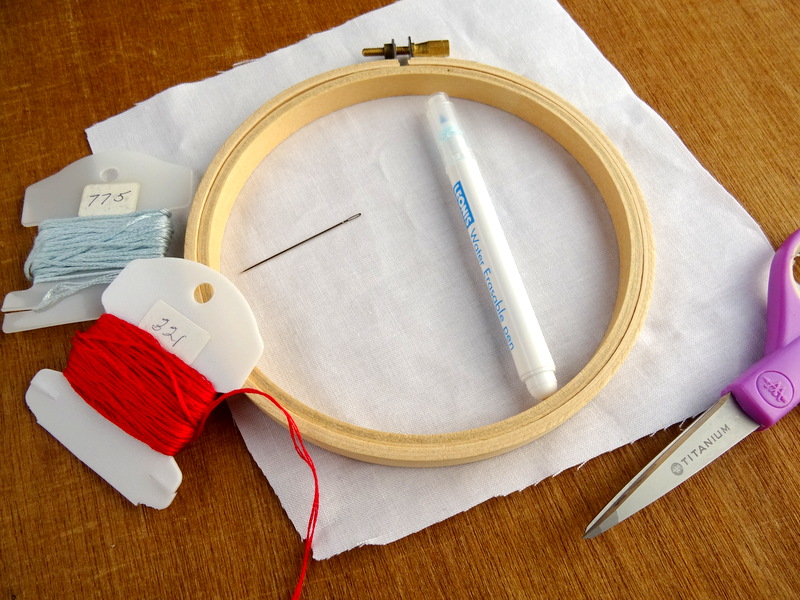
You Will Need…

  • Embroidery Hoop
  • Fabric big enough to fit the hoop for a stand-alone project, or the item you wish to embroider.
  • Embroidery Floss in the color of your choice. If you are embroidering your snowflakes on dark fabric choose a bright white or pale blue. If you are using white fabric like in the photos shown here, try a light blue or silver floss instead. Don’t be afraid to use more than one color in your snowflakes. Pro tip: metallic floss makes for fun & festive embroidery snowflakes!
  • Free Snowflake Embroidery Pattern: Download and resize however you like. Pattern transfer instructions are included in the PDF.
  • Sewing Scissors, a Water Soluble Marking Pen and maybe a Small Ruler to keep your stitches straight.

Simple Snowflake Embroidery Pattern

Snowflake Embroidery Pattern FREE PDF

For this project, I’ve created a free downloadable pattern featuring three simple snowflakes. You can download it HERE, or by clicking the title above. I’ve also included instructions for transferring the pattern to fabric in the PDF. Once you have your pattern on the fabric come back here for further instructions.

Simple Snowflake Embroidery Pattern

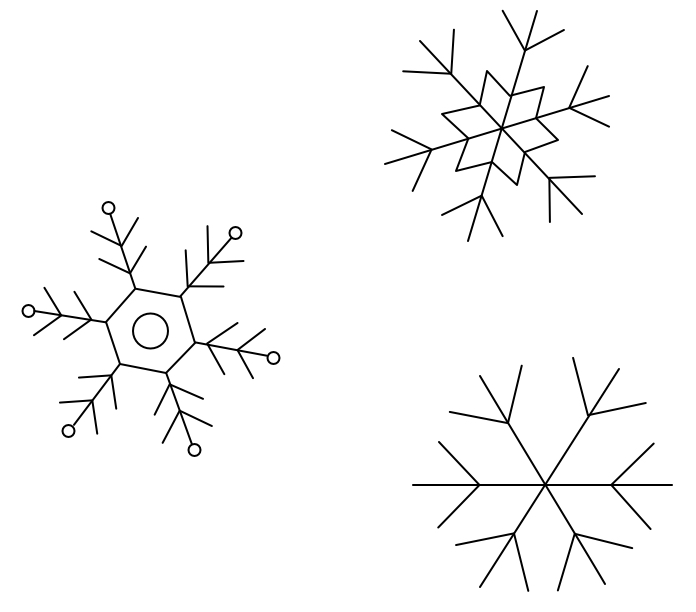
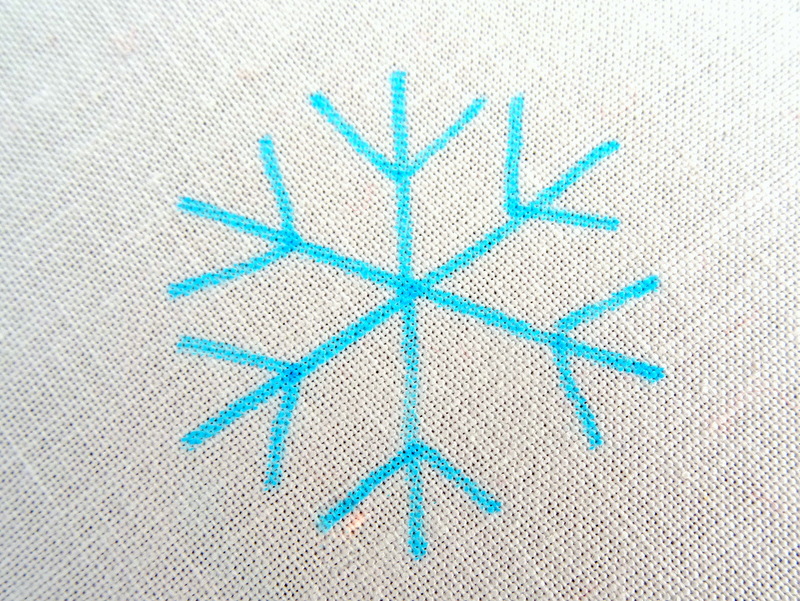
Snowflake Embroidery Pattern #1

Simple Snowflake Embroidery Pattern

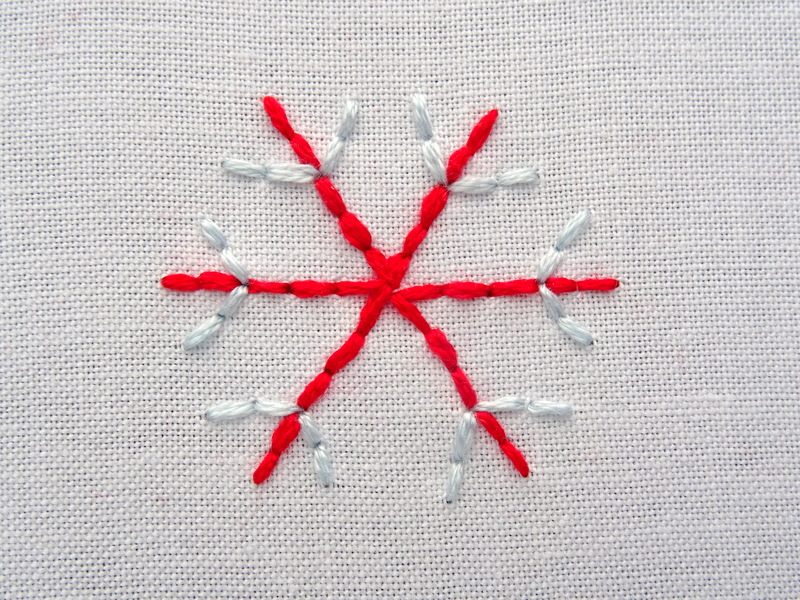
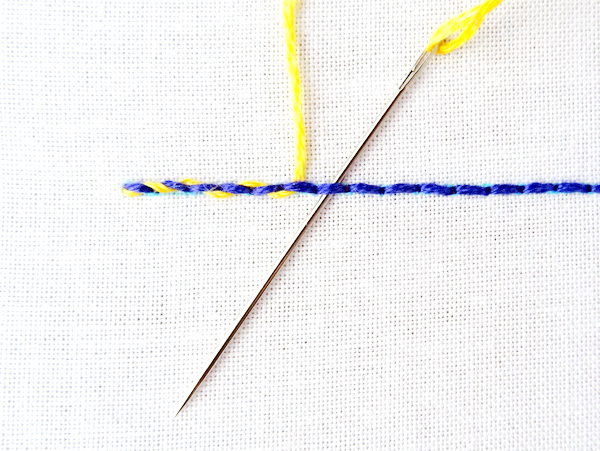
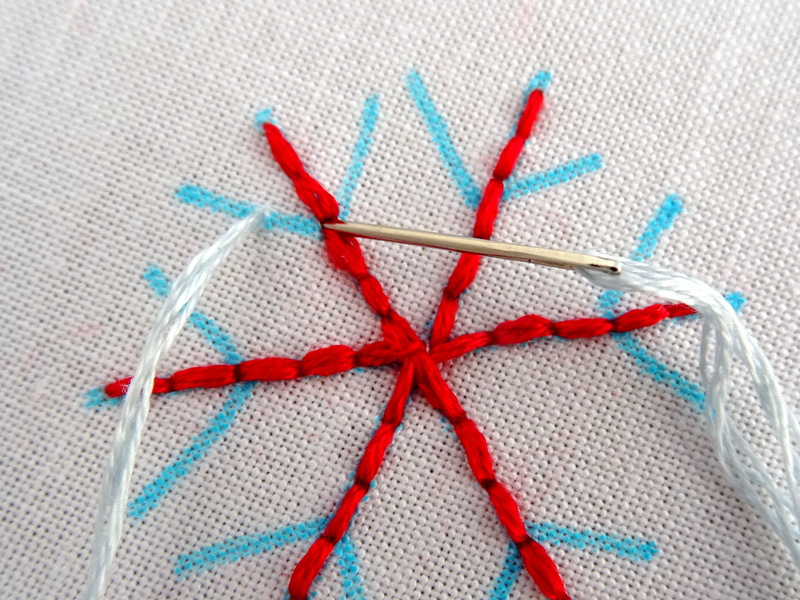
Let’s start with the most basic snowflake. I designed this one to be simple and easily stitchable in even the smallest size. The only stitch required is back stitch. If you are not familiar with this stitch, or you need a refresher, be sure to visit my Basic Embroidery Stitches tutorial.  For this snowflake, I’ve chosen to use two contrasting colors of embroidery floss. The bright red (DMC 321) will create the long lines while the pale blue (DMC 775) is used for the short, diagonal lines.

Simple Snowflake Embroidery Pattern
Thread your needle with floss. For this size snowflake, I’m using 4 strands of DMC floss. Using back stitch, make a single stitch along the first line. Continue stitching until you reach the end of the line.

Simple Snowflake Embroidery Pattern
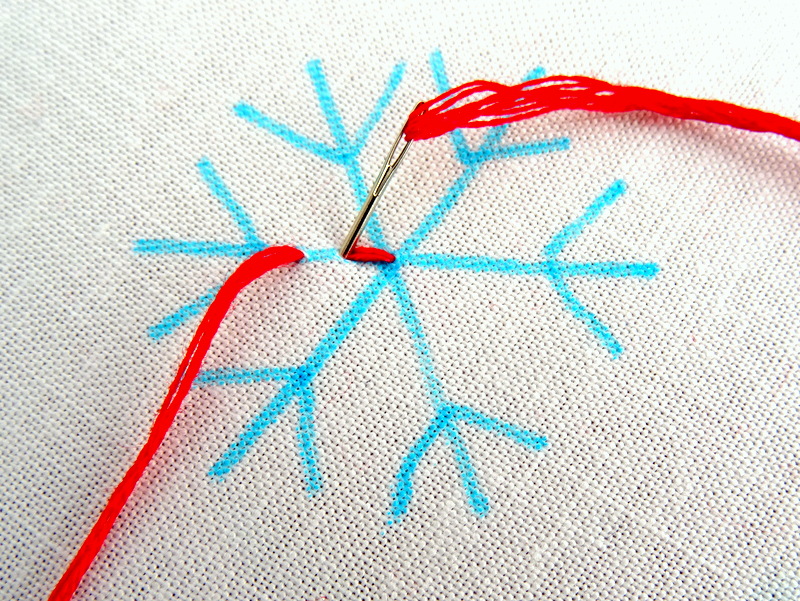
For this size snowflake, I am using five stitches on each line – three below the slanted V and two above. Depending on the size snowflake you are stitching you might want to adjust the stitch count and length. This is also where the mini ruler comes in. If you’re a stickler for details and want to be sure each stitch is even, measure and mark the fabric ahead of time. Or, if you’re like me and don’t mind a few imperfections, go ahead and eyeball it.

Simple Snowflake Embroidery Pattern
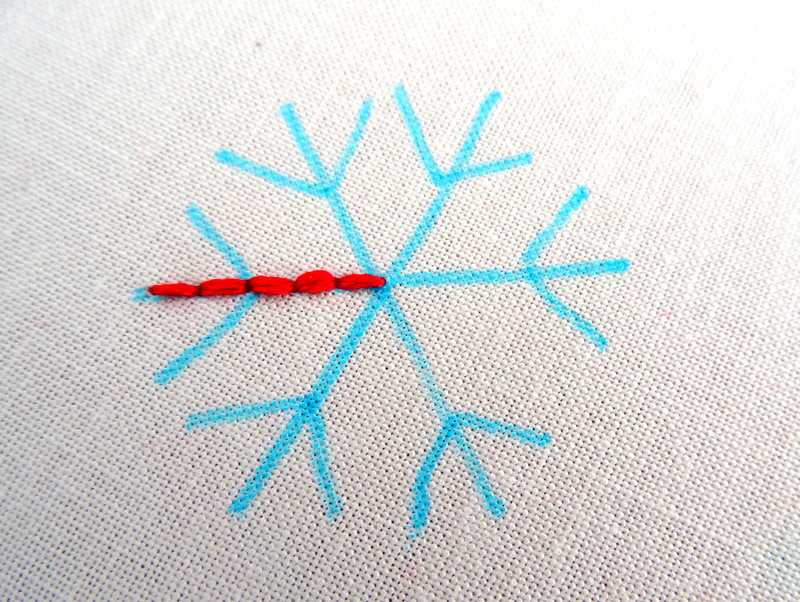
Once you’ve completed the first line, flip the fabric over and weave your thread down to the middle of the snowflake. Come back up on the next line and stitch to the end. Continue this process until all the long lines are filled in.

Simple Snowflake Embroidery Pattern
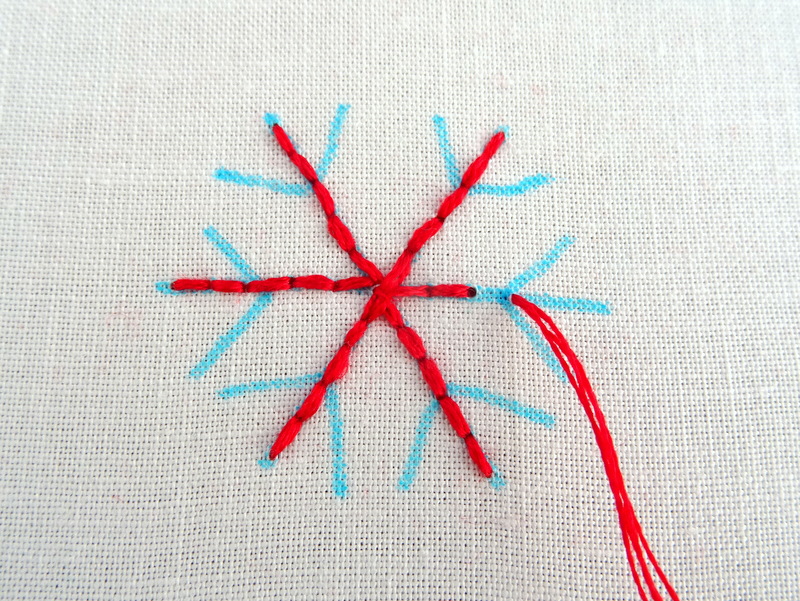
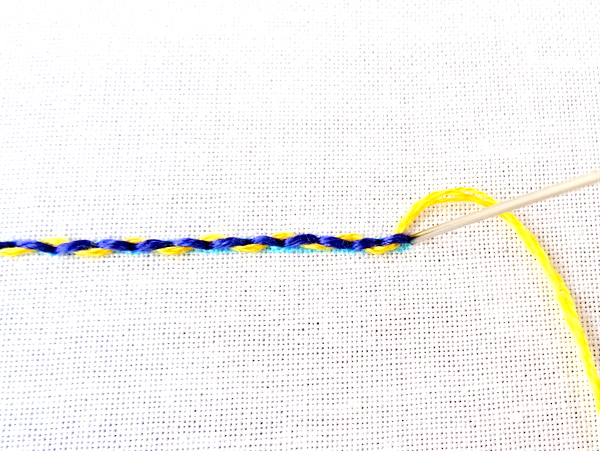
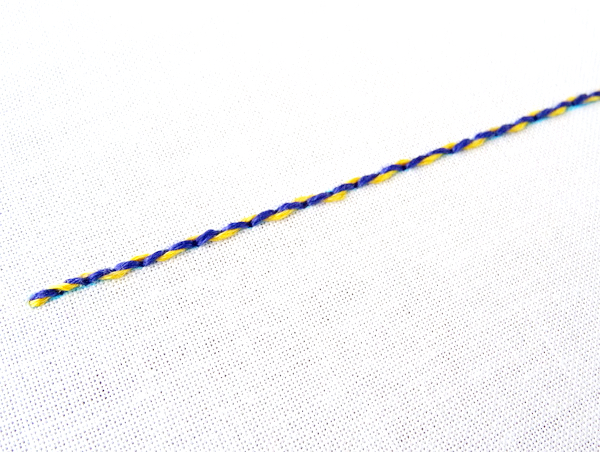
If you are using a second color, end the first floss on the back and re-thread the needle. I am using four strands of DMC floss in pale blue (DMC 775). Start in the middle of one of the short diagonal lines and fill in with two stitches on each line. End the first stitch in the middle of the third and fourth stitch of the long line. Again, depending on the size of your snowflakes you might need to adjust the stitch count and size.

Simple Snowflake Embroidery Pattern
Move over to the adjacent diagonal line and repeat.

Simple Snowflake Embroidery Pattern
Continue around the snowflake until all the lines are stitched and you have a beautiful snowflake!

Simple Snowflake Embroidery Pattern

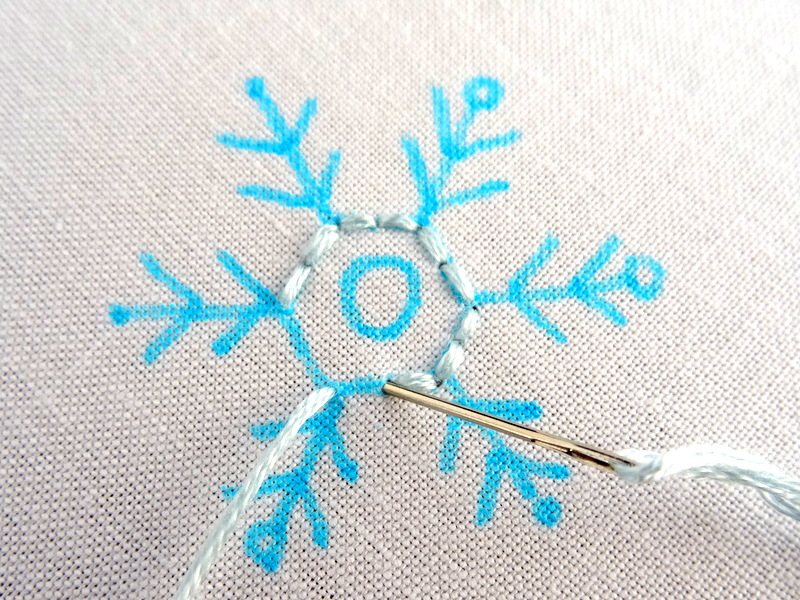
Snowflake Embroidery Pattern #2

Simple Snowflake Embroidery Pattern

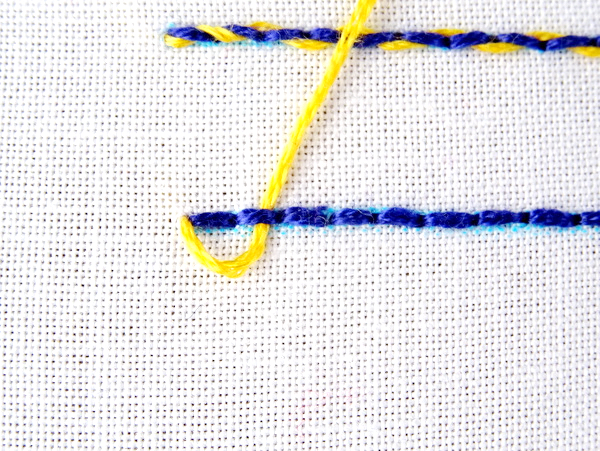
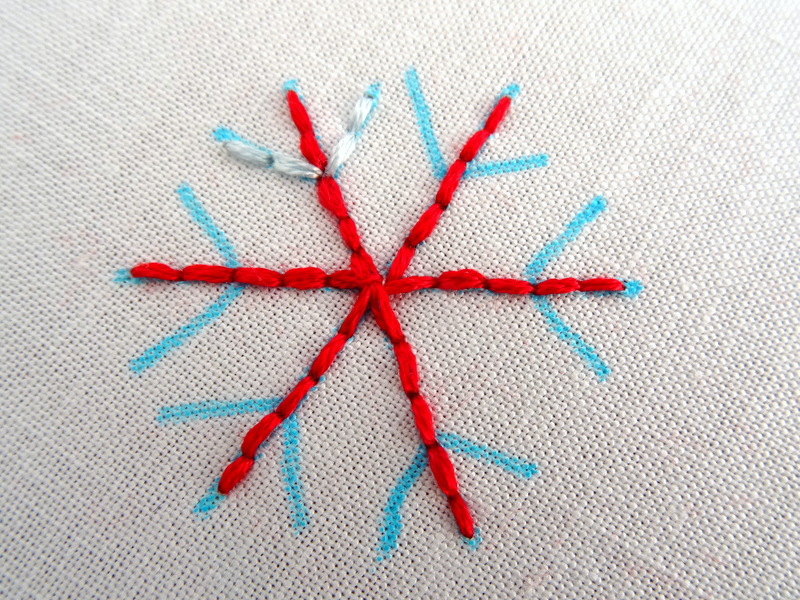
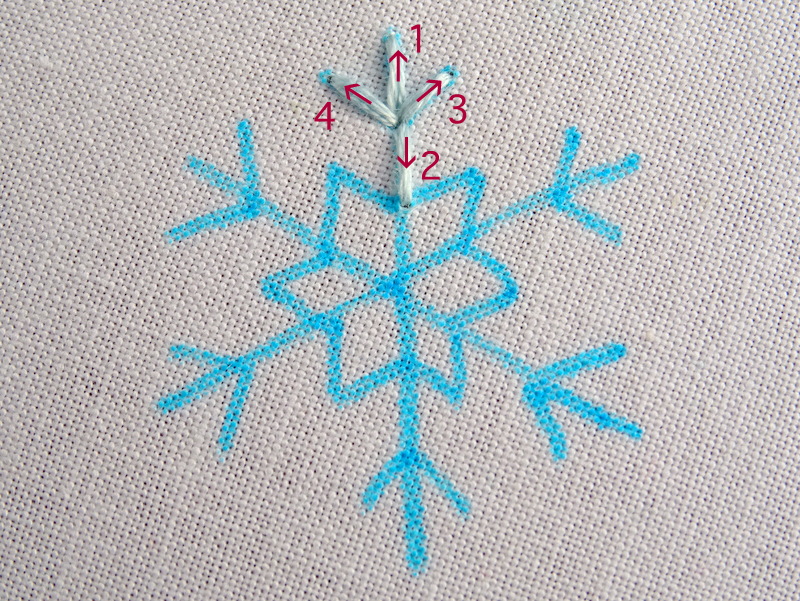
Now that we’ve learned the basics, let’s move on to the second snowflake pattern. For this one, I am using four strands of a single color floss (DMC 775). Feel free to add more colors to your liking. Once again, the only stitch required is back stitch. Begin by making a single back stitch at the end of one of the long lines. Start the stitch at the intersection of the two short diagonal lines and end it at the top of the long line.

Simple Snowflake Embroidery Pattern
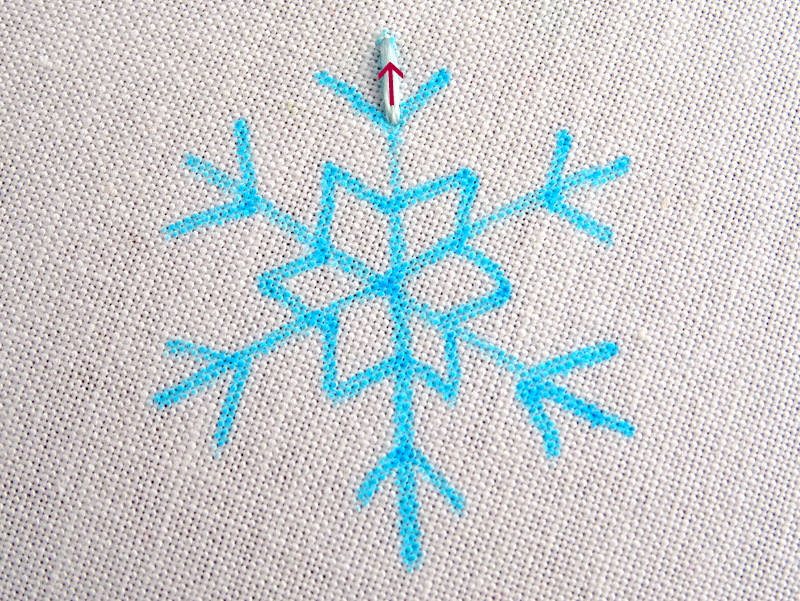
Make three more stitches to complete the section. Start in the middle and stitch outward.

Simple Snowflake Embroidery Pattern
Flip your work over, weave the floss through until it reaches the bottom of the #2 stitch. Take the floss back up through the fabric at the middle point to the right. Make a single back stitch.

Simple Snowflake Embroidery Pattern
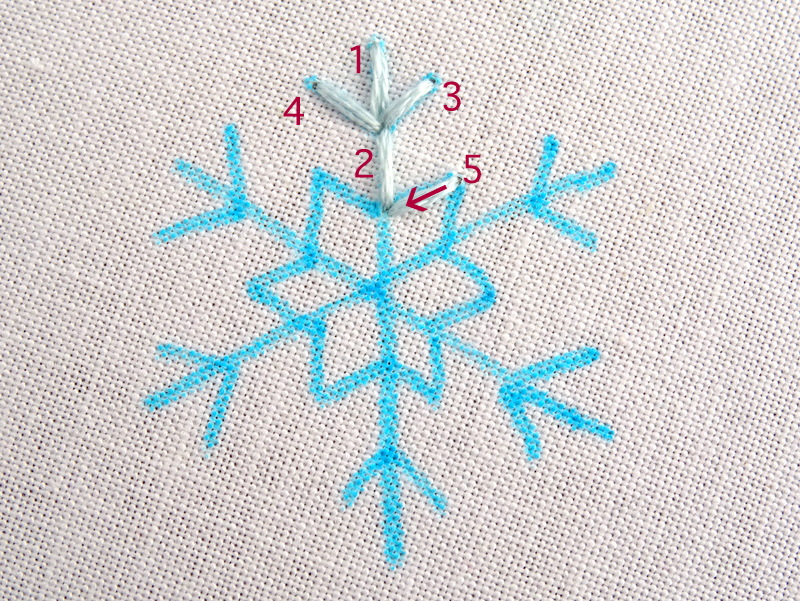
Now, simply continue around the snowflake in the same fashion making sure that each stitch begins where the last one ends.

Simple Snowflake Embroidery Pattern
Finish off the snowflake by filling in the center spokes with single back stitches.

Simple Snowflake Embroidery Pattern
Tada! Look at that beauty!

Simple Snowflake Embroidery Pattern

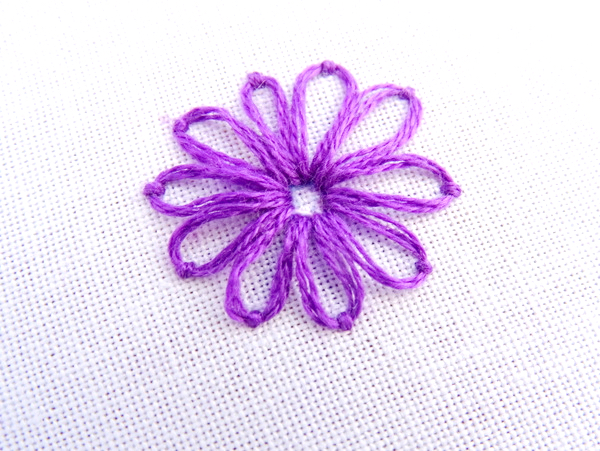
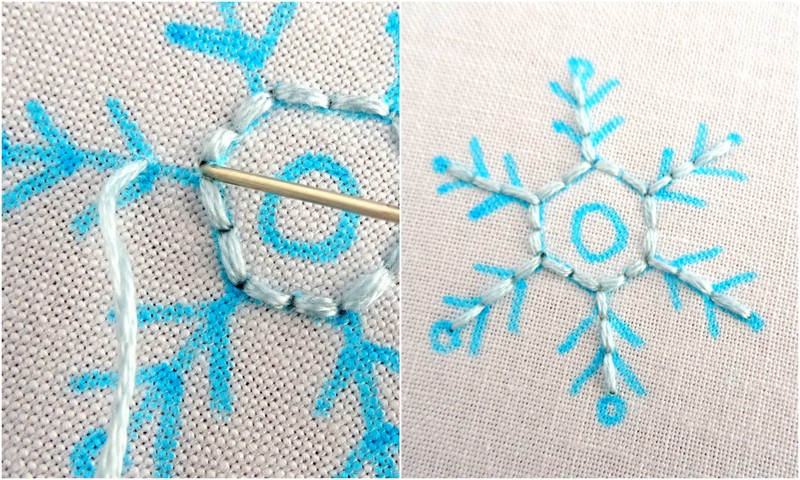
Snowflake Embroidery Pattern #3

Simple Snowflake Embroidery Pattern

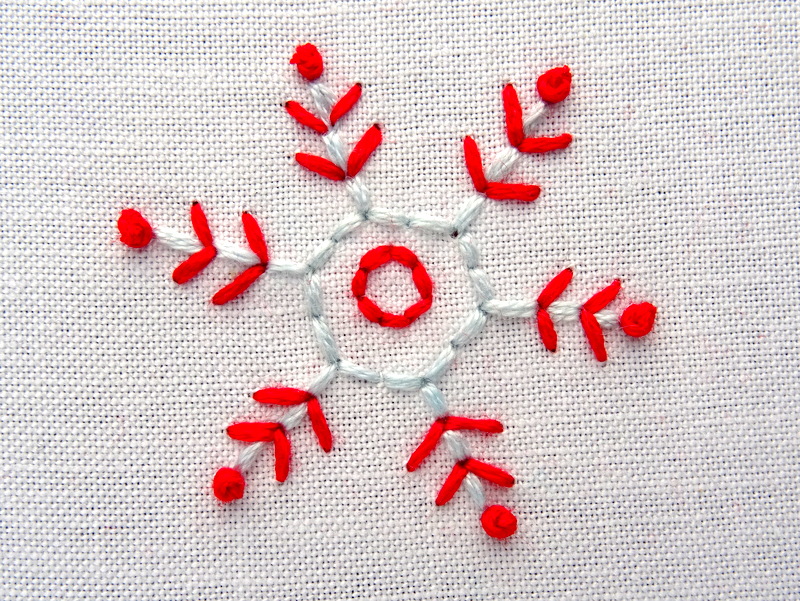
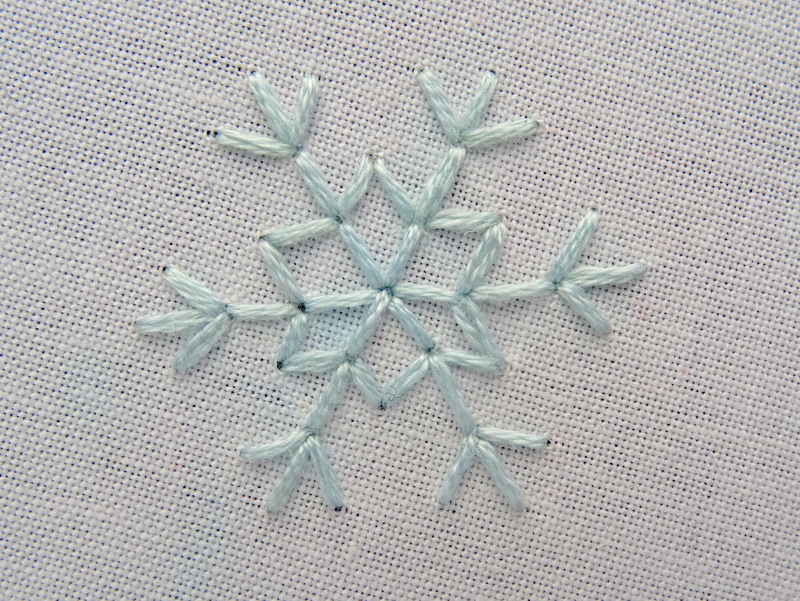
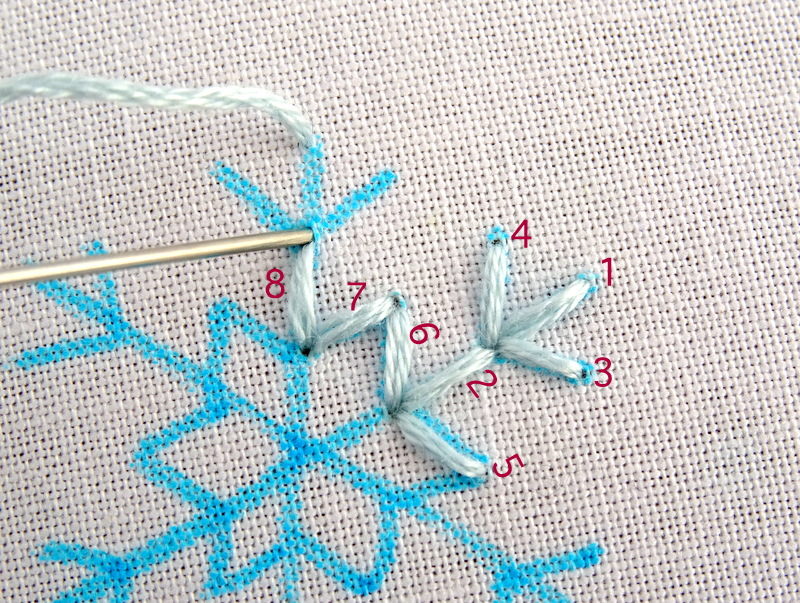
The third and final snowflake embroidery pattern is the most detailed. While it looks complicated it’s actually quite easy and only requires one additional stitch along with back stitch. For this snowflake, I’ve used 4 strands each of light blue (DMC 775) and bright red (DMC 321). Feel free to use a single color or go wild and choose three or four!

Starting with the light blue floss, back stitch around the inner hexagon shape. For this size snowflake, I’m using two stitches per side. Adjust as necessary according to the size of your snowflake.

Simple Snowflake Embroidery Pattern
After completing the middle, back stitch up each long line. Remember to weave the floss through the back before starting each line. This is especially important if you are stitching with a dark floss on a light fabric.

Simple Snowflake Embroidery Pattern
If you are using a second color floss, end the first color on the back and thread the needle with the new color. Starting at the bottom of a long line, work your way back and forth on the diagonal lines with single back stitches.

Simple Snowflake Embroidery Pattern
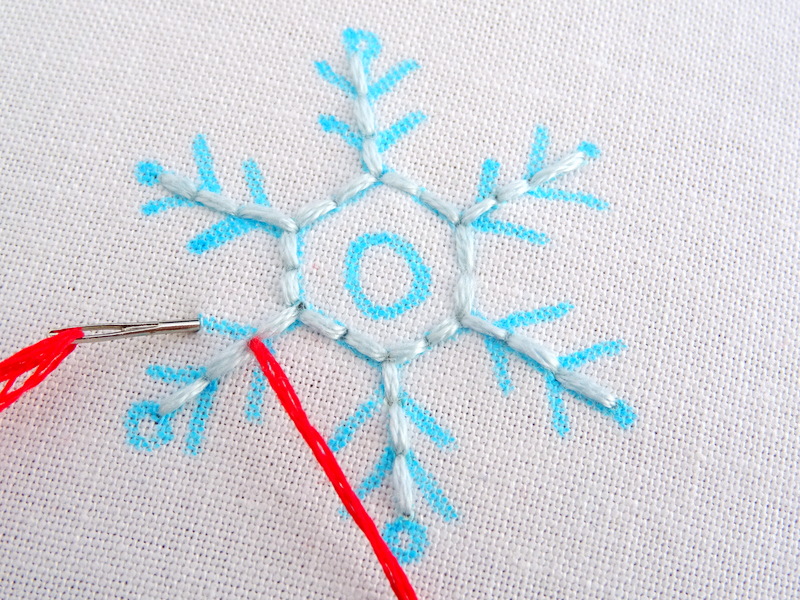
At the top of the line make a single french knot. Bring the needle to the front of the fabric and wrap the thread once or twice around the needle. Holding the thread with one hand, push the needle back through the fabric directly next to the where you came out. Gently pull the needle through to form a complete knot. For more detailed instructions, take a look at my French Knot Embroidery Tutorial.

https://www.wanderingthreadsembroidery.com/french-knot-embroidery-tutorial/

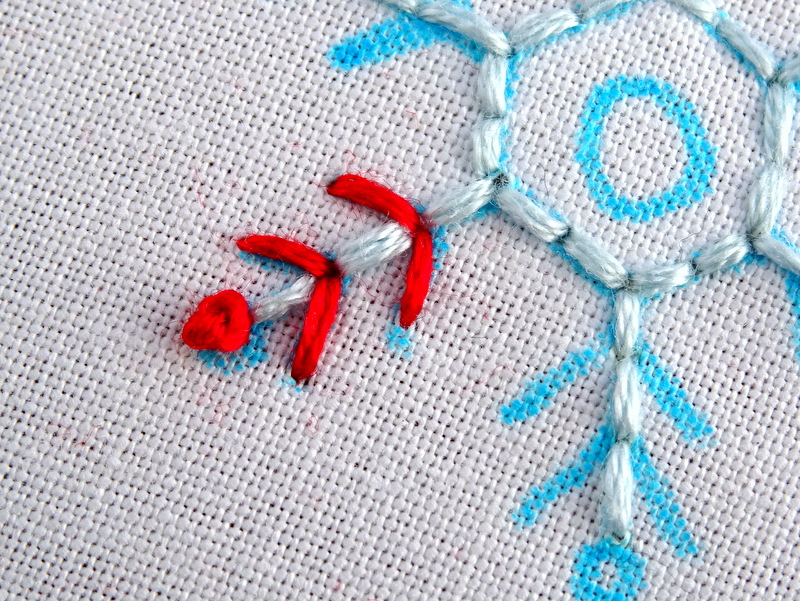
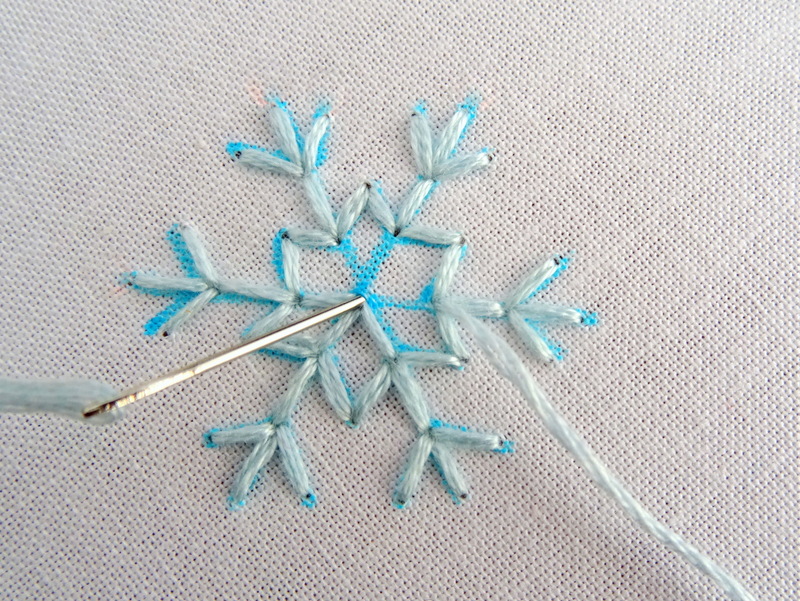
Work all the way around the snowflake, filling in the short diagonal lines with back stitch and adding a small french knot to the end of each long line.

Simple Snowflake Embroidery Pattern

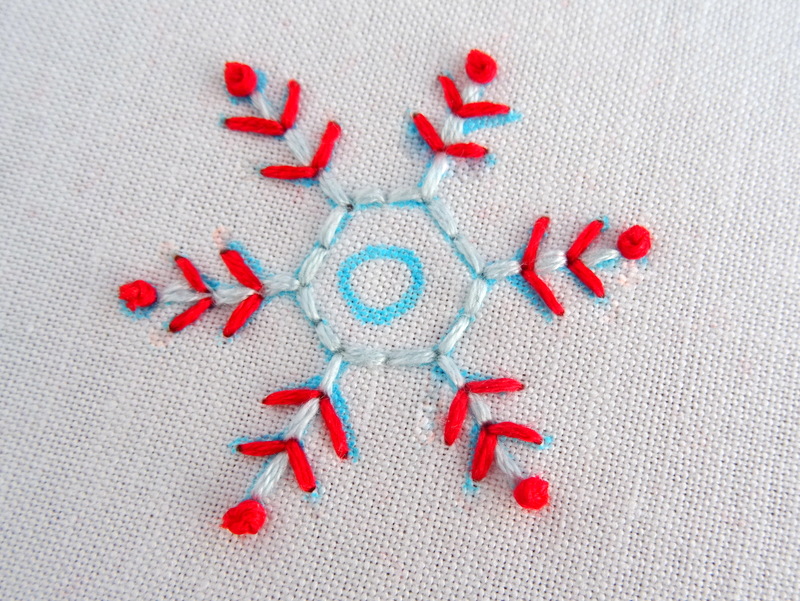
Finally, stitch the inner circle. You could fill it in with a cluster of french knots, or follow my lead and simply stitch around the edge with back stitch.

Simple Snowflake Embroidery Pattern

Put Your Snowflake Embroidery Skills to Use!

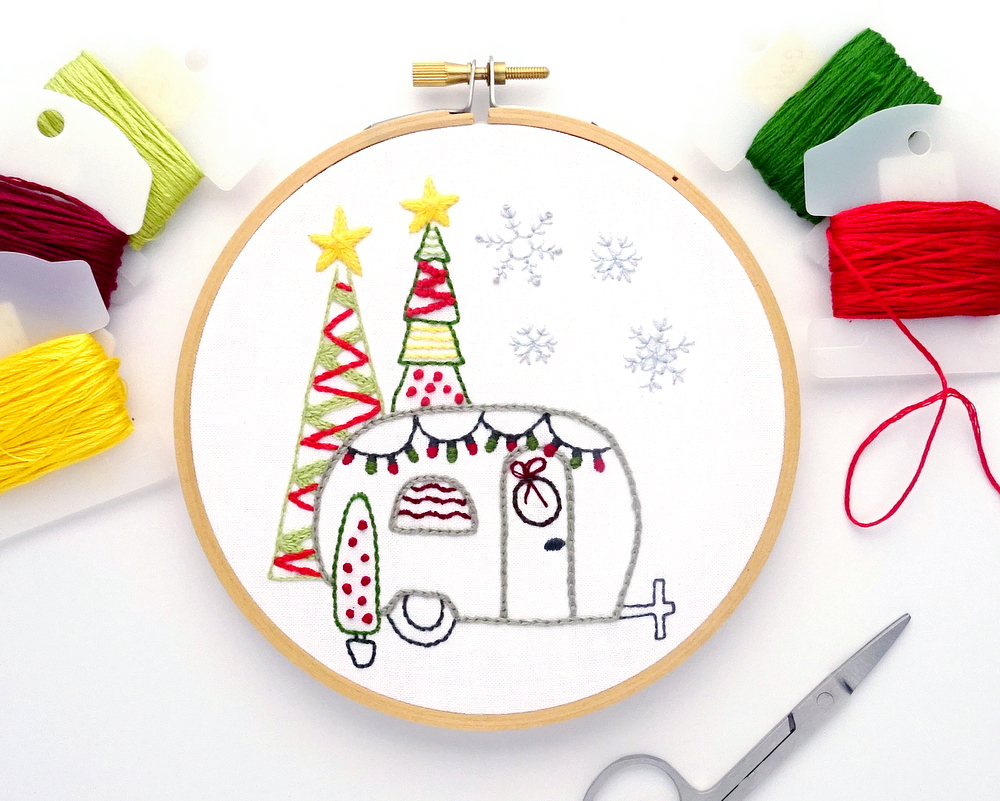
If you’re looking for a project to put your new snowflake embroidery skills to good use, look no farther than my Vintage Trailer Happy Holidays Pattern. This PDF pattern features a vintage trailer all decked out for the holidays. With bright lights, colorful trees and snowflakes falling all around, it’s sure to put you in a festive mood. Visit the Vintage Trailer Happy Holiday listing in my shop to purchase the pattern.

Vintage Trailer Holiday Hand Embroidery Pattern

Whipped and Woven Embroidery Stitches Tutorial

Whipped and woven embroidery stitches are a simple way to add embellishment to any embroidery piece. Frequently stitched with contrasting threads, these fun and colorful stitches are used for borders, lines, lettering, and so much more. Best of all, once you learn the basics, whipped and woven embroidery stitches are fast and easy to master.

Whipped and Woven Embroidery Stitches Tutorial

In this lesson, we will cover a few different versions of whipped and woven stitches featuring three basic line stitches. If you need a refresher on embroidery line stitches, visit our Basic Embroidery Stitches: 4 Line Stitches tutorial.

Whipped and Woven Embroidery Stitches: Back Stitch

Let’s start with a Whipped Back Stitch. Begin by stitching a straight line with back stitch. Thread a needle with a contrasting color and come up at the start of the line.

Whipped and Woven Embroidery Stitches Tutorial
Bring the needle through the next stitch without going through the fabric.

Whipped and Woven Embroidery Stitches Tutorial
Pull the thread all the way through and continue in this manner, whipping the thread in and out of the back stitch, pulling tight each time.

Whipped and WoEmbroidery Stitches Tutorial
At the end of the line, bring the thread back down through the same hole of the last back stitch and end the thread on the back of the fabric.

Whipped and Woven Embroidery Stitches Tutorial
Congratulations, you just stitched your first whipped back stitch!

Whipped and Woven Embroidery Stitches Tutorial
Next, let’s move on to a Woven Back Stitch. Once again, create a straight line of back stitch and then come up at the beginning with a contrasting color thread. This time, skip a stitch and bring the thread through the second stitch. Be sure to only pass through the thread and not the fabric.

Whipped and Woven Embroidery Stitches Tutorial
Instead of pulling the thread tight like we did for a whipped stitch, only pull it part way through to create a small loop. Continue weaving the thread up and down through every other back stitch, trying the keep the loops as even an as possible. By experimenting with the size of the loops you can create a variety of results.

Whipped and Woven Embroidery Stitches Tutorial

Whipped and Woven Embroidery Stitches: Running Stitch

Now let’s try the same method using a running stitch. Make a straight line of running stitch and bring a needle with contrasting thread up at the beginning. Remember, if you need a refresher for Running Stitch, visit our Basic Embroidery Stitches: 4 Basic Line Stitches tutorial.

Whipped and Woven Embroidery Stitches Tutorial
Following the same method used for whipped back stitch, bring the thread up through the first stitch and pull tight. Continue down the line, whipping through the running stitch and pulling the thread tight each time.

Whipped and Woven Embroidery Stitches Tutorial
Because of the extra spaces in running stitch, the end result will be quite a bit different than a whipped back stitch.

Whipped and Woven Embroidery Stitches Tutorial
Finally, let’s combine the whipped and woven methods to create a Whipped & Woven Running Stitch. Don’t worry, it only sounds complicated! Start by stitching a line of woven running stitch with two contrasting colors. Next, thread a needle with a third color and bring it up at the beginning of the line. Weave the third color thread through every other whipped sitch without pulling the thread tight.

Whipped and Woven Embroidery Stitches Tutorial

Whipped and Woven Embroidery Stitches Tutorial

Whipped and Woven Embroidery Stitches: Variations & Patterns

As you can see, whipped and woven embroidery stitches are not only easy to create but are also fun to stitch due to the number of possible creative variations. From stitch type, thread color and loop size there are many ways to embellish your stitches by whipping and weaving. Pictured below is the letter M filled in with woven back stitch. This lesson can be found in the How to Embroidery Large Letters by Hand {Part 2} project.

How to Embroider Large Letters
While this tutorial focuses only on back and running stitch, many embroidery stitches can be whipped or woven. Stem, split and chain are all perfect candidates, with tons of options for making the stitch your own. Several Wandering Threads Embroidery patterns recommend whipped and woven stitches to create a variety of effects. The most common is for the rays of the sun, as seen in the Florida, Iowa, Michigan, New Jersey, and North Dakota State Patterns.

Whipped and Woven Embroidery Stitches Tutorial

Whipped and Woven Embroidery stitches are a fun and easy way to add embellishment to any embroidery project! Happy Stitching!

How To Embroider Large Letters By Hand {Part 2}

Learning how to embroider letters is both a fun and useful skill. From monograms to labels to quotes, there are endless ways embroidery letters can add that little something special to all your projects. In How To Embroider Letter By Hand {Part 1} we learned four simple stitches for embroidery letters. We also discussed font choice and the importance of stitch length and direction.

In part two, we take those basic skills to the next level by learning how to embroider large letters. These are the type of letters that are wide and thick and need more than a thin outline stitch. In this lesson, we will cover traditional and non-traditional filler stitches in addition to combination stitches for creating fun and unique large embroidered letters.

How to Embroider Large Letters

Free Downloadable Pattern

For this project, I’ve created a free downloadable PDF pattern so you can follow along at home. Download it HERE, or by clicking the link at the end of the post. Included with the PDF are instructions for transferring the pattern to fabric along with a materials list (which can also be found at the bottom of this post).

Once you transfer the pattern to fabric, come back here for stitching instructions.

How to Embroider Large Letters

How To Embroider Large Letters with Satin Stitch

For the first letter, we’re going to use satin stitch. This is a classic filler stitch that creates a smooth, satin-like finish. If you are not familiar with satin stitch, I recommend first reviewing my Satin Stitch Embroidery Tutorial. One of the common complaints about satin stitch is that it’s hard to keep the stitches straight. To avoid this problem, we’re going to make our stitches diagonal. Starting at the top left corner of the H, make a single stitch on the diagonal.

How to Embroider Large Letters


Stitch all the way to the top corner, making sure your stitches are close but not overlapping.

How to Embroider Large Letters


Turn the fabric over and thread the needle through the stitches down to the where you started. From here we’re going to stitch all the way down the letter. When you reach the end of the short section take the thread across to the far side of the H.

How to Embroider Large Letters


After the middle is filled in, shorten the stitch again and continue stitching down the left side of the letter.

How to Embroider Large Letters


When you reach the bottom, once again turn your work over and thread the needle back up to the top of the middle section of the H. From here, continue stitching upward until you reach the top of the letter.

How to Embroider Large Letters


The final step is to fill in the bottom of the right side leg. You now have a beautiful satin stitch letter!

How to Embroider Large Letters

How To Embroider Large Letters With Stem Stitch and French Knots

For the next letter, we’re going to combine two stitches. Stem stitch will outline the letter while French Knots act as a filler stitch. Once again, if you are not familiar with these stitches be sure to review their corresponding tutorials.

» Stem Stitch Tutorial
» French Knot Tutorial

Start by outlining the inner and outer areas of the letter O with stem stitch.

How to Embroider Large Letters


Next, use french knots to fill in the letter. After some experimentation, I decided on two evenly spaced rows of knots. You might only want one, or you might choose to the place the knots close together and fill in the letter completely. Either way, the combination of stem stitch and french knots is an easy way to fill in any letter.

How to Embroider Large Letters

How to Embroider Large Letters with Chain Stitch and Whipped Back Stitch

For the third letter, we’ll use a different combination of stitches. This time the letter M is outlined with chain stitch and the inside is filled with whipped back stitch. You can learn more about both of these stitches by taking a look at their tutorials.

» Chain Stitch Tutorial
» Back Stitch Tutorial

Begin by outlining the letter M with chain stitch and stitching the inner line with back stitch. Next, using a different color thread, weave through the back stitch without pulling the thread tight.

How to Embroider Large Letters


The end result is a wavy line that serves as a filler stitch and contrasts nicely with the sharp lines of the letter M.

How to Embroider Large Letters

How to Embroider Large Letters with Split Stitch and Lazy Daisy Embellishments

I think this last letter might be my favorite. Once again, we’re using a combination of two stitches to create a simple outline with some fun embellishments. Start by outlining the E with split stitch. Next, add a row of lazy daisy stitches up the straight side of the E. Finally, using a contrasting color thread, stitch a trio of lazy daisies into the top and bottom corners of the letter.

» Split Stitch Tutorial
» Lazy Daisy Tutorial

How to Embroider Large Letters


That’s it! Four letters, seven stitches, and one fun and easy large lettering project.

How to Embroider Large Letters

Free Downloadable Pattern

Use this link to download the free HOME Large Lettering PDF:
How to Embroider Large Letters

Materials List:

  • 9 x 9-inch Fabric Square:
    Choose a fabric with a medium weave such as cotton, muslin, or flour sack.
  • Embroidery Hoop:
 Size 8
  • Embroidery Needle: Size 7 or 9
  • Water Soluble Pen or other items for pattern transfer. (See Transfer Instructions on the PDF)
  • Small Scissors
  • DMC Embroidery Floss #: 3809, 928, 930, 927, 445

Color & Stitch Guide

The thread colors and stitches for each letter are as follows:
H – DMC thread 3809 / Satin Stitch
O – DMC thread 928 / Stem Stitch & French Knot
M – DMC thread 930 (outer) & 3809 (inner) / Chain & Whipped Back Stitch
E – DMC thread 927 (outer) & 445 (inner corners) / Split & Lazy Daisy Stitch

More Embroidery Letters: The Nature Alphabet Pattern!

Nature Alphabet Hand Embroidery Pattern

If you love stitching letters, the Nature Alphabet Pattern is for you! Featuring a set of embroidered letters adorned with leaves, this simple pattern uses only three different stitches and is suitable for all skill levels.

Stitch the full alphabet as a sampler, use the individual letters for monograms, or combine the letters to make words of your own. Visit the Nature Alphabet listing in my Pattern Shop for more details about this PDF pattern or to purchase.

Happy Stitching!

Lazy Daisy Embroidery Stitch Tutorial

The name says it all. Lazy Daisy is arguably the simplest stitch for creating embroidered flowers. It can also be called the Detached Chain Stitch, but let’s face it, that name is not nearly as fun! Lazy Daisy stitch is nothing more than a simple loop arranged in groups to create flowers, combined in a line to make Chain Stitch, or worked individually to create leaves. There are also a number of variations for taking this simple stitch to the next level.

Lazy Daisy Embroidery Stitch Tutorial

Let’s start this lesson by making a simple flower.  You can draw the whole thing, or just a small center circle and work from there. Bring the needle and thread to the front at the edge of the center circle.

Lazy Daisy Embroidery Stitch Tutorial

Put the needle back in right next to where you came out. Without pulling it all the way through, weave it up and out of the fabric a small distance away. This will be your stitch, or petal, length.

Lazy Daisy Embroidery Stitch Tutorial

Now, take the thread and wrap it around the needle. If you’ve already learned Chain Stitch, this method will be familiar.
Lazy Daisy Embroidery Stitch Tutorial
Pull the thread all the way through to create a loop. The tighter you pull, the narrower the loop will be.

Lazy Daisy Embroidery Stitch Tutorial
Anchor the loop by bringing the thread back down just on the other side of the loop.

Lazy Daisy Embroidery Stitch Tutorial
Continue working around the edge of the loop until you have a complete flower.

Lazy Daisy Embroidery Stitch Tutorial

Lazy Daisy Stitch Variations

There are a number of variations on the basic Lazy Daisy stitch. For starters, you can make long thin petals with long stitches pulled tight. Or short rounded petals with short stitches left loose.

Lazy Daisy Embroidery Stitch Tutorial
Lazy daisy can also be made with two thread colors. I find the simplest way to achieve this look is by adding a second thread color over the original anchor stitch. In this example, I also used the contrasting color to fill in the middle with French Knots.

Lazy Daisy Embroidery Stitch Tutorial
How about a spider web lazy daisy? Simply follow the directions for Spider Web Stitch using a lazy daisy as the base.

Lazy Daisy Embroidery Stitch Tutorial
Finally, lazy daisy stitch is not limited to only flowers. You can place the loops in a line to make leaves, in a circle to make a border, or even by themselves to create interesting embellishments.

Lazy Daisy Embroidery Stitch Tutorial

Lazy Daisy Stitch Patterns

Lazy Daisy stitch can be found in many of the Wandering Thread Embroidery Patterns. 

Clockwise from top left: Alaska Flower Pattern, Hot Springs National Park Pattern, Wildflower Meadow Pattern, May Wreath Pattern

Lazy Daisy Stitch Flower

Happy Stitching!

1 6 7 8 9 10 11 12