FREE Embroidery Pattern: Botanical Ferns

This free embroidery pattern is perfect for practicing some of the more advanced hand embroidery stitches. Sharpen your skills while creating a botanical masterpiece. Frame this piece in the hoop, in a wooden frame, or turn it into a pillow, tea towel, market bag, or anything else you desire!

FREE Embroidery Pattern: Botanical Ferns

Three Stitches, Three Colors

This simple pattern uses only three stitches and three colors of embroidery floss.

Fern #1: Satin Stitch & DMC floss 3348
Fern #2: Fern Stitch & DMC floss 987
Fern #3: Fishbone Stitch & DMC floss 3363
You can find the full line of embroidery stitch tutorials in my library of step-by-step embroidery tutorials.

Botanical Ferns Embroidery Pattern Download

The free embroidery pattern is available to download as a PDF by clicking HERE, or on the title above. The PDF includes:

  • Full-color photo of the finished embroidery piece
  • One pattern sized to fit a 7 or 8″ hoop
  • Reverse image of the pattern for iron-on transfer
  • Printable stitch and color guide to provide guidance or inspiration
  • Material list
  • Instructions for transferring the pattern using three simple methods

Happy Stitching!

Fern Stitch Embroidery Tutorial + Free Pattern

Fern Stitch is a simple, delicate stitch that is easy to learn and quick to execute. It combines three small stitches worked in a group along a vertical or curved line to create an open lacy pattern. Fern stitch is perfect for creating leaves, branches, floral sprays, and all kinds of foliage. It can also be stitched in multiple rows to create a geometric pattern. Fern stitch is useful for all types of embroidery projects and is a snap to learn!

fern-stitch-embroidery-tutorial

Straight Line Fern Stitch

Begin by drawing three parallel lines on your fabric roughly a half-inch apart. Bring the needle up at the top of the middle line (point A) and back down one stitch length below (point B). Instead of pulling the thread all the way through, set up the next stitch by angling the needle in a diagonal fashion and bringing it out at the top of the far-right line (point C).

fern-stitch-embroidery-tutorial
Pull the thread through and then take the needle back down in the same hole where you ended the first stitch (point B). Create the final stitch in the grouping by angling the needle and bringing it out at the top of the left line (point D).

fern-stitch-embroidery-tutorial

Pull the thread through and you have just created your first grouping of fern stitch.

fern-stitch-embroidery-tutorial
Start the next stitch by coming back up in the middle (Point B), down one stitch length below (Point E), and angling the needle up to Point F.

fern-stitch-embroidery-tutorial

Continue making this three-stitch grouping with one straight middle stitch and two diagonal side stitches until you reach the end of the line.

fern-stitch-embroidery-tutorial

Fern Stitch Tips & Variations

Once you learn the basic steps of fern stitch, the variations and possibilities are endless! For a more organic and natural look, try stitching without the outer guidelines and varying the diagonal stitch lengths and angles. Create realistic foliage and underwater seaweed by branching several lines off each other. Add small french knots on the end and you have a simple floral spray.

Fern stitch also looks beautiful worked along a curved line or made into a circular shape. You can even outline your fern stitch shapes with backstitch to create unique geometric filled shapes. One of my favorite way to embroider leaves is with a single row of fern stitch outlined with small back stitches.

fern-stitch-embroidery-tutorial

Free Fern Pattern!

Do you know what else fern stitch is good for? Making ferns! Fill in the branches of this simple fern pattern with varying lengths of fern stitch to create a and whimsical embroidered fern. Click HERE to view and download the free pattern.

Fern Tutorial Free Pattern
Start by stitching the center of the fern with stem stitch.

fern-stitch-embroidery-tutorial

Next, fill in the branches with fern stitch. Starting at the far end of each branch, create a grouping of small stitches. Continue down the branch, increasing the size of the stitches as you go. Don’t worry about making the stitches uniform in shape or perfectly tapering them along the branch. Your fern will be more realistic if the stitches are imperfect, just like a fern frond found in nature.

fern-stitch-embroidery-tutorial

Fern Stitch Patterns

Want to put your stitching skills to use? Check out the Tropical Leaves Houseplant Pattern where fern stitch plays the star in creating a delicate hanging plant.

Tropical Leaves Hand Embroidery Pattern

The Wildflower Bouquet Pattern featuring a spray of fern stitch foliage.

Wildflower Bouquet Hand Embroidery Pattern

Or, the Christmas Wreath Pattern which uses fern stitch to create bold leaves inside the holly wreath.

Christmas Wreath Hand Embroidery Pattern

Happy Stitching!

How to Transfer Embroidery: 3 Simple Methods

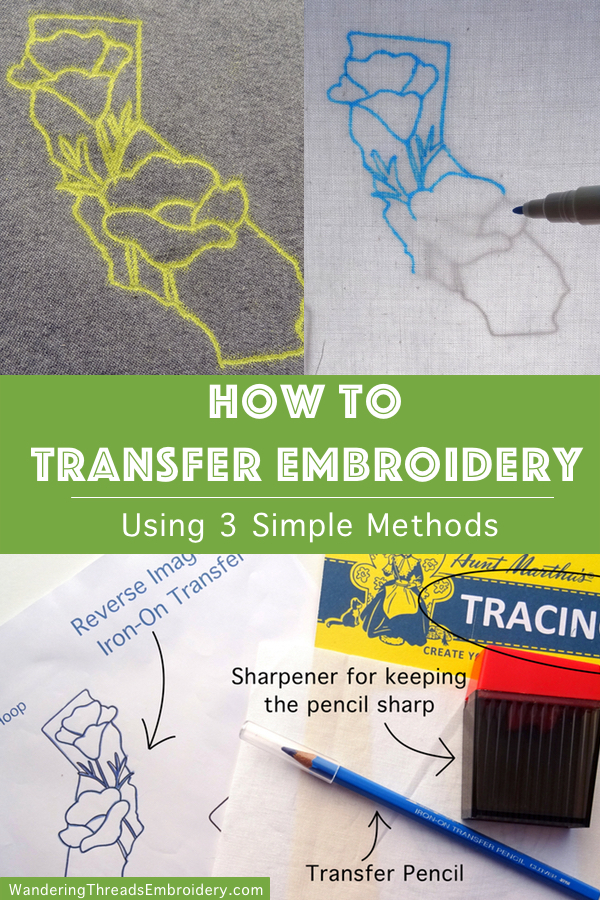
I don’t know about you, but the first time I bought a digital embroidery pattern and tried to transfer it to my fabric I was stumped! How was I supposed to get the pretty pattern from my screen to a piece of fabric? Luckily I figured out pretty fast that learning how to transfer embroidery is actually really easy. Follow along as we learn three simple methods for transferring embroidery from screen to paper to fabric.

How to Transfer Embroidery

Trace It!

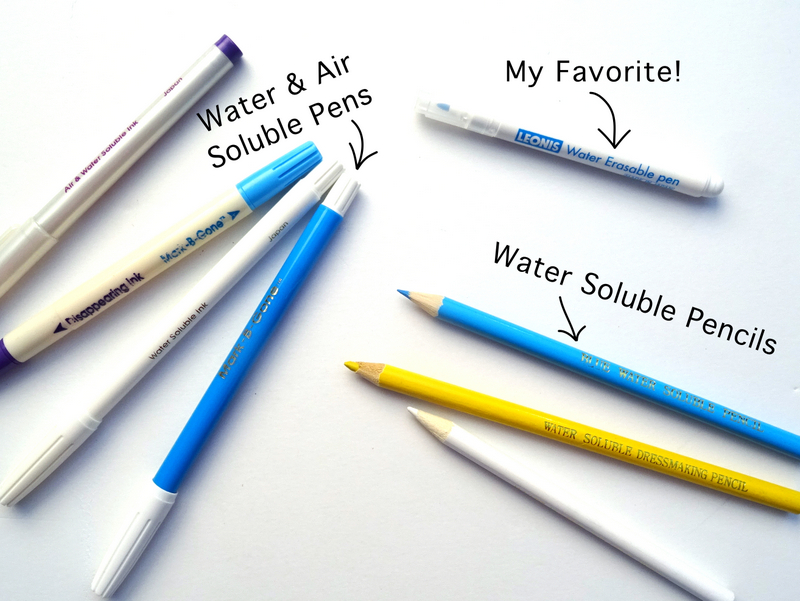
This method uses a water-erasable pen or pencil along with a bright window or light box to trace the pattern from paper to fabric. I have tried a LOT of different transfer pen and pencils with varying results. In general, I prefer a pen over a pencil. The pen allows for thinner lines that work well for patterns with fine details. I have also learned to avoid the air-erasable pens because the lines disappear way faster than I can possibly embroider!

My all-time favorite water-erasable pen is the Leonis Water Erasable Marking Pen. The tip stays sharp, the ink lasts for a long time, and it washes out with only a quick rinse of water. You can find these pens in many craft stores or on Amazon where you can get a 10-pack for only $15.

How to Transfer Embroidery

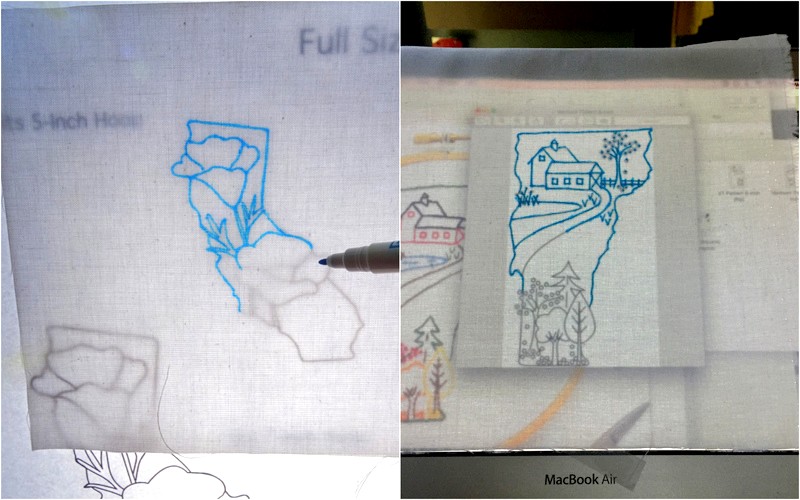
Once you’ve sourced a good tracing pen, print the pattern and place it on a light table or tape it to a bright window. Position the fabric on top and secure it well. Trace the pattern onto the fabric using the transfer pen. *Pro tip: A computer or tablet screen makes a great lightbox! Simply open the embroidery pattern on your computer, tape the fabric over the pattern on the screen, and trace it using the pen. No printer needed!

How to Transfer Embroidery

Iron It!

For this method, you will need an iron-on transfer pen or pencil which can be bought at most fabric/sewing stores. I prefer to use a Clover Iron-On Transfer Pencil. The thing to remember when using the Iron-on method is that the marks will rarely if ever wash out completely. Only after repeated washing and scrubbing have I had any luck removing iron on marks. As a result, this transfer method should be considered permanent and will need to be completely covered by the embroidery.

How to Transfer Embroidery

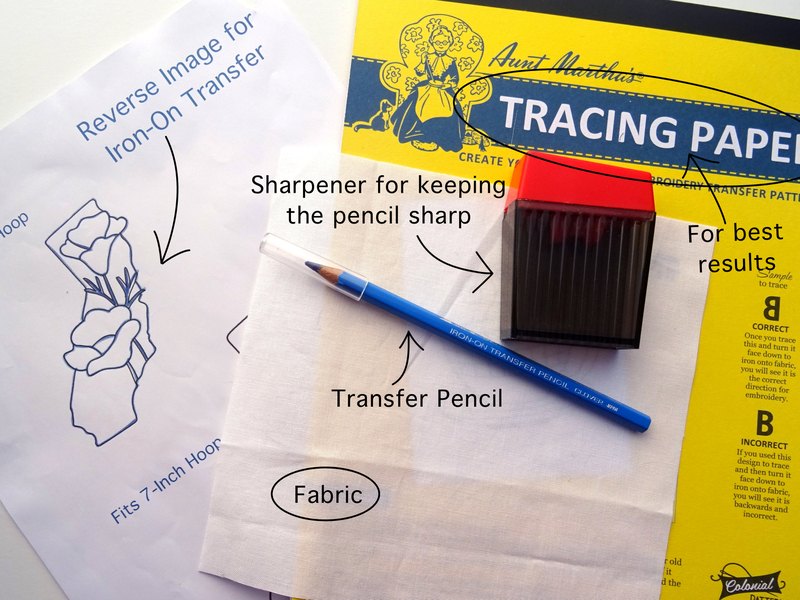
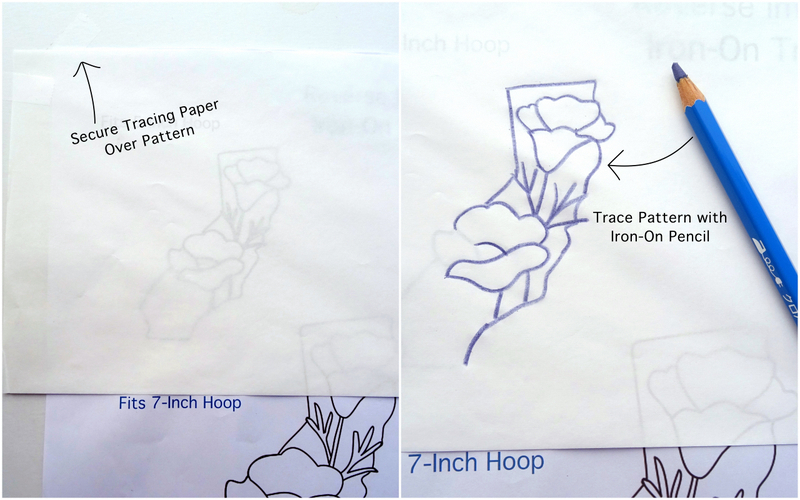
Start by printing the reverse image of the pattern. This is crucial because if you use a regular pattern it will transfer backward onto your fabric. (Reverse patterns for iron-on transfer are included with all the Wandering Threads Patterns). Using the iron-on pen or pencil, you can trace directly over the printed pattern, or cover it with a piece of tracing paper and trace over top. I prefer the tracing paper because I consistently get better results when using it. Be sure to press firmly and use even strokes.

How to Transfer Embroidery

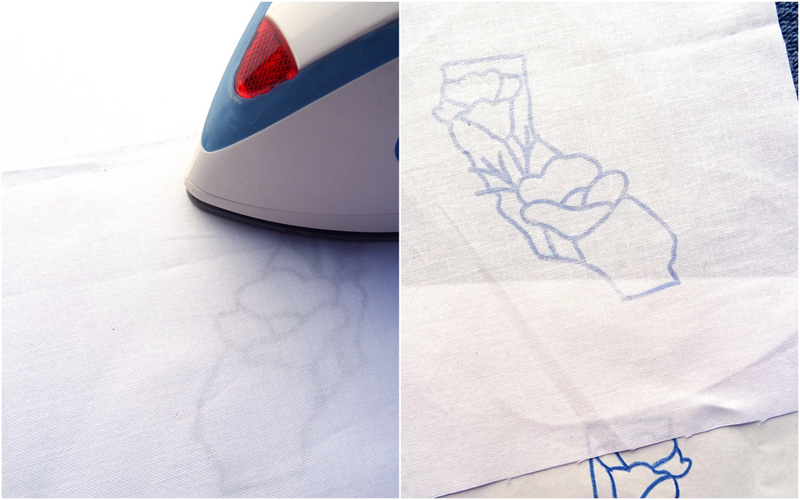
Place the traced pattern onto an iron-safe surface. Put the fabric on top and secure with tape. Press a hot iron on top of the fabric for at least 10 seconds without moving the iron around. Gently lift one edge of the fabric to check that the design has transferred before removing the fabric.

How to Transfer Embroidery

Transfer It!

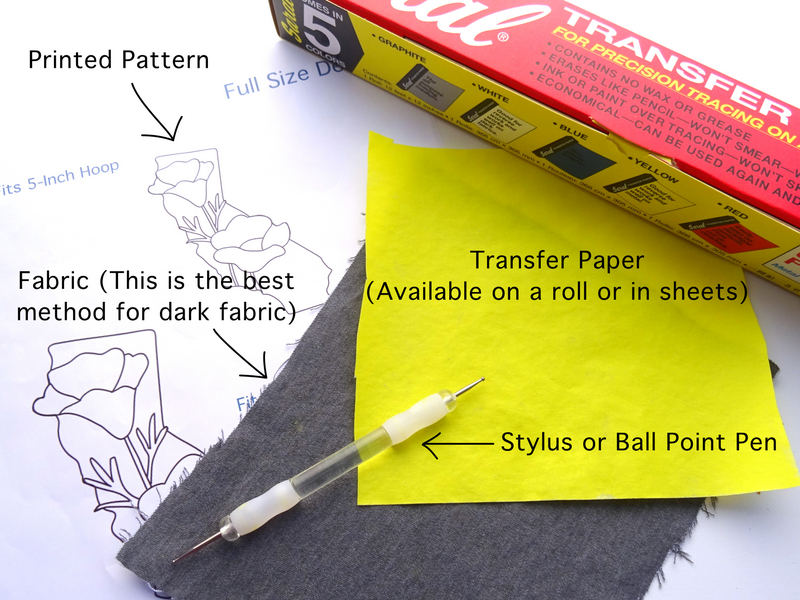
Finally, we have the transfer paper method. In my opinion, this is the very best way to transfer a pattern to dark fabric. You can buy transfer paper at most fabric or craft stores. It is available in different colors and is sometimes called Dressmaker’s Carbon Paper. This special paper is coated on one side with a powdery ink that transfers to the fabric.

It will wash out eventually but takes a little work. For this reason, I only use it on dark fabric as I’ve had a hard time completely removing the marks from white or light colored fabrics. Transfer paper is often sold in a package containing several different colors. The light colors show up really well on dark fabrics. Because I love embroidering on dark fabrics (like these fun embroidery bags) I went ahead and bought a roll of Yellow Saral Transfer Paper. It works great and I like that I can simply cut off a piece the exact size that I need.

How to Transfer Embroidery

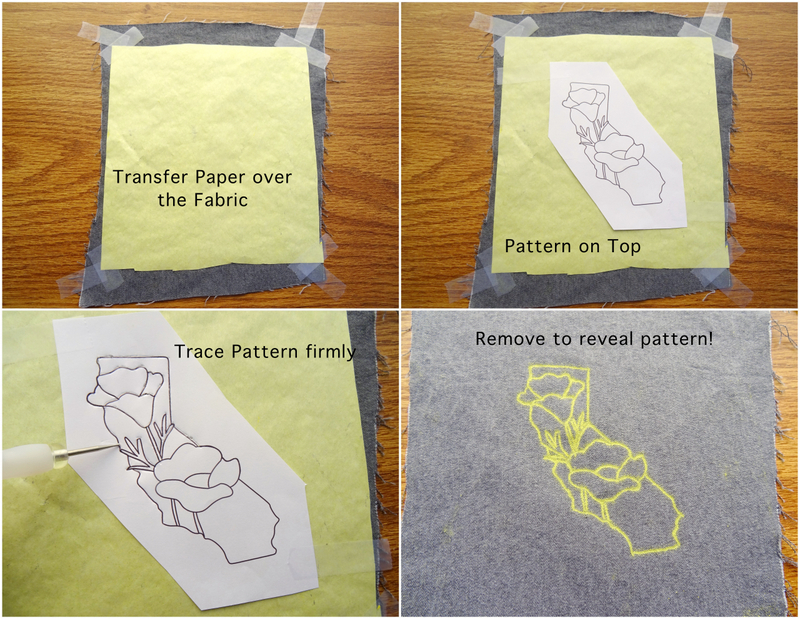
To use, secure your fabric to a flat, hard surface, cover with a piece of transfer paper (powder side down) and place the printed pattern on top. Trace the pattern using a pencil, fine-tipped pen, or stylus. Press very firmly and make sure the paper does not move. Keep in mind that the transfer lines from this paper fade fast. After 24 hours you will only see faint lines. If you are transferring a large pattern, or one that you don’t plan to finish embroidering in less than a single day, only transfer a small portion of the pattern, stitch, then repeat the transfer process for the remaining portion of the pattern.

How to Transfer Embroidery

Now that you know how to transfer embroidery, get out there and start stitching!

But wait…there’s one more transfer method: How to use Stick & Stitch Embroidery Transfer Paper

**Some of the items on this page are part of our Amazon affiliate store. Wandering Threads Embroidery is paid a small percentage if you click through and purchase an item. The prices are the same as buying directly from Amazon and the funds help cover the cost of running this site. Thanks so much for your support!

FREE Doodle Flower Embroidery Pattern

In 2011, the Swedish Embroidery Guild designated July 30th as World Embroidery Day. The idea was born around the notion that embroidery creates connections among nations while promoting peace and equality. They even wrote a beautiful World Embroidery Day manifesto which is nothing short of inspiring.

The entire manifesto is worth a read, but my favorite line is the following: “let us use embroidery as an inspiration for people to engage in creativity that leads to a better understanding between countries and between people.” Yes!!!! You can read the full manifesto HERE.

Doodle Flower Embroidery Pattern

A FREE Pattern For You!

In honor of this special day, I designed a free pattern just for you! The Doodle Flower pattern is a fun & festive way to promote peace & unity through creativity and embroidery. The pattern features five unique flowers worked with only a handful of basic stitches to ensure it is accessible for everyone from beginners to experts.

Doodle Flower Embroidery Pattern

Make it a Hoop or a Pillow

This pattern fits perfectly inside a 10-inch hoop. You can either frame it in the hoop (learn how HERE) or turn it into a cute, flower-filled 12-inch throw pillow!

Doodle Flower Embroidery Pattern

Doodle Flower Embroidery Pattern Download

The free downloadable PDF pattern is available for download by clicking HERE, or on the title above. The PDF includes:

  • Full-color photo of the finished embroidery piece
  • One pattern sized to fit a 10″ hoop
  • Reverse image of the pattern for iron-on transfer
  • Printable stitch and color guide to provide guidance or inspiration
  • Material list
  • Instructions for transferring the pattern using three simple methods

As usual, if you need to brush up on your stitches you can find a full line of tutorials in my library of step-by-step embroidery tutorials.

Happy Stitching!

1 4 5 6 7 8 9 10 12